"I accidentally deleted all my playlists from iTunes, but luckily they're still on my iPhone. Is there a simple way to copy those playlists from my iPhone back into iTunes?"
- From Apple Support Community
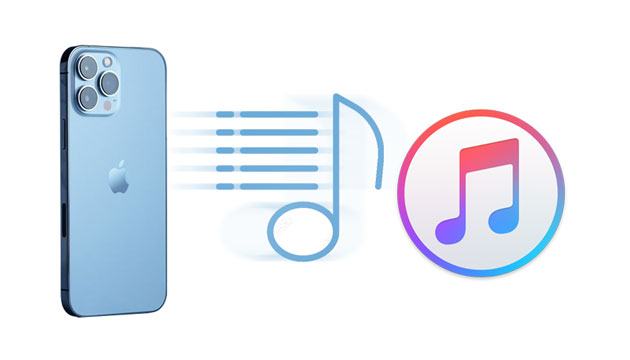
Have you ever been stuck on not being able to migrate your playlists from iPhone to iTunes? Don't worry. You're not alone, and this problem is easier to solve than you think. With just a few simple steps, you can easily transfer your playlists. First, make sure you have the latest version of iTunes installed on your computer. Then grab your iPhone and follow our easy guide below to copy your playlists from iPhone to iTunes without any hassles.
Moving playlists from your iPhone to iTunes is usually pretty straightforward. However, you might run into a few hiccups along the way—like your iPhone not connecting to iTunes or your playlists not appearing after you connect. If that happens, take a moment to fix these issues before continuing with the transfer.
1. Plug your iPhone into the computer using the original USB cable and launch iTunes if it doesn't open automatically.
2. Trust the computer if it's the first time connecting your iPhone to the computer.
3. Select "Playlist" under the "On My Device" section and choose the desired playlists on the right panel.
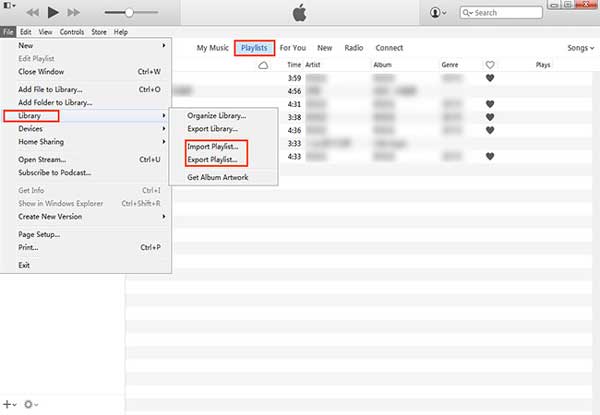
4. Tap "File" at the top-left corner of the iTunes window > "Library" > "Export Playlist..." > name the exported file > "Save".
5. Click "File" on the iTunes window > "Library" > "Import Playlist..." > pick the file you exported a moment ago.
Wondering how to transfer music from iPhone to computer without iTunes? Read this stepwise guide to learn the best iTunes-free way to sync music from iPhone to computer.
4 Ways to Transfer Music from iPhone to Computer Without iTunesDirectly transferring playlists from iPhone to iTunes will save a .txt file on your computer, which cannot be edited or played straight away. Thus, many people are not keen to sync playlists from iPhone to iTunes with the help of iTunes. Coolmuster iOS Assistant is a powerful and easy tool to export playlists from iPhone to a computer or the default iTunes backup location. Besides, it also allows you to selectively transfer data between a computer and iPhone.
The highlights of Coolmuster iOS Assistant:
Move playlists from iPhone to iTunes by using iOS Assistant:
01 Install and run the software on your computer. Connect your iPhone to the computer via USB and hit Trust on your iPhone if asked. Once detected, it will display the iPhone information on the home interface.

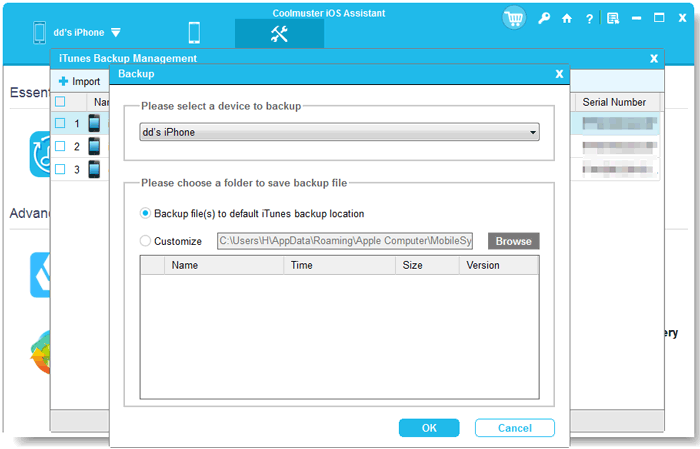
02 Click "Super Toolkit" on the top and choose "iTunes Backup & Restore". Click the "Backup" option and pick your iPhone from the drop-down list. Finally, select the "Back up files to default iTunes backup location" option and click OK. It will export all iPhone data, including playlists, to the default iTunes backup location.
Video Guide:
Find some iOS custom ringtones on computer but know little about how to add ringtones to iPhone from computer? This passage will provide you the easiest and fastest way to add iOS custom ringtones to iPhone.
If you have wonderful playlists in the iTunes library, you can move them to your iPhone via iTunes.
Here's how:
For iTunes 12 and above:
1. Open iTunes on your computer and connect your iPhone to the computer. Ensure that iTunes can detect and display your iPhone.
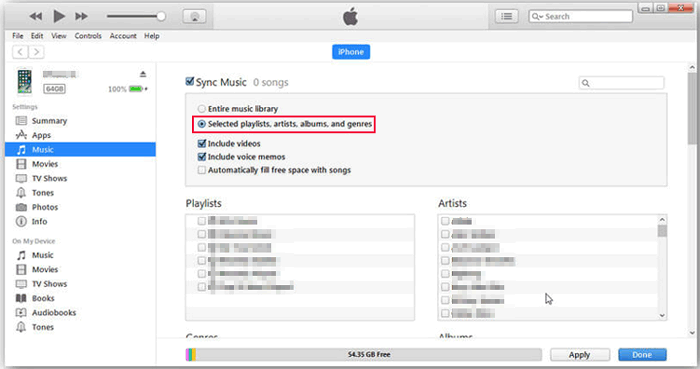
2. Tap "Music" on the left panel, check the box next to "Sync Music", and select the "Selected playlists, artists, albums, and genres" option.
3. Choose the playlists you want to transfer to your iPhone under "Playlists" and hit "Apply".
For iTunes 11 and below:
1. Run iTunes on your computer and plug your iPhone into the computer.
2. Click the iPhone icon when it shows up in the iTunes window and choose "Music" on the left panel.
3. Tick off the box next to "Sync Music" and check the "Selected playlists, artists, albums, and genres" option.
4. Select the wanted playlists under "Playlists" and hit "Apply".
Transferring playlists from iPhone to iTunes or vice versa is not difficult as you think. As you can see, you can use iTunes or a third-party tool to achieve it easily. But if you wish to use the playlists on your computer directly, I recommend you try Coolmuster iOS Assistant. It saves your playlists from your iPhone to iTunes in readable formats, and the whole process takes only a few seconds.
If you want to share your opinion with us, please leave a comment below.
Related Articles:
[Guide] How to Delete Playlists on iPhone Quickly in 3 Easy Ways?
How to Transfer Music from Windows Media Player to iPhone (Top Two Methods)
4 Ways on How to Delete Music from iPhone But Not iTunes
How to Transfer MP4 to iPhone Simply and Quickly? (New Data)

 Transfert iOS
Les deux meilleures façons de transférer des playlists de l'iPhone vers iTunes (et vice versa)
Transfert iOS
Les deux meilleures façons de transférer des playlists de l'iPhone vers iTunes (et vice versa)


 Free Download for PC
  Free Download for Mac