TL;DR:
Emptying the Trash on a Mac doesn't instantly destroy files; it just marks their space as available, keeping them recoverable until overwritten by new data.
Crucial Tip: Recovery is never 100% guaranteed. To prevent your missing files from being permanently overwritten, stop using your Mac immediately and perform the recovery process as fast as possible.
We've all been there: you clear up disk space only to realize a crucial document or irreplaceable photo was still inside. If you need to recover emptied trash on Mac, the solution isn't immediately obvious, as the standard "Put Back" option vanishes, making it feel like your data is lost forever.
Fortunately, emptying the Trash doesn't mean your files instantly vanish from the storage drive. The system simply marks the space they occupy as "available", meaning the data remains recoverable until it is overwritten by new files.
Whether you have a recent backup or need to rely on specialized data recovery tools, this guide will walk you through four effective methods to get your files back, followed by answers to some frequently asked questions.
If you have Time Machine set up on your Mac, you are in luck. Time Machine is Apple's built-in backup utility that automatically backs up your entire system. If a backup was created before you emptied the Trash, you can restore your files easily.
To recover trash on Mac with Time Machine:
Step 1: Connect the external storage drive that contains your Time Machine backups to your Mac.
Step 2: Open the folder where the deleted files were originally stored before they were moved to the Trash.
Step 3: Click the "Time Machine" icon in the menu bar and select "Browse Time Machine Backups" (or search for Time Machine using Spotlight).
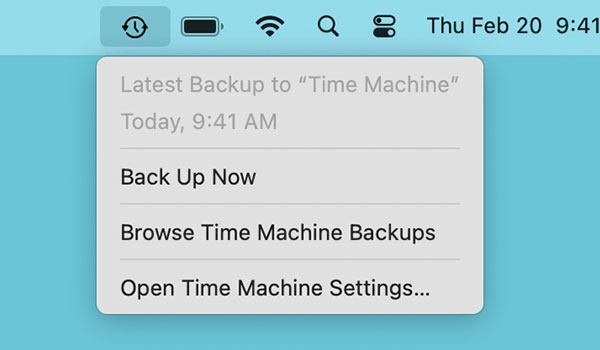
Step 4: Locate and select the files you want to retrieve, then click the "Restore" button. The files will be sent back to their original location.

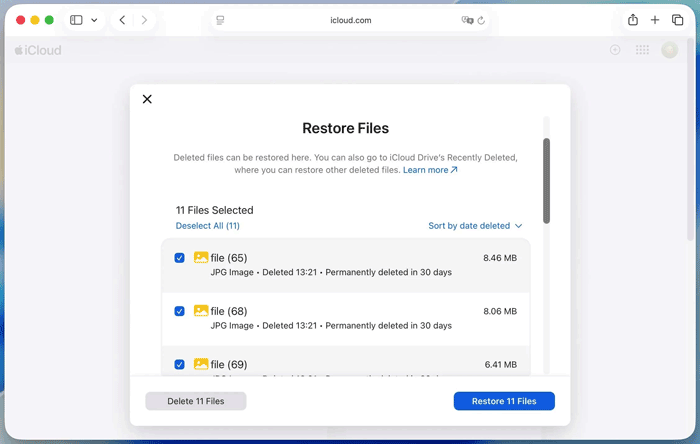
If you have enabled iCloud Drive to sync your Desktop and Documents folders, or if you deleted files directly from your iCloud Drive, Apple provides a safety net. iCloud keeps a hidden archive of recently deleted items for 30 days before permanently purging them.
To restore files from emptied trash on Mac via iCloud Drive:
Step 1: Open your web browser and go to iCloud.com, and sign in with your Apple ID and password.
Step 2: Scroll down on the homepage or click the menu icon in the top right, then select "Data Recovery".
Step 3: Click on "Restore Files". Browse through the list of recently deleted files. Check the boxes next to the items you wish to recover and click "Restore".
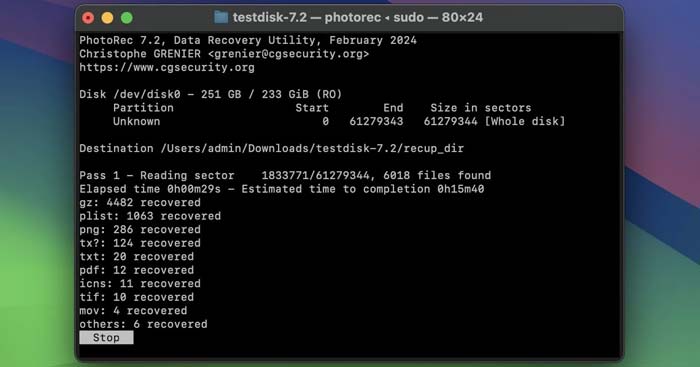
If you do not have a backup, you will need to resort to data recovery software. PhotoRec is a powerful, free, open-source file data recovery utility. It ignores the file system and goes after the underlying data, making it highly effective even after the Trash has been emptied.
Note: PhotoRec uses a Command-Line Interface (CLI) rather than a graphical user interface, which can look intimidating, but it is highly effective.
Here are the recovery steps:
Step 1: Download and install PhotoRec (often bundled with TestDisk) on your Mac. Then open "Terminal" (Applications > Utilities > Terminal), type "sudo photorec", and press "Enter". Type your Mac's administrator password when prompted.
Step 2: Use the arrow keys to select the hard drive where your files were deleted, then press "Enter". Next, select the partition style (usually Mac partition map or PCL, PhotoRec will attempt to detect this automatically).
Step 3: Choose the specific partition and select the file system type (usually Other for Mac's APFS/HFS+ file systems). Then select whether you want to scan the "Free" space (recommended for emptied trash) or the "Whole" drive.
Step 4: Select a destination directory where the recovered files will be saved. Crucial tip: Save them to an external drive to avoid overwriting your lost data. Finally, press "C" to begin the recovery process.
If the command-line nature of PhotoRec feels too complex, a dedicated graphical tool like Coolmuster Data Recovery for Mac offers a much more user-friendly, point-and-click experience. It is designed specifically to scan formatted or emptied storage spaces and extract lost files.
Key features of Coolmuster Data Recovery:
Download Coolmuster Data Recovery on your Mac.
To recover your deleted files after emptying trash on Mac with this program:
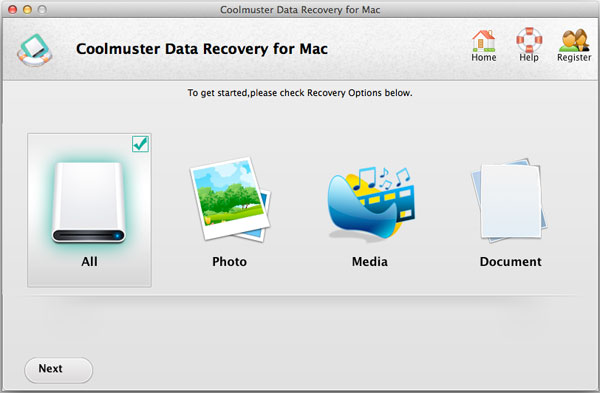
01Download and install Coolmuster Data Recovery for Mac on your computer. Launch the application, choose "All" if you want to recover different file types, and tap "Next" to go on.
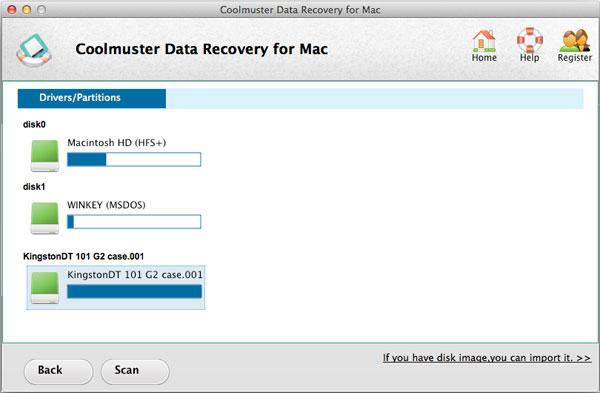
02Choose the drive or partition where your files were stored before deletion and click the "Scan" button.
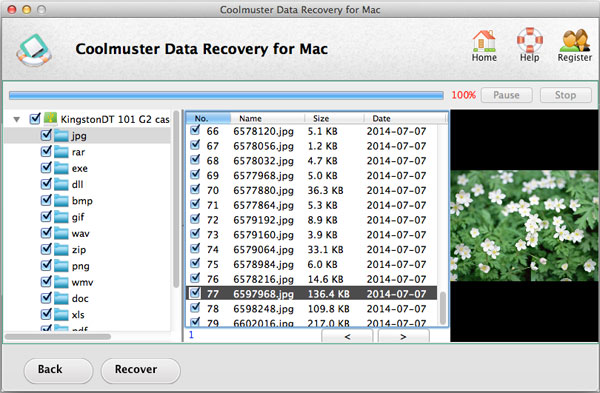
03Once the scan is complete, browse through the found files. The software organizes them by file type for easy navigation.
04Preview the files, check the boxes next to the ones you want to salvage, and click the "Recover" button to save them safely to an external drive.
Q1: Can I use Terminal to recover emptied trash on Mac?
No, not directly using native macOS commands. While you can use Terminal commands (like mv) to move files out of the Trash before it is emptied, native Terminal commands cannot undo a permanent deletion once the Trash has been emptied. However, as shown in Part 3, you can use Terminal to launch and run third-party command-line recovery utilities like PhotoRec.
Q2: Does emptying trash on Mac permanently delete files?
Not immediately. Emptying the Trash removes the file directory pointers and tells macOS that the space is now blank and ready to be written over. The actual data remains intact on your drive until new data needs to use that space. However, if your Mac uses a Solid-State Drive (SSD) with TRIM enabled, the operating system may actively wipe the blocks of deleted data much faster than a traditional Hard Disk Drive (HDD), making swift action essential.
Q3: Is recovery 100% guaranteed?
No. There is no 100% guarantee in data recovery. The success rate depends heavily on two factors: time and drive activity. If you continue using your Mac after emptying the Trash, the system will write new data (caches, system logs, new downloads) over the deleted files, rendering them unrecoverable. To maximize your chances, minimize your Mac usage and perform the recovery process immediately.
Accidentally emptying your Trash on a Mac can be stressful, but it doesn't have to be permanent. If you regularly back up your system via Time Machine or sync your data with iCloud Drive, you can easily retrieve your files in just a few clicks. If backups aren't an option, third-party software like PhotoRec or Coolmuster Data Recovery can step in to scan your drive and rescue your data.
Moving forward, the best defense against data loss is prevention: always double-check the contents of your Trash before emptying it, and ensure your automated backup systems are running regularly.
Related Articles:
Mac Security and Data Recovery: Stepwise Guide [Updated]
[Solved] Can't Open HEIC Photos on Mac: Reasons and Solutions
8 Top-notch Android File Transfer Apps for Mac [Full Guide]
Top 6 Ways to Transfer Files from Mac to Android Effortlessly


 Free Download for Mac
  Free Download for PC

