TL;DR:
Wondering whether PhotoRec is the right data recovery tool for you? This review covers its key features, supported devices, recovery performance, real user feedback, pros and cons, and step-by-step recovery process. We'll also compare it with Coolmuster Data Recovery to help you choose the solution that best fits your needs.
Losing important files can be frustrating, whether it's due to accidental deletion, formatting, system crashes, or corrupted storage devices. Fortunately, data recovery software like PhotoRec offers a way to retrieve lost files without spending a fortune.
But is PhotoRec really the best choice? While it has earned a solid reputation as a free and open-source recovery tool, its command-line interface and lack of file preview may not suit every user. In this PhotoRec review, we'll explore what PhotoRec is, how it works, its strengths and weaknesses, real user opinions, and the best alternative if you're looking for a more beginner-friendly solution.
PhotoRec is a free, open-source data recovery program developed by CGSecurity, the same team behind TestDisk. Despite its name, PhotoRec can recover much more than photos. It supports over 480 file extensions and can restore documents, videos, archives, audio files, and many other file types from damaged, formatted, or deleted storage media.
Unlike many commercial recovery tools, PhotoRec ignores the file system and scans storage devices sector by sector using a technique called file carving. This allows it to recover files even when the file system has been severely corrupted.
Although highly effective, PhotoRec primarily operates through a text-based interface, which may present a learning curve for users unfamiliar with command-line tools.

PhotoRec includes a variety of powerful recovery capabilities:
PhotoRec supports a wide range of storage devices, including:
Supported file systems include:
Because PhotoRec performs raw signature-based recovery instead of relying on the file system, it can often recover files even from severely damaged or inaccessible partitions.
PhotoRec is completely free.
There are:
It is distributed under the GNU General Public License (GPL), making it one of the few fully featured recovery tools available at no cost.
To better understand PhotoRec's strengths and weaknesses, we analyzed feedback from Reddit, technical forums, and software review websites.
What Real Users Say About PhotoRec?
One Reddit user shared that PhotoRec recovered thousands of deleted images after an accidental conversion script removed the originals, describing the tool as "amazing" despite the lengthy scan time.
Another user recovering data from a damaged CF card reported that PhotoRec successfully restored nearly 380 RAW photos after several other recovery tools had failed.
Many beginners say the biggest challenge isn't the recovery performance but the interface. Users frequently mention that the command-line workflow is difficult to understand if they have little technical experience.
Another recurring complaint is that recovered files usually lose their original filenames and folder structure, leaving users with thousands of generically named files that must be sorted manually after recovery.
Based on these user experiences, PhotoRec offers several clear strengths, but it also has limitations that may affect the overall user experience.
Pros
Cons
Unlike many modern data recovery tools with graphical interfaces, PhotoRec uses a text-based workflow. Although the recovery process is relatively straightforward once you understand the menu options, first-time users may need some time to become familiar with the interface.
Here's how PhotoRec recovers lost files on a Windows PC:
Step 1. Launch PhotoRec on your Windows computer. It is recommended to run the program as an administrator to ensure it has full access to the storage devices.
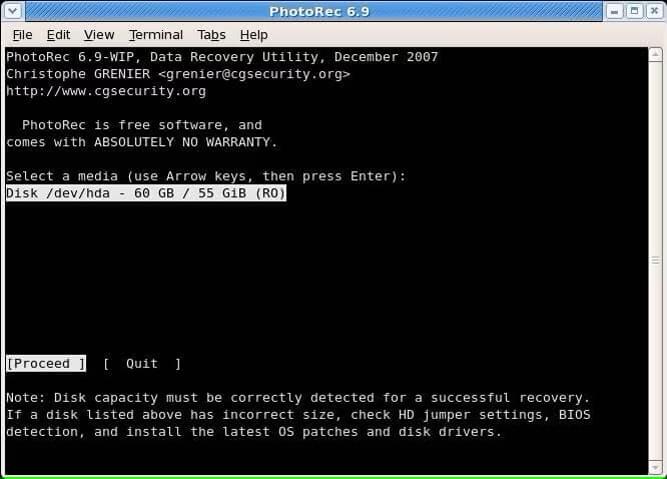
Step 2. Use the Up and Down arrow keys to select the disk that contains your lost files, then press "Enter" to continue.
Step 3. On the main menu, you'll see several options, including Search, File Opt, Options, and Quit. Select "Search" to begin the recovery process.
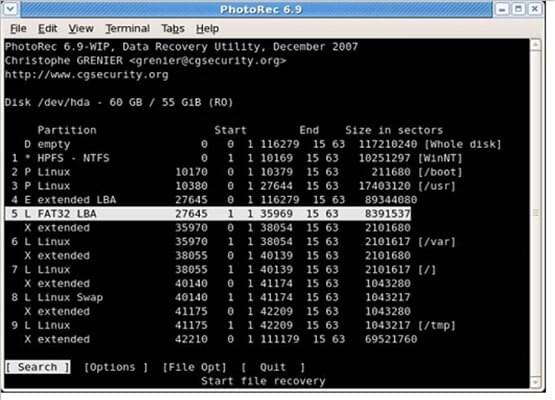
Step 4. Choose the partition you want to scan. Then, specify the file system type. For most Windows users, selecting "Other" is the correct option for NTFS, FAT, exFAT, and FAT32 file systems.
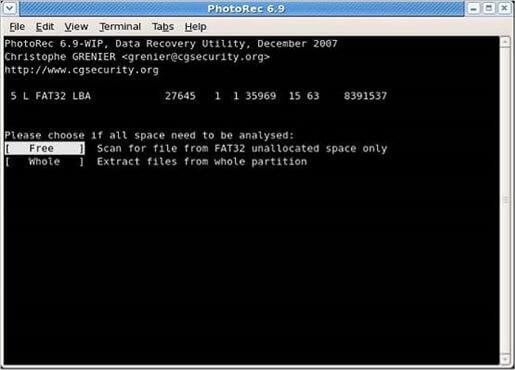
Step 5. Next, choose the scan mode. You can select:
Step 6. Select a destination folder where the recovered files will be saved. To avoid overwriting recoverable data, choose a different drive from the one being scanned.
Step 7. PhotoRec will begin scanning the selected partition and recovering any detected files. Depending on the size and condition of the storage device, the process may take anywhere from a few minutes to several hours.
Once the scan is complete, open the destination folder to view the recovered files. Because PhotoRec relies on file signatures rather than the original file system, recovered files may not retain their original filenames or folder structure, so some manual organization is usually required.
While PhotoRec is powerful, its command-line interface and lack of preview functionality make it less suitable for many everyday users. If you prefer a simpler recovery experience, Coolmuster Data Recovery is one of the best alternatives.
Compared with PhotoRec, Data Recovery offers an intuitive graphical interface, making the recovery process much easier. Users can scan, preview recoverable files, and selectively restore only the items they need, which saves both time and storage space.
Why choose Data Recovery?
PhotoRec vs. Coolmuster Data Recovery
| Feature | PhotoRec | Coolmuster Data Recovery |
| User Interface | Command-line | Graphical interface |
| Ease of Use | Moderate to difficult | Very easy |
| File Preview | No | Yes |
| Selective Recovery | Limited | Yes |
| Supported File | Types 480+ | Multiple common file formats |
| Recovery Performance | Excellent | Excellent |
| Price | Free | Paid with free trial |
| Best For | Advanced users | Home and business users |
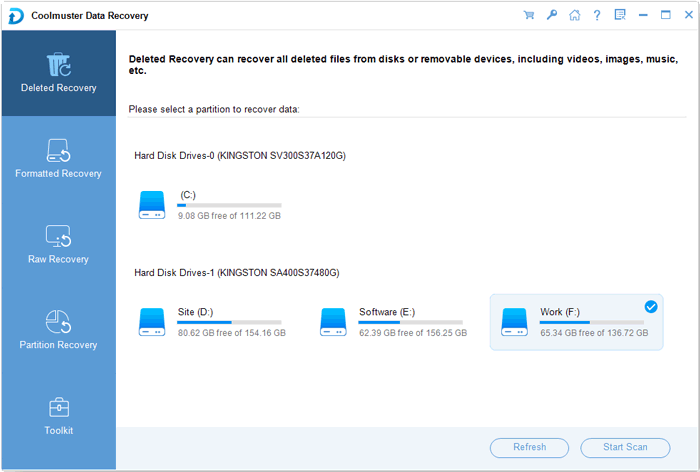
Recovering deleted or lost files with Data Recovery is much simpler than using PhotoRec, thanks to its intuitive graphical interface. Here's how it works:
01Download, install, and launch Data Recovery on your computer.
02Connect the storage device you want to recover data from, such as a USB flash drive, SD card, external hard drive, or memory card.
03Select the appropriate recovery mode from the left-side panel, choose the drive or partition you want to scan, and click "Start Scan".
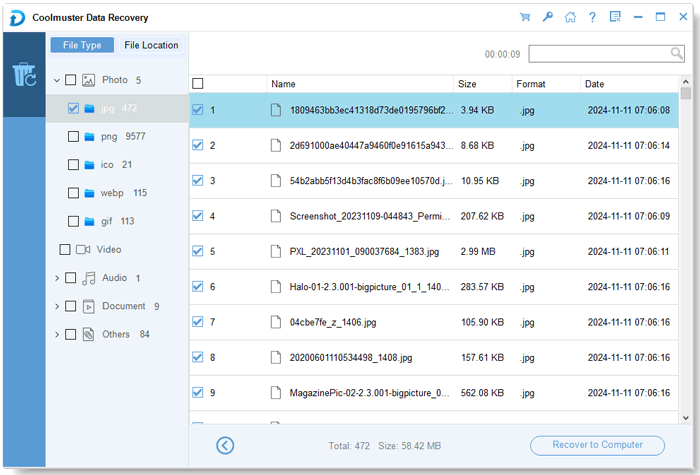
04After the scan is complete, all recoverable files will be displayed by category. You can use the built-in filters to quickly locate files by file type or storage location, and preview supported files before recovery.
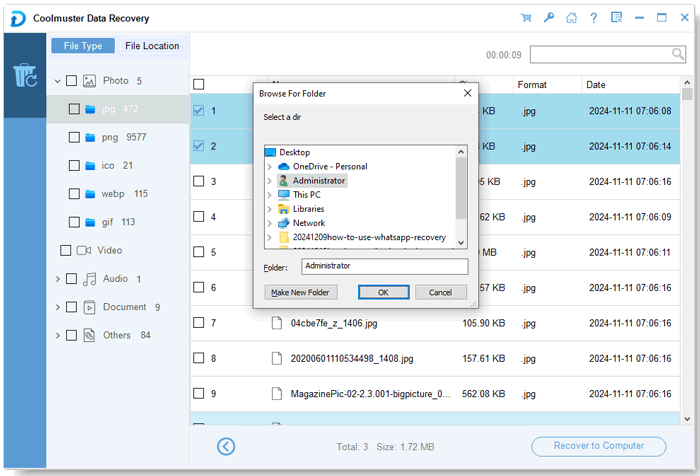
05Select the files you want to recover, click "Recover to Computer", choose a safe destination folder, and confirm the recovery process.
If you'd like to see the recovery process in action, watch the step-by-step video tutorial below.
1. Is PhotoRec safe?
Yes. PhotoRec is generally considered safe to use. It performs read-only operations on the source drive, meaning it does not modify or overwrite existing data during the recovery process. To maximize recovery success, it's recommended to save recovered files to a different storage device rather than the original drive.
2. Can I preview files before recovery?
No. PhotoRec does not provide a preview feature. You must recover the files first and then open them afterward to determine whether they are the ones you need.
3. Can PhotoRec recover permanently deleted files?
No. Like any other data recovery software, PhotoRec cannot recover files that have been permanently overwritten. Once new data occupies the storage space of a deleted file, the original data is irretrievably lost. To improve the chances of successful recovery, stop using the affected storage device immediately after data loss to avoid overwriting recoverable data.
PhotoRec remains one of the most powerful free data recovery tools available today. Its ability to recover files from formatted, damaged, and corrupted storage devices makes it a valuable utility for advanced users and IT professionals. However, its command-line interface, lack of preview functionality, and inability to preserve original filenames or folder structures may make it challenging for beginners.
If you're comfortable with a text-based workflow and want a completely free recovery solution, PhotoRec is certainly worth trying. On the other hand, if you prefer an easier recovery process with file preview, selective recovery, and a modern graphical interface, Coolmuster Data Recovery offers a more convenient and user-friendly alternative.
Related Articles:
Top 10 Best SD Card Recovery Software | 100% Working
Best Laptop Data Recovery Software for You: 12 Recovery Tools
How to Unformat SD Card Without Hassle (Proven Methods)
Data Recovery Software Free: Easily Recognize Different Free Tools


 Free Download for PC
  Free Download for Mac

