If you want to transfer documents, videos, or other files between your computer and iPhone without using the cloud, iTunes File Sharing can help. Although many users now rely on AirDrop or cloud services, File Sharing is still a simple and direct method for moving files between a computer and certain apps on your device.
In this guide, you'll learn what iTunes File Sharing is, where to find it, how to use it step by step, and its pros and cons.
iTunes File Sharing is a feature that allows you to transfer files between your computer and specific apps on your iPhone, iPad, or iPod touch. It works through a USB connection and does not require an internet connection.
The feature is built into iTunes on Windows and older macOS systems. On newer versions of macOS (Catalina and later), Apple removed iTunes and replaced device management with Finder. However, the File Sharing function still exists - just in a different place.
The supported file types depend on the app. Common examples include:
If the app supports those file formats, you can usually transfer them using File Sharing.
Not all apps support File Sharing. Only apps that allow file transfers through iTunes or Finder will appear in the File Sharing section. If an app does not show up, it means the developer did not enable this feature.
Common Types of Supported Apps:
Many users ask: Is iTunes still available in 2026? The answer depends on your computer.
So yes - iTunes is still available in 2026, but mainly for Windows users. Mac users now access File Sharing through Finder instead of iTunes.
If you are using a Windows computer, follow these steps:
![]()
You will now see a list of apps that support File Sharing.
If you are using macOS Catalina or newer:
This "Files" tab is the new File Sharing section.
As mentioned above, you can use iTunes File sharing feature to transfer data from iTunes to iPhone apps directly and this part is going to show you how to sync ringtones to iPhone. Since Apple does not allow any apps to sync ringtones directly to iPhone, however, with iTunes File Sharing, it is possible that iPhone ringtone makers share ringtones from ringtone app to computer, and then sync ringtones to iPhone.
Here is how to share ringtones with iTunes File Sharing:
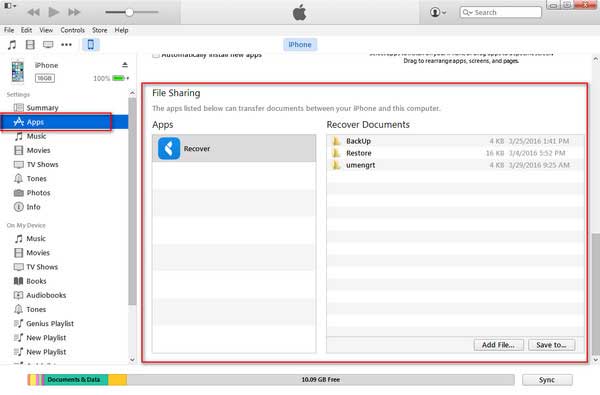
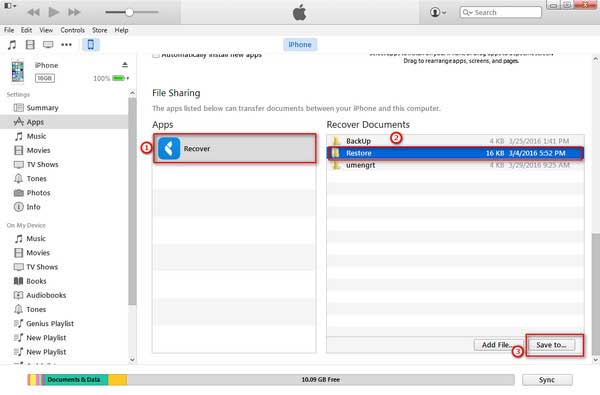
Step 1. Make your iPhone connected to computer with USB cable, and then launch iTunes. Please make sure that you have installed the latest iTunes on your computer. On iTunes window, click your iPhone icon > "Apps" tab > scroll down to find "File Sharing" section.
Step 2. In order to export ringtone files, select the ringtone maker app from the apps list, then select the ringtone you want from the Recover Documents on the right panel, then hit the "Save to..." option to select the save path.
Step 3. Go back to "Library" on iTunes, then directly drag your ringtones from where you have saved to the "Tones" tab to save it on your iTunes library.

Step 4. Then you can start to transfer ringtones from iTunes to your iPhone's tone. Firstly, you can click the arrow icon besides your iPhone icon, then you can see a list of file folders on your iPhone.
Step 5. Then you can select the ringtone and drag the ringtone to the "Tones" tab.
Step 6. Finally, you can check if you have synced the selected ringtone to your iPhone. To do so, turn on your iPhone and go to "Settings" > "Sounds", and the new ringtones should be placed on the top on ringtones section.
iTunes File Sharing is helpful for simple file transfers, but it also has clear limitations. Here is a simplified overview.
Pros:
Cons:
Sometimes iTunes File Sharing does not work as expected. You may not see your device, the File Sharing section may be missing, or files may fail to transfer. Below are common problems and simple fixes.
If your iPhone or iPad does not appear in iTunes or Finder:
On Windows, also make sure iTunes is updated to the latest version.
If you cannot find the File Sharing section:
If the section still does not appear, reconnect the device and try again.
If the app you want does not show up:
Remember, only apps with File Sharing enabled by the developer will appear in the list.
If the transfer fails:
Large files may take longer, so wait until the process fully completes.
If the transfer finishes but you cannot see the file:
Some apps organize imported files into specific folders.
Although iTunes File Sharing can handle simple file transfers, it has limitations like being app-specific, requiring a USB cable, and not supporting full device backups. For users who want more flexibility, a faster and easier solution is Coolmuster iOS Assistant - a professional tool for managing iPhone and iPad data on your computer.
Key features of Coolmuster iOS Assistant:
Free download Coolmuster iOS Assistant on your computer now:
How to use iOS Assistant to manage iPhone/iPad without iTunes File Sharing:
01 Install and open Coolmuster iOS Assistant on your PC. Connect your iPhone to the PC via a USB cable. Tap "Trust" on your iPhone if prompted; the software will detect your iPhone automatically.

02 All your iPhone files are categorized on the left panel. Click the file types you want to access, for example, contacts, then all the contacts on iPhone will be displayed on your computer.
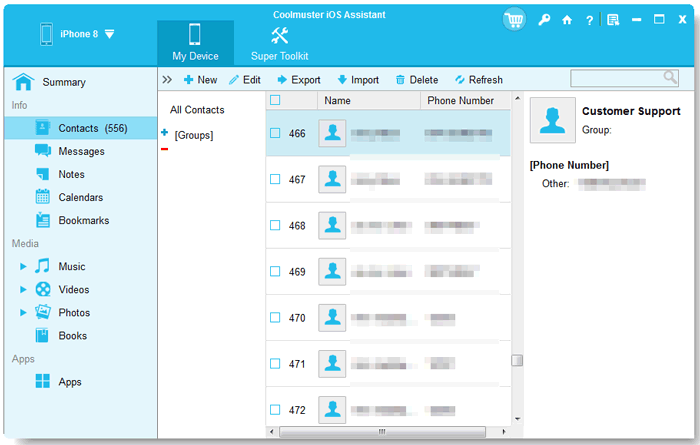
03 You can view the iPhone files and select the ones you need to transfer. Then, click "Export" to get them on PC. You can also click "Import" to copy files from computer to iPhone/iPad.
Video Guide:
iTunes File Sharing is a simple and free way to transfer documents, videos, and other files between your computer and supported apps on your iPhone or iPad. It works well for basic app-specific transfers, but it cannot handle full device backups, large-scale data management, or unsupported apps.
For users who need more flexibility and convenience, tools like Coolmuster iOS Assistant provide a faster, more reliable alternative, allowing you to transfer, backup, and organize all types of iOS data with ease.
Related Articles:
2 Simple Ways to Sync iPhone with Multiple Computers
How to Transfer Music from iPhone to Computer Effectively? (4 Tips)
Top 10 iTunes Alternatives for Windows You Can't Miss
How to Transfer Voice Memos from iPhone to Computer without iTunes


 Free Download for PC
  Free Download for Mac

