When preparing to sell, donate, or dispose of a computer or storage device, many users assume that deleting files or formatting the disk is enough. In reality, these actions do not permanently remove data. With the help of recovery tools, deleted files can often be restored.
This is why learning how to overwrite a hard drive is essential. Overwriting replaces existing data with new information, making recovery virtually impossible. In this guide, we'll explain what it means to overwrite a hard drive, why it matters, and how to overwrite a hard drive on Windows and Mac safely and effectively.

Overwrite hard drive refers to the process of repeatedly writing random data, zeros, or specific algorithms onto the storage areas of the hard drive that originally contained data, thereby completely destroying the original data structure and making it impossible to recover through data recovery software. Unlike regular deletion or quick formatting, hard drive overwriting directly affects the disk sector level and is a true form of "irrecoverable deletion". Common overwriting methods include single-pass overwriting, multiple-pass overwriting, and overwriting algorithms that meet security standards (such as DoD 5220.22-M).
In many cases, overwrite hard drive is a necessary step to protect privacy and data security. Common reasons include:
If the hard drive has stored important or sensitive information, simply deleting files is not secure; overwriting the hard drive is a more reliable solution.
If you are using a Windows system, here are two methods to overwrite hard drive.
If you're familiar with command-line tools, Windows provides a built-in tool called DiskPart, which can overwrite a hard drive. However, it's important to note that this method doesn't have a graphical interface. If you select the wrong hard drive, the data will be irretrievable. Before proceeding, make sure to confirm the target hard drive number.
Here is how to overwrite hard drive on Windows using DiskPart:
Step 1. In the Windows search box, type "cmd", right-click, and select "Run as administrator".
Step 2. Type "diskpart" and press "Enter".
Step 3. Type "list disk" to view the list of currently connected hard drives.
Step 4. Type "select disk X" (replace X with the number of the hard drive you want to overwrite).
Step 5. Type "clean all" and press "Enter" to begin overwriting the hard drive.
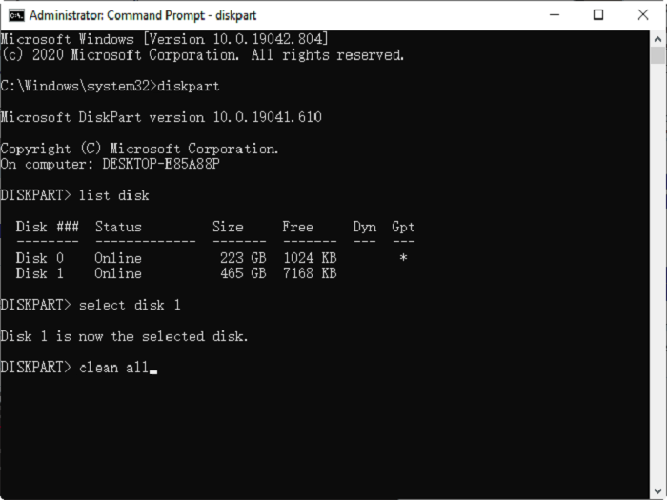
The "clean all" command will overwrite the entire hard drive, and the process may take a long time, but the effect is thorough. Once executed, the data will be irrecoverable, so make sure to double-check the hard drive number before proceeding.
Using Windows Diskpart to erase a hard drive is a good option, but it is more suitable for users who are very familiar with command-line tools. For users who are not comfortable with the command line and prefer a simpler and more secure method, Coolmuster Data Erasure is an excellent choice. It supports various data overwrite standards, allows one-click complete data removal, and is compatible with multiple storage devices such as HDDs, SSDs, and USB drives.
Key features of Coolmuster Data Erasure:
* Securely erase files and folders from HDDs, SSDs, or external drives to prevent data remnants.
* Wipe entire disks (both system and non-system) using Quick Erase or DoD 5220.22-M(E) standards for permanent data destruction.
* Remove residual data from free space without affecting existing files—supports both quick and DoD-certified deep wipes.
* Erase data from USB drives, partitions, external hard drives, and even clean system drives (C drive) without the need for bootable media.
* Ensure compliance with government-grade security standards and guarantee irreversible deletion of sensitive data.
Here is how to overwrite data on hard drive using Coolmuster Data Erasure:
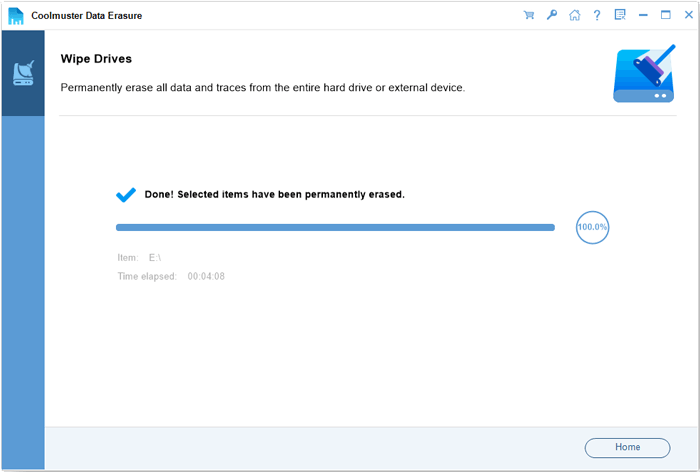
01Download and install Coolmuster Data Erasure on your Windows PC. Launch the program and choose the "Drive Wiper" mode from the main interface.
02Select the desired erasure level, either "Quick Erase" or "Deep Erase". Then, select the drive you want to wipe, and click the "Erase Now" button to begin the wiping process.
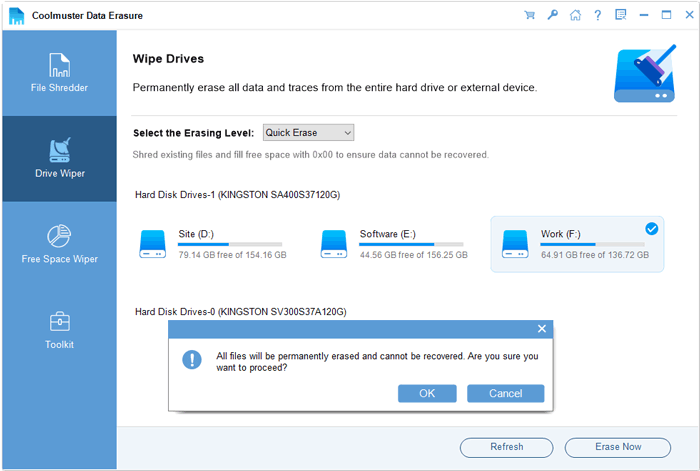
03Confirm your choice when prompted. Make sure you've backed up any important data, as this will completely erase everything on the selected drive.
Video Tutorial:
In macOS, you can also achieve a certain level of hard drive overwriting using Disk Utility. How do you overwrite a hard drive on Mac? Follow the steps below:
Step 1. Open Disk Utility by going to "Applications" > "Utilities" > "Disk Utility", or search for it using Spotlight.
Step 2. In the Disk Utility window, select the hard drive you want to overwrite from the left-hand panel. Make sure to choose the correct drive, as this will erase all data on it.
Step 3. Click the "Erase" button at the top of the Disk Utility window.
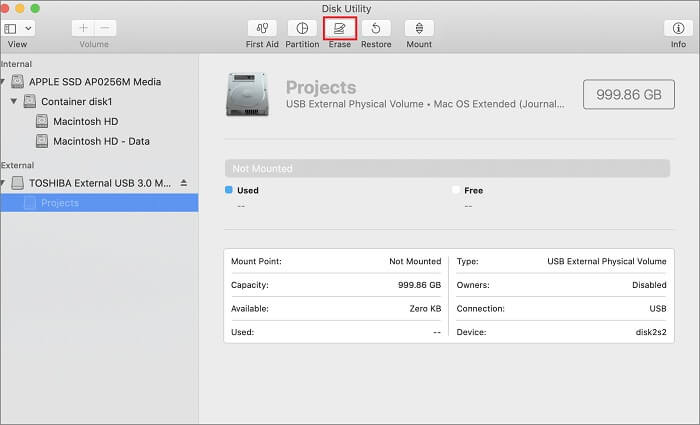
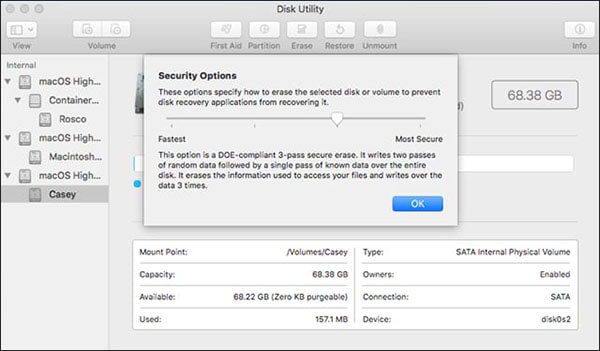
Step 4. Click on "Security Options". A slider will appear where you can choose the level of erasure. You can either select "Fastest" (one pass) or slide towards "Most Secure" (multiple passes for more thorough erasure).
Step 5. After selecting your preferred security level, click "OK", then click "Erase" to confirm. The process will begin, and the drive will be overwritten.
Step 6. Wait for the process to complete. Once finished, the drive will be wiped, and all previous data will be erased.
Whether on Windows or Mac, simply deleting or formatting the drive cannot truly protect data security. Overwrite hard drive is the key step to prevent data recovery and protect privacy. If you're a Windows user, among various solutions, Coolmuster Data Erasure stands out as the ideal choice for overwriting hard drive data due to its ease of use, thorough coverage, and reliability.
If you're planning to sell a device, clean an old hard drive, or completely destroy sensitive data, using a professional data overwriting tool is undoubtedly the safest and most hassle-free option. Download it now and give it a try.
Related Articles:
How to Delete All Data from HP Laptop? Solved in 3 Safe Ways
[Step-by-Step Guide] How to Securely Wipe Free Space on SSD?
Disk Cleanup Not Deleting Files on Windows 10/11: 5 Quick Fixes
Reset Toshiba External Hard Drive: Step-by-Step Guide for Beginners


 Free Download for PC

