TL;DR:
To quickly clear a USB drive for re-use, a standard Format (File Explorer / Mac Disk Utility) works. However, to permanently erase a USB drive so data is 100% unrecoverable (for selling, donating, or malware removal), you must overwrite its storage sectors. Use Coolmuster Data Erasure for one-click deep wiping, or run Windows Command Prompt (diskpart clean all) / Mac Terminal (diskutil zeroDisk) to zero-fill the drive.
Whether you are selling, donating, disposing of an old flash drive, or removing malware, knowing how to erase a USB drive completely is essential to prevent privacy leaks. While deleting files or doing a Quick Format only removes file references, true sanitization requires overwriting raw sectors with zeros or random data (NIST SP 800-88 compliance).
The USB drive is a convenient tool for storing and transferring files (How to transfer photos from iPhone to USB?), and this guide covers step-by-step methods to permanently wipe USB sticks on Windows 11/10 and Mac.
When you want to permanently sanitize sensitive files, confidential financial records, or business data from a flash drive before selling, donating, or recycling it, standard Windows formatting is not enough.
Coolmuster Data Erasure is a professional data wiping software that overwrites raw storage sectors to render data 100% unrecoverable by any data recovery software. This method ensures full compliance with privacy protection standards while remaining fast and user-friendly.
01Download and launch the tool on your PC. Connect your USB drive to a working USB port. In the main interface, select the "Drive Wiper" mode, then choose the desired erasure level, either "Quick Erase" or "Deep Erase", to proceed.
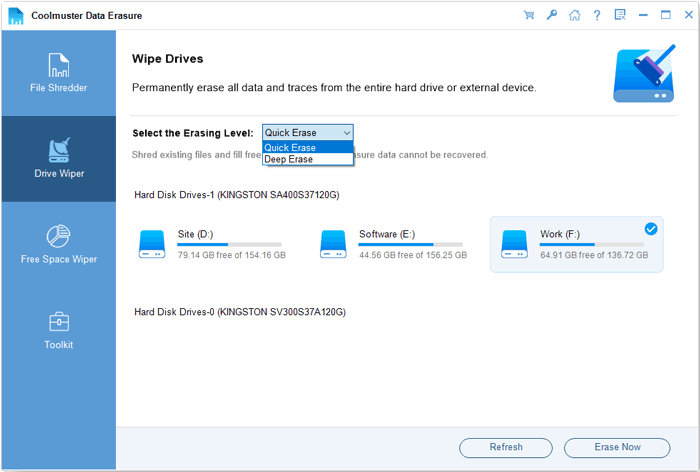
02Select the USB drive letter (e.g., Drive E: or F:) you want to wipe, then click the "Erase Now" button to start the wiping process.
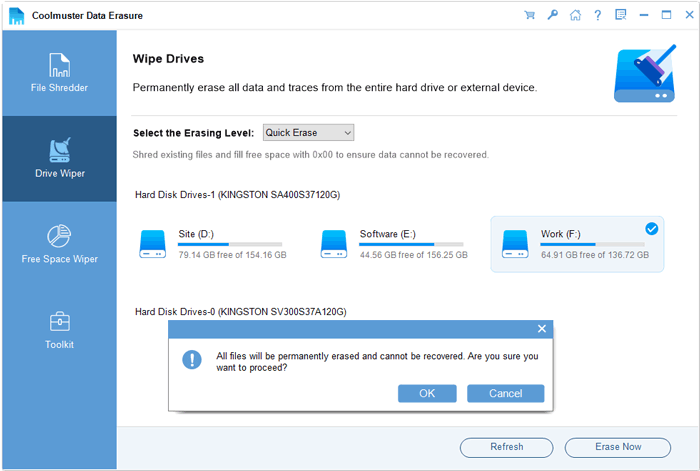
03When prompted, confirm your selection. Make sure you have backed up any important data, as this will erase everything on the drive permanently and irreversibly.
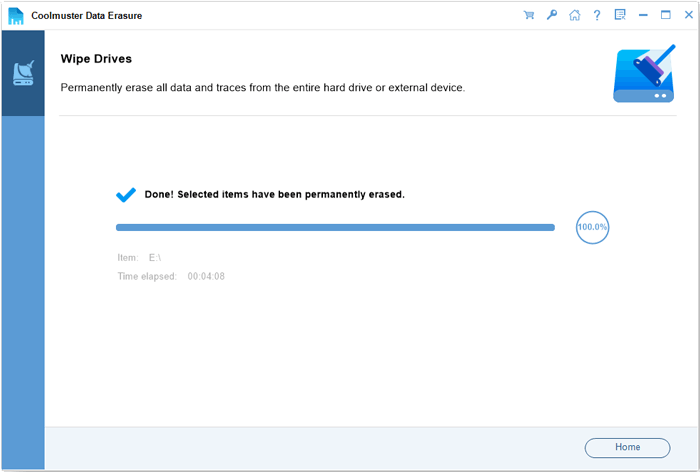
Video Tutorial:
Formatting is the most common method to clear files and reset file systems (FAT32, exFAT, or NTFS). If your USB drive does not contain sensitive personal data, formatting is a quick and effective way to erase data and resolve minor file system errors.
Step 1. Insert the USB drive into your Windows computer USB port.
Step 2. Open File Explorer (Win + E) and locate your USB flash drive under "This PC".
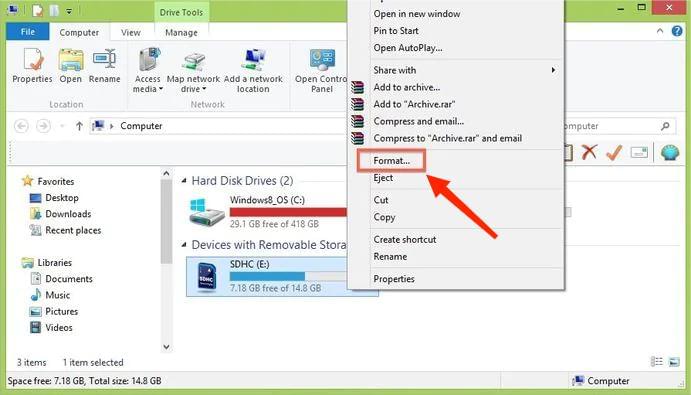
Step 3. Right-click the USB device and select "Format...".
Step 4. Choose the appropriate file system: FAT32 (best cross-platform compatibility for drives <=32GB), exFAT (best for large files >4GB and cross-platform use), or NTFS (Windows-only). Uncheck "Quick Format" if you want Windows to zero-out data and check for bad sectors.
Step 5. Click "Start" and confirm the warning pop-up by clicking "OK" to begin formatting.
Diskpart is a built-in command-line utility in Windows that operates at a low level to thoroughly erase a USB drive. It is ideal for situations where a USB drive won't format, shows write-protected errors, has corrupted partition tables, or requires complete data wiping.
Step 1. Type "cmd" in the Windows search box, right-click "Command Prompt", and select "Run as administrator".
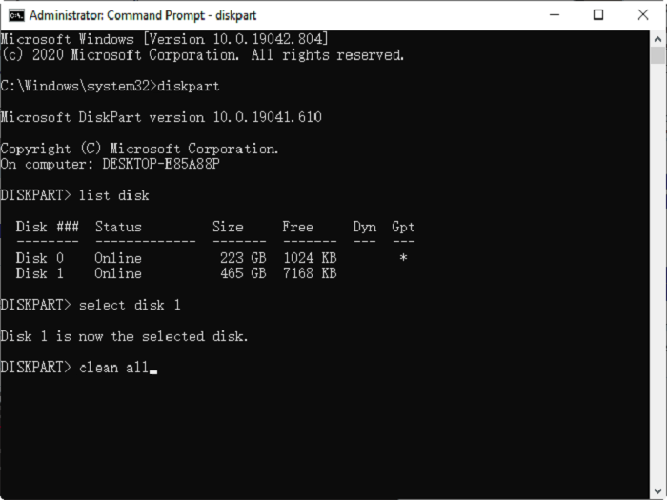
Step 2. In the Command Prompt window, type diskpart and press "Enter".
Step 3. Type list disk and press "Enter". Carefully identify your USB drive number by looking at its storage size (e.g., Disk 1 or Disk 2).
Step 4. Type select disk X (replace X with your actual USB device's number. Warning: Selecting the wrong disk number will erase your main hard drive!).
Step 5. Type clean all and press "Enter". This process will write zeros to every sector. It may take several minutes depending on the size and speed of your USB drive.
Step 6. Once completed, recreate a fresh partition by running these commands in order:
create partition primary (press Enter)
format fs=exfat quick (press Enter)
assign (press Enter)
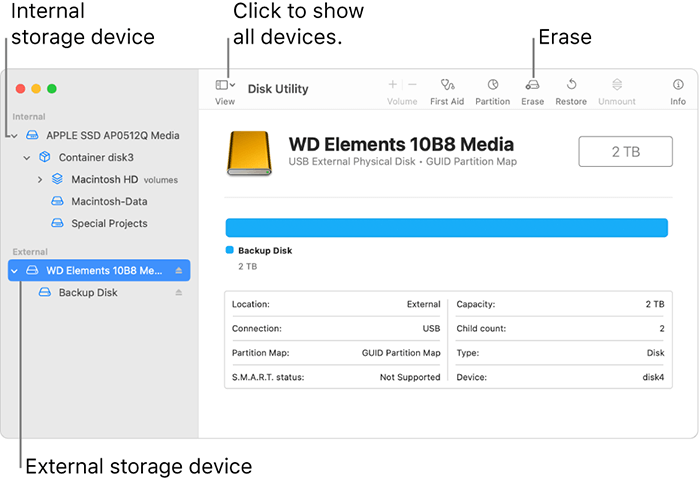
If you are using macOS, Apple provides built-in tools like Disk Utility and Terminal to format or securely overwrite USB drives without third-party software.
For power users, macOS Terminal offers a direct command to zero-fill a drive:
diskutil list and press Enter to find your USB identifier (e.g., /dev/disk2).diskutil zeroDisk /dev/diskN (replace N with your USB drive number, e.g., disk2) and press Enter. This will overwrite the entire drive with zeros.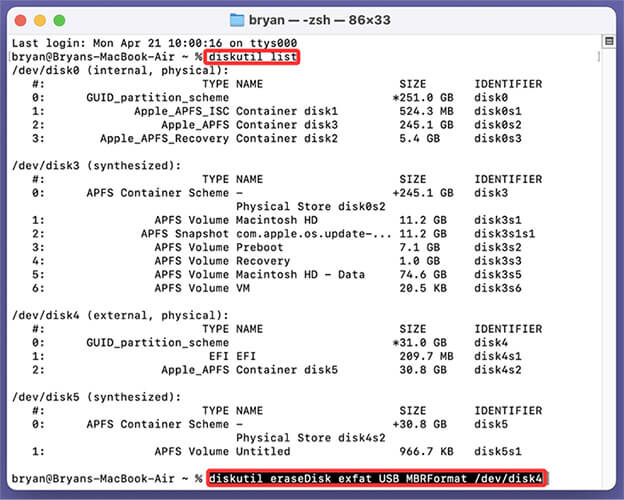
Sometimes, you may encounter errors when attempting to clear a USB drive. Here are solutions to common USB wiping issues:
Issue 1: "The disk is write-protected" Error
Fix: Check if your USB flash drive has a physical write-protection switch on the casing and toggle it off. Alternatively, open Command Prompt as Administrator, run diskpart -> select disk X -> attributes disk clear readonly to remove read-only attributes.
Issue 2: "Windows was unable to complete the format"
Fix: This usually happens due to corrupted partition structures or bad blocks. Use Diskpart clean all or Coolmuster Data Erasure to bypass File Explorer restrictions and rebuild raw partitions.
Issue 3: USB Drive Capacity Shows Incorrect Size (e.g., 64GB drive showing only 2MB)
Fix: This indicates hidden Linux/bootable partitions. Run diskpart -> clean -> create partition primary to wipe all partition tables and merge unallocated space back into a single volume.
Q1: Does formatting a USB drive erase all data permanently?
A: No. A standard Quick Format only removes the drive's file system index, leaving raw data recoverable via data recovery software. A Full Format (Windows) or Deep Wipe (Coolmuster Data Erasure) overwrites physical storage sectors, making data unrecoverable.
Q2: Will erasing a USB flash drive remove viruses and malware?
A: Yes. Performing a full erase or diskpart clean all completely wipes all partitions, hidden virus scripts,autorun files, and boot sector malware from the USB drive.
Q3: What is the best file system to choose after erasing a USB drive?
A: Choose exFAT if you plan to use the USB on both Windows and Mac computers without file size limits. Choose FAT32 for maximum compatibility with TV/car stereos/gaming consoles (max file size 4GB). Choose NTFS for Windows-only PCs.
Q4: How many overwrite passes are needed to safely erase a USB drive?
A: According to NIST SP 800-88 guidelines, a single-pass zero-fill (1 pass) is sufficient for modern flash-based storage devices. For higher security compliance, military standards like DoD 5220.22-M (3 passes) can be used via Coolmuster Data Erasure.
That concludes our complete guide on how to erase a USB drive safely and permanently. If you want to completely erase USB data and ensure it is fully unrecoverable with zero technical hassle, Coolmuster Data Erasure is the best choice.
While standard formatting leaves files recoverable and command-line tools like Diskpart can be slow and complex, Coolmuster provides a fast, one-click solution with military-grade sanitization standards. Download Coolmuster Data Erasure today to protect your digital privacy.
Related Articles:
How to Make SSD Data Unrecoverable? - 3 Effective Methods
[Solved] How to Use iPhone as USB Drive in a Few Simple Steps;
How to Transfer Photos from USB to iPhone with or without Computer?
How to Delete Files on iPhone/iPad in 6 Ways [Step-by-Step Guide]







 Free Download for PC


