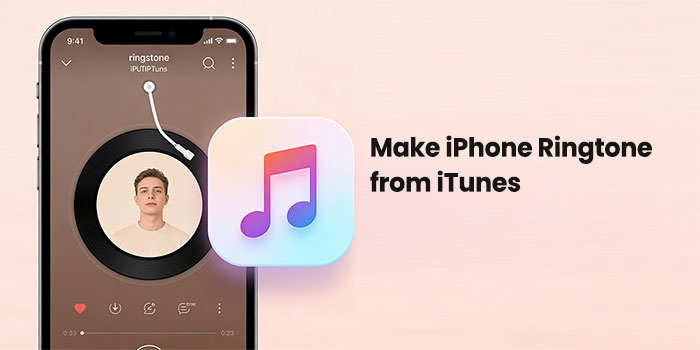
If you're looking to customize your iPhone ringtone without spending money on the iTunes Store, or if you want to turn your favorite song into a ringtone, you're not alone! Unlike Android, which has allowed users to set any song as a ringtone with just a few taps for years, iPhones still require a bit more effort to make custom ringtones.
Fortunately, iTunes provides a way to create free ringtones for your iPhone. In the guide below, we'll walk you through the steps to make your own iPhone ringtones from iTunes.
Before you begin, ensure that you have the latest version of iTunes installed on your Windows computer. Also, confirm that the song you want to use is already available in your iTunes library.
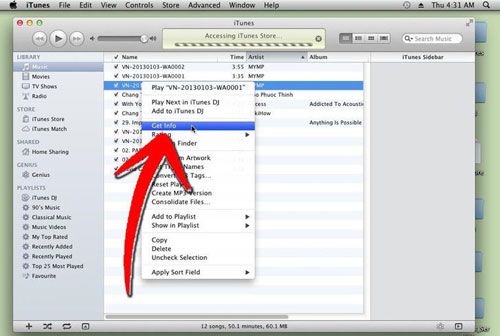
Step 1: Select the Song
Launch iTunes and locate the song you wish to use for your ringtone. Right-click on the song and choose "Get Info" from the menu.
Step 2: Trim the Song
In the "Get Info" window, go to the "Options" tab. Check the boxes for "Start Time" and "Stop Time", then set the beginning and ending points for the ringtone. Remember, the maximum length for a ringtone is 40 seconds.
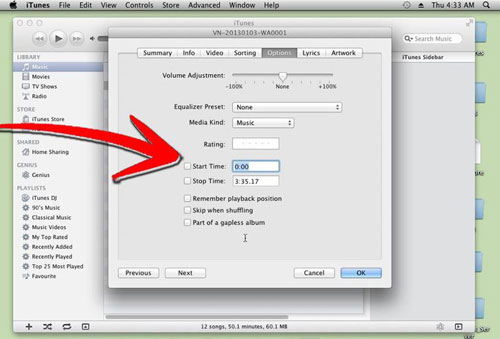
Tip: Listen to the song first and select the exact part you want to use as your ringtone before adjusting the times.
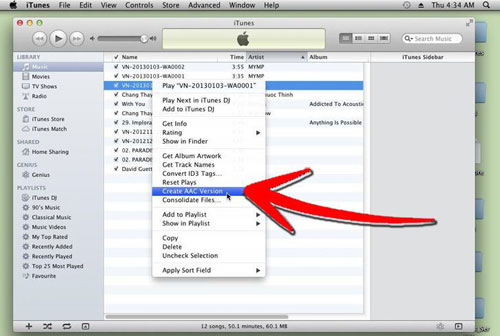
Step 3: Create the AAC Version
Right-click the song again and choose "Create AAC Version". This will generate a new version of the song with the segment you selected in Step 2.
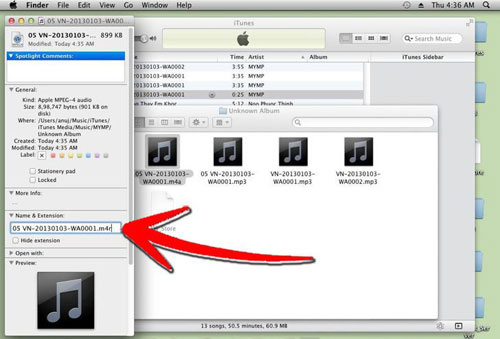
Step 4: Rename the File Extension
Once the new song is created, right-click it and select "Show in Windows Explorer" (on Mac, use "Show in Finder"). This will open a new window with the song saved as an .m4a file.
To make it a ringtone, rename the file extension from .m4a to .m4r (the correct format for iPhone ringtones). Leave this window open for the next step.
Step 5: Remove the Shortened Song from iTunes
Go back to iTunes and delete the newly created AAC version by right-clicking and selecting "Delete Song". When prompted, choose "Keep File" to leave the actual file on your computer.
Step 6: Add the Ringtone to iTunes
Now, return to the Windows Explorer window with the .m4r file, and double-click it. This will automatically add the file to iTunes under the Tones library. (How to Add Ringtones to iTunes)
Step 7: Sync the Ringtone to Your iPhone
Connect your iPhone to iTunes, then select the "Tones" section. Check "Sync All Tones", and click Sync or Apply to transfer the ringtone to your iPhone.
Step 8: Set Your New Ringtone
On your iPhone, go to "Settings > Sounds > Ringtone". Your newly created ringtone will appear at the top of the list. You can also set it as your text tone or voicemail sound.
While creating ringtones with iTunes is usually straightforward, there are some common issues users may face. Here are a few errors you might encounter and the solutions to fix them.
Problem: After renaming the file extension to .m4r and double-clicking it, the ringtone does not appear in the Tones section of iTunes.
Solution:
Problem: Even after syncing your iPhone with iTunes, the new ringtone doesn't show up on your device.
Solution:
Problem: After syncing the ringtone, it doesn't show up in the Ringtone section in "Settings > Sounds".
Solution:
Problem: The ringtone plays the wrong part of the song or skips to another song.
Solution:
Problem: After renaming the file extension, the file cannot be opened or is corrupted.
Solution:
Problem: After syncing, the ringtone volume is too low, even though the volume settings on the iPhone are correct.
Solution:
Problem: On Windows, when you try to rename the file extension to .m4r, the operating system prevents you from making changes.
Solution:
To transfer ringtones from iPhone to computer for backup or other use, you can ask help from a third-party tool - Coolmuster iOS Assistant, which is is a powerful tool designed to help you manage and back up your iPhone data effortlessly. It allows you to back up not just contacts, messages, and photos, but also ringtones, music, and other media. With just a few clicks, you can transfer your custom ringtones from your iPhone to your computer for safekeeping or future use.
Key features of Coolmuster iOS Assistant:
Steps to Back up Ringtones from iPhone to Computer:
01 Download and install Coolmuster iOS Assistant on your computer. After launching the program, connect your iPhone using a USB cable. Ensure your device is unlocked.

02 Once your iPhone is detected, go to the "Tones" section in the left side of the software. You will see a list of all the ringtones on your iPhone, including custom ones.
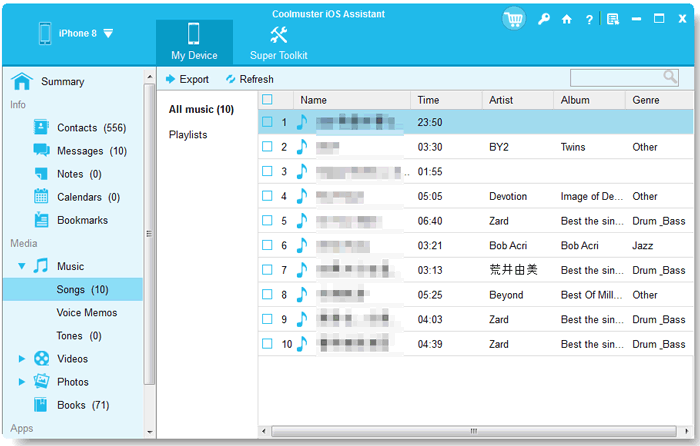
03 Select the ringtones you wish to back up. Click "Export" and choose a destination on your computer to save the files. The ringtones will be transferred with their original format intact.
Video Guide:
Q1. Can I use any song in iTunes to create a ringtone?
Yes, you can use any song in your iTunes library to create a ringtone, as long as the song is not DRM-protected. DRM-protected songs (from the iTunes Store) cannot be used for ringtone creation.
Q2. Why is my ringtone not syncing to my iPhone?
If the ringtone isn't syncing, make sure the "Sync Tones" option is selected in iTunes. Also, check that the ringtone is in the "Tones" section of your iTunes library, and that you've synced your iPhone after adding the ringtone. (iTunes Not Syncing with iPhone after iOS Update?)
Q3. How long can my ringtone be?
iPhone ringtones must be "40 seconds or less". If the song you're using is longer, you'll need to trim it within iTunes to fit the ringtone length requirement.
Q4. Why does my ringtone sound distorted or choppy on my iPhone?
This issue can occur if the audio quality of the original song is low or if the file was not properly converted during the ringtone creation process. Try re-exporting the ringtone from iTunes and ensure it's in the ".m4r" format.
Q5. Can I make a ringtone for a specific contact?
Yes, once your ringtone is synced to your iPhone, you can assign it to a specific contact by going to "Contacts > Edit > Ringtone". Select the ringtone you created, and it will play whenever that contact calls.
Creating custom ringtones for your iPhone with iTunes is a simple process that allows you to personalize your device. By trimming songs to 40 seconds, converting them to the right format, and syncing with iTunes, you can enjoy unique ringtones. The entire process is quick and doesn't require any additional software. Whether you want a favorite song or a unique sound for your alerts, iTunes makes it easy to customize your iPhone experience.
Related Articles:
How to Transfer Ringtones from Android to iPhone [4 Methods]
How to Delete Ringtones from iPhone Easily | Full Guide


 Free Download for PC
  Free Download for Mac

