iPhone's built-in Notes application brings great conveniences to us when in need of taking notes, such as during class or meetings. It allows you to write down your to-do lists or some sparkling ideas without a notebook. Thus, there are many important things stored in this app that you may want to back up notes on iPhone to a computer.
So, how can you transfer notes from iPhone to your computer? In this guide, we'll walk you through five simple and effective ways to achieve it so that you can keep your iPhone notes safe. Let's get started.

The simplest method I'd like to recommend is exporting your iPhone notes to a computer with Coolmuster iOS Assistant. This professional iOS management tool makes it easy to handle all your iPhone, iPad, and iPod touch data. With it, you can quickly and safely transfer notes, photos, music, videos, contacts, messages, and call logs between your iOS device and your computer.
Key Highlights of Coolmuster iOS Assistant:
Now, please download the free trial of the version you need to your computer, and see how iOS Assistant helps you to copy notes from iPhone to PC/Mac.
How do you transfer notes from iPhone to computer via iOS Assistant? Here are the steps:
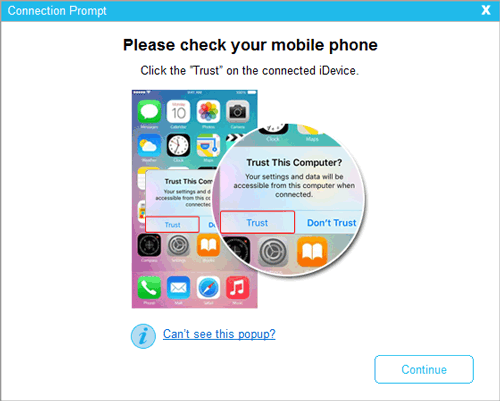
01Download this software and launch it on your computer. Connect your iPhone with a USB cable. Choose the "Trust" option on the pop-up window on your iPhone.
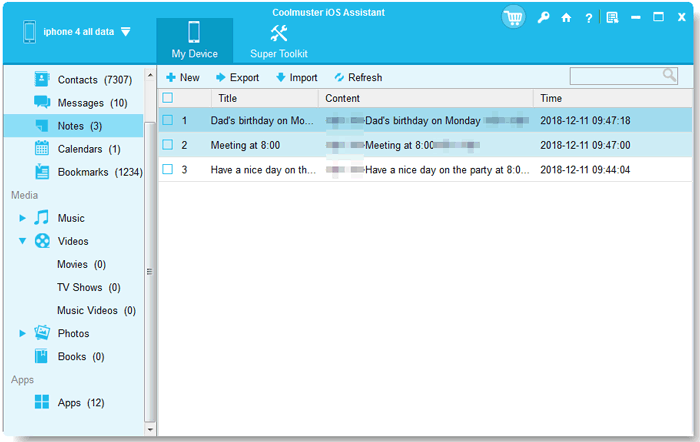
02You will see the main interface below once your iPhone is recognized by the software.

03Enter the "Notes" folder and select the notes that you want to transfer. Then, click the "Export" button and choose the format you like to transfer from your iPhone to your computer.
Note: We are sorry to tell you that currently, iOS Assistant doesn't support copying notes from iPhone to computer in iOS 11 or later.
Video Tutorial:
iCloud is a cloud storage service provided by Apple, allowing users to sync data across different devices, including notes, photos, contacts, and more. With iCloud synchronization, users can access notes from their iPhone on their computer without the need for a USB cable. However, this method requires a stable internet connection, and iCloud's free storage space is limited, which may require purchasing additional storage. (How to free up iCloud storage?)
Here is how to put notes from iPhone to computer via iCloud:
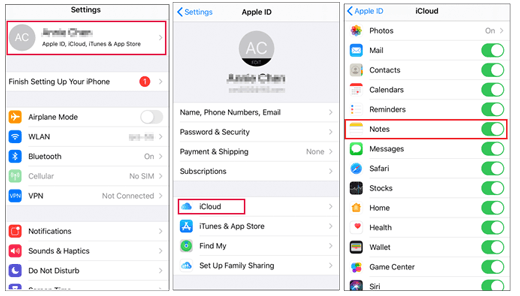
Step 1. Open the "Setting" app, tap "your name", go to "iCloud", then enable "Notes".
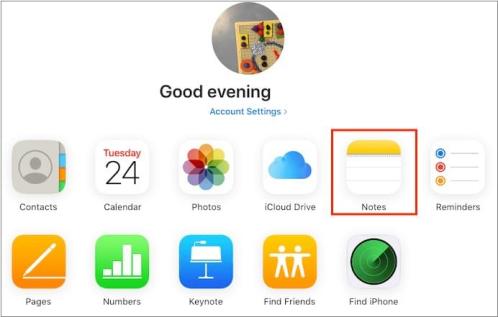
Step 2. On your computer, log in to iCloud.com with your Apple ID, and select "Notes", you can access all the notes that are uploaded from your iPhone.
Step 3. Now, you can copy notes from iCould.com to your PC.
iTunes is a popular app that you can enjoy music, movies, and TV shows and manage them perfectly through this app. Do you know you can use it to export notes from iPhone to computer? First of all, you need to have an Outlook account because the notes can only be copied to Microsoft Outlook.
Here is how to transfer notes from iPhone to PC with iTunes:
Step 1. Connect your iPhone to a computer with a USB cable. Launch iTunes on your computer.
Step 2. Click your device displayed on the left side of iTunes and go to the "Info" tab.
Step 3. Scroll down and select the "Sync notes with Outlook" checkbox, hit the "Sync" button, and start backing up notes from iPhone to computer.
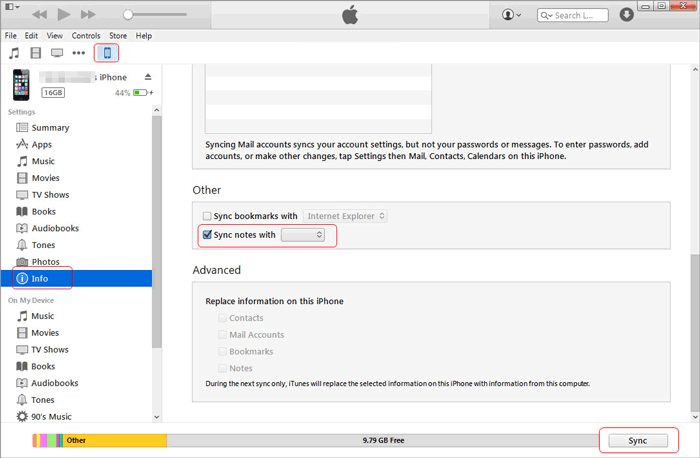
Notes will be automatically transferred from your iPhone to computer after this setting. If you are not a Microsoft Outlook user, you may find this way a little complex. (You may want to know how to extract iPhone notes from iTunes backup.)
If you only want to copy a few notes from your iPhone to your computer, you can use email to solve this problem. It is simple, and no other apps are required. Here is how to transfer iPhone notes to PC with email:
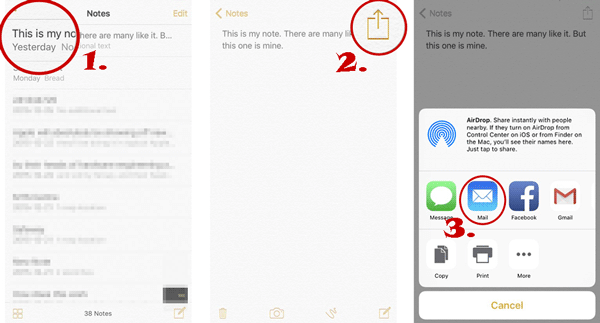
Step 1. On your iPhone, open the "Notes" app.
Step 2. Select the note you want to transfer.
Step 3. Tap the share icon at the top of the screen (usually an upward-pointing arrow).
Step 4. From the pop-up sharing options, select "Mail".
Step 5. Enter the email address you want to send the note to.
Step 6. After sending the email, you can log in to the corresponding email account on your computer.
Step 7. Open the email you just sent, and you will see the content of the note.
You can easily copy the notes you require to your computer via email, but please note that the notes can only be transferred one by one. Therefore, it may not be an ideal way to finish the task if you have many notes to transfer.
AirDrop is a fast wireless transfer method that allows you to transfer notes from your iPhone to your Mac without any data cables or third-party software. It connects via Wi-Fi and Bluetooth for convenient and quick backups. However, AirDrop only allows one note to be transferred at a time, so transferring multiple files may take longer.
Step 1: On your Mac, open Finder and make sure AirDrop is enabled. Set it to receive files from "Contacts Only" or "Everyone."

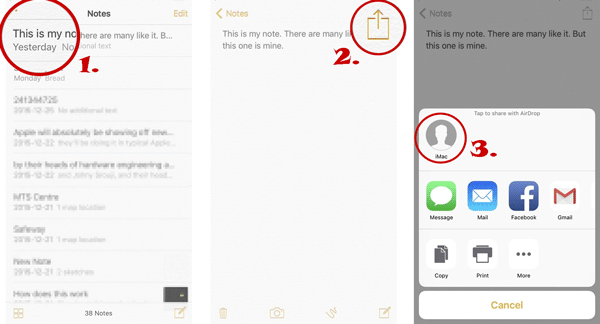
Step 2: On your iPhone, open the Notes app and select the note you want to back up.
Step 3: Tap the Share icon in the top-right corner of the note.
Step 4: Choose AirDrop from the sharing options.
Step 5: Select your Mac from the list of available devices.
Step 6: On your Mac, accept the incoming note file. The note will be saved to your Downloads folder by default.
You now know several ways to transfer notes from your iPhone to a computer, each suited to different needs. Whether you opt for iCloud sync, a professional tool like Coolmuster iOS Assistant, or a simple email transfer, these methods keep your important notes safe and easily accessible across all your devices. For broader iPhone data management, not just notes, iOS Assistant stands out as a flexible and user-friendly solution.
Related Articles:
How to Transfer Notes from iPhone to iPhone with/without iCloud?
[Step-by-Step Guide] How to Transfer Notes from iCloud to iPhone?


 Free Download for PC
  Free Download for Mac

