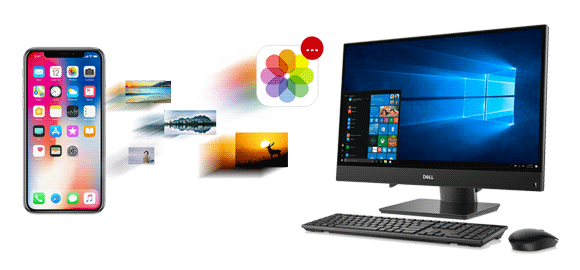
"I take a lot of photos with my iPhone, do you have any good way to help me transfer some important iPhone camera roll to my computer? I can't copy my iPhone camera roll to my computer, please help me!"
- From Apple Support Community
You probably have a ton of photos saved in your iPhone's camera roll. Those are precious moments you definitely don't want to lose. To protect those precious memories, it's a good idea to back them up. One of the best ways to do that is to transfer photos from your iPhone to your computer.
There are several easy ways to back up iPhone camera roll to your computer. In this guide, we'll walk you through each step step by step. Take a look and choose the method that works best for you. Get started now!
Coolmuster iOS Assistant is a handy tool for Windows users who want to back up or transfer data between their iPhone and computer. With just a few simple steps, you can safely move your iPhone content to your PC.
When it comes to backing up your iPhone Camera Roll, Coolmuster gives you two flexible options:
To get started, download Coolmuster iOS Assistant for free. Connect your iPhone to your computer using a USB cable and unlock it by entering your passcode. Then you're ready to start backing up your Camera Roll with ease.
How to transfer iPhone camera roll to computer:
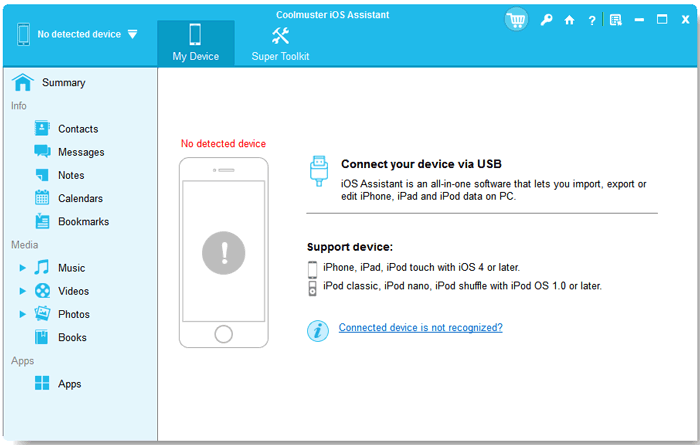
01 Launch the program after downloading and installing the right version on your computer (Mac or Windows PC), then connect your iPhone to PC with a USB cable.

02 After detecting your iPhone, the program will display all the iPhone file types on the left panel. Please click "Photos" tab to load all the photos and albums on your iPhone, including the Camera Roll.
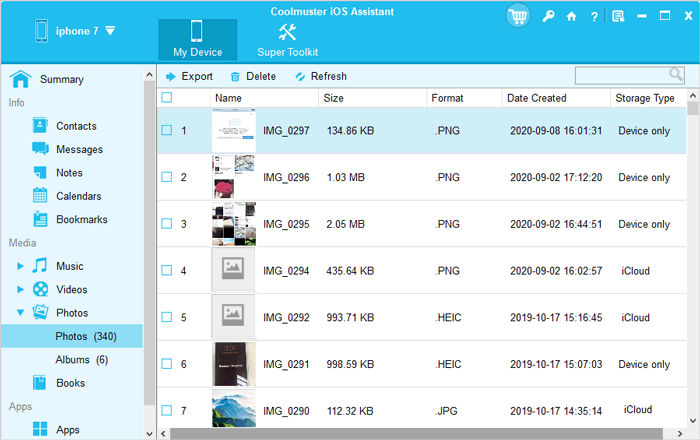
03 Now please preview and select the desired pictures from Camera Roll for transferring, then hit "Export" button to save them on your computer for backup immediately.
How to Back Up iPhone Camera Roll to Computer:
01 Launch iOS Assistant and wait until it detects the connected iPhone. Go to the top menu to click the "Super Toolkit" option.
02 Choose the "iTunes Backup & Restore" tab on the screen and click the "Backup" option.
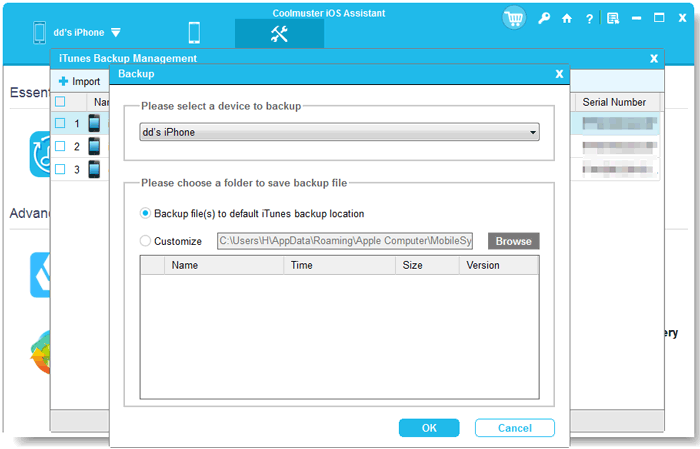
03 Select your device for backup and choose a location to save the new backup files. Then click OK to start backing up iOS data, including camera roll from iPhone to the computer.
Video Guide:
If you use a Windows 7/8 computer, you could use the AutoPlay to backup iPhone Camera Roll to PC.
1. Get a USB cord to connect your iPhone or iPad and computer. Wait for a while till the computer complete the installation of driver for your device. After that you'll see a pop-up window of AutoPlay as below.
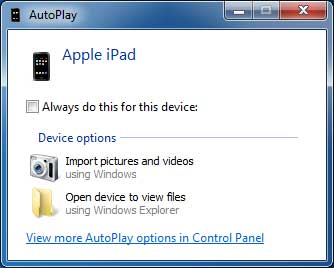
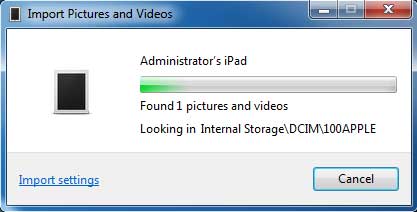
2. On the AutoPlay dialog, please click the "Import pictures and videos" option, which will make your computer detect the photos and videos on your iPhone (iPhone Photos Disappeared from Camera Roll?). This process could be a little bit longer if there are a large amount of images and videos.
3. Click "Import Settings" option on the pop-up window, then select a targeted folder besides "Import images to:" option to save the exported photos.
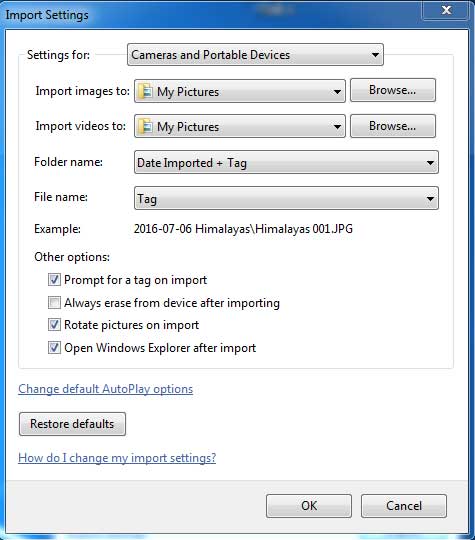
4. Hit "OK" option to start transferring Camera Roll from iPad to computer.
When you connect your iPhone to a computer, your PC treats it like a digital camera or a USB drive. That means you can access your photos directly through File Explorer.
Here's how to transfer iPhone camera roll to PC via File Explorer step by step:
1. Connect your iPhone to your computer using a USB cable. If your iPhone asks for your passcode, unlock it.
2. On your PC, open File Explorer and go to This PC. You'll see your iPhone listed under Devices and drives — click on it.
3. Open the Internal Storage folder, then go into the DCIM folder. Inside, you'll find folders named something like 100APPLE, 101APPLE, etc. These folders contain your photos. (iPhone Photos Not Showing Up on PC?)
4. Just browse through them, find the pictures you want, and copy-paste them to a folder on your computer.

It's a quick and easy way to move your Camera Roll photos without using any extra software.
Another way to move your iPhone Camera Roll to your PC is by using iTunes. Just make sure you have the latest version of iTunes installed on your computer and that you're signed into your iTunes account.
Here's how to transfer your photos using iTunes:
1. First, organize your iPhone photos into folders so they're easier to manage.
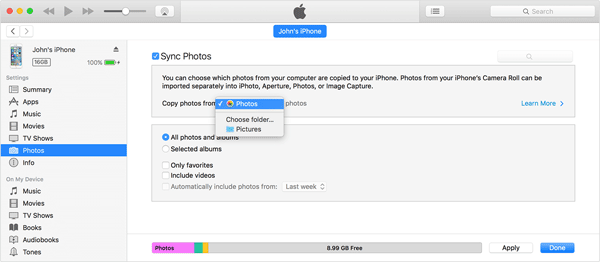
2. Connect your iPhone to your PC using a USB cable and launch iTunes.
3. In iTunes, go to the top menu and click on the "Photos" tab.
4. Check the box that says "Sync photos from", then choose "Selected folders".
5. Tick the boxes next to the folders you want to transfer.
6. Finally, click "Sync" and wait for the process to finish.
If you're using a Windows 10 or 8 computer, the built-in "Photos app" makes it easy to transfer pictures from your iPhone's Camera Roll to your PC. Here's how to do it in a few simple steps:
1. Use a USB cable to connect your iPhone to your computer.
2. Click the "Start" button (bottom-left corner of the screen), then find and open the "Photos" app.
3. In the Photos app, click "Import" at the top, then choose "From a USB device". You can also click "Import Settings" if you want to change where the files will be saved. (Can't Import Photos from iPhone to PC?)
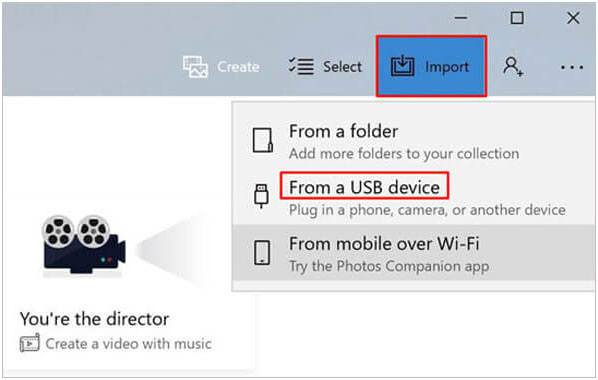
4. The app will load all the photos and videos from your iPhone. "Deselect" any items you don't want to copy, then click "Import Selected" to start the transfer.
That's a wrap on how to back up your iPhone Camera Roll to your PC! Among all the methods, Way 1 is highly recommended. With Coolmuster iOS Assistant, you get two flexible options to transfer your Camera Roll with ease.
But that's not all. Coolmuster iOS Assistant can also back up your videos, music, contacts, messages, and more. It's a handy tool to keep all your important iPhone data safe and organized. Give iOS Assistant a try and see how simple iPhone data backup can be.
If this guide helped you out, feel free to share it with others who might find it useful!
Related Articles:
[Solved] How to Recover Photos from iPhone That Won't Turn On?
[Fixed] Photos Stuck on Preparing to Import from iPhone?
[100% Workable] Fix iPhone Save Image Not Working
7 Easy and Quick Ways to Fix Unable to Share Photos on iPhone


 Free Download for PC
  Free Download for Mac

