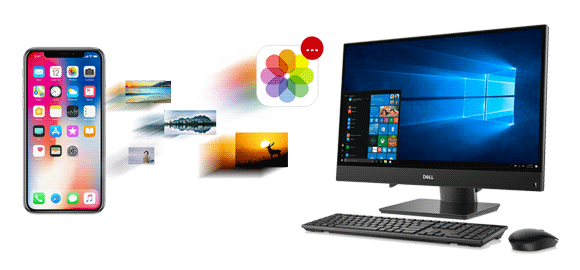
There are several reasons why you might need to transfer photos from your iPhone to your computer, like editing pictures, backing them up to a hard drive, sharing them with another phone, or sending them to a friend.
However, no matter the reason, transferring photos from your iPhone to a computer or PC can sometimes be tricky. That's why we've put together a list of easy methods to help you transfer your photos smoothly.
When sharing files between devices, you likely prefer a tool that is fast and easy to use. Coolmuster iOS Assistant is exactly that, a powerful solution for transferring photos from iPhone to PC or Mac. With just one click, you can transfer all your iPhone photos to your computer. Before the transfer, the software will neatly display all your photos and albums from your device, allowing you to preview and select the specific photos you want to transfer. This solution is easy to use and straightforward. Here are its key features:
Key Features of Coolmuster iOS Assistant:
How can I export pictures from iPhone to computer using Coolmuster iOS Assistant? Here are the steps:
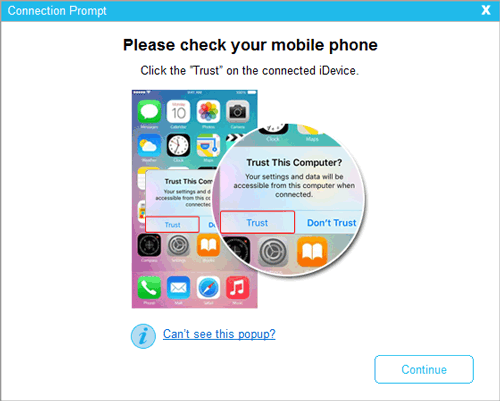
01Download the right version of the app and launch it. When you see its primary interface, connect the iPhone to the PC with a USB cable. Click "Trust" when asked. Press "Continue" to proceed.
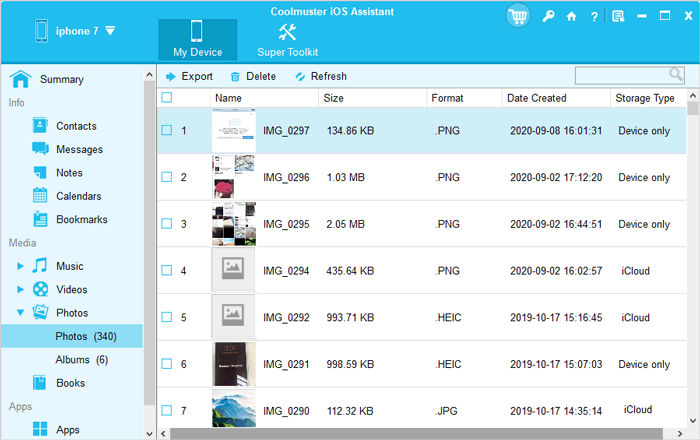
02After the device is detected, you'll see all your iPhone data on the main interface arranged in folders on the left panel. Click on the "Photos" folder, preview the pictures and choose the ones to export to the computer.

03Once done, click the "Export" button on the top menu, choose a location on your computer to save the exported photos, and the photos transfer will start immediately.
Video Tutorial:
Learn More: 5 Ways on How to Transfer Photos from Computer to iPhone
iCloud is a cloud service provided by Apple. By configuring settings, you can automatically sync your photos to iCloud and then access them on your computer. The advantage of this method is that you can access your photos on any device without the need for a USB connection. However, the drawback is that you need sufficient iCloud storage space, and both your iPhone and computer must remain connected to the internet. Here is how to upload photos from iPhone to computer:
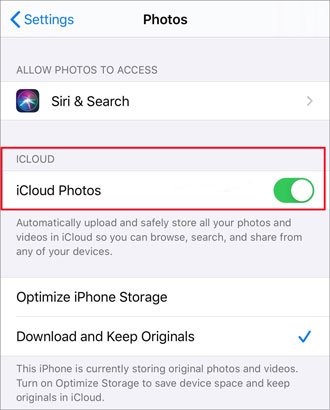
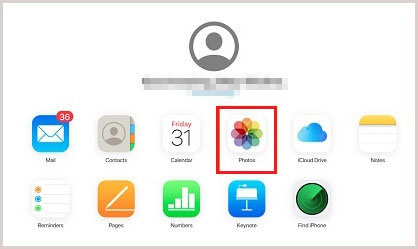
Step 1. Open "Settings" > "Photos" > "iCloud Photos", and then enable this option.
Step 2. Open a web browser and visit iCloud.com. Log in using your Apple ID and password.
Step 3. On iCloud.com, click on "Photos".
Step 4. Select the photos you want to download, then click on the cloud icon with a downward arrow.
See More: Not enough iCloud storage space? Read this article to learn how to resolve this problem.
The built-in Photos application in the Windows operating system provides an easy option to transfer photos on Windows 10/11. Through simple steps, you can directly import photos from your iPhone to your computer. Here is how to transfer photos from iPhone to PC on Windows 10/11 with the Photos app:
Step 1. Firstly, use a USB cable capable of file transfer to connect your iPhone to the PC.
Step 2. Unlock and open your iPhone. If the device is locked, your computer won't be able to detect it.
Step 3. On your PC, select the "Start" button, then choose "Photos" to open the Photos application.
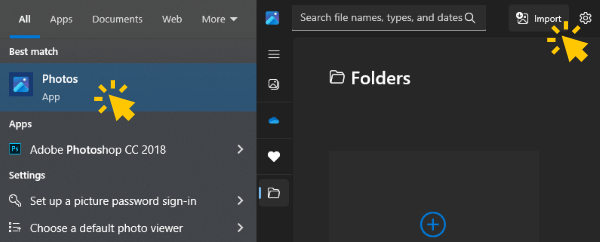
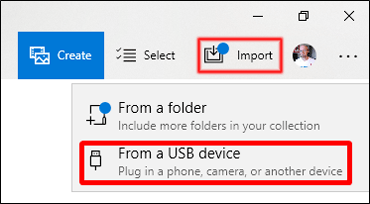
Step 4. Choose "Import" > "From a USB device", and follow the instructions. You can select the items you want to import and choose a save location. Wait for some time for detection and transfer to complete.
iTunes is the official device management tool provided by Apple. Through iTunes, you can opt for manual management of photos and download them to your computer. This is a traditional but effective method. However, it has limitations as you cannot preview or choose specific photos or albums for transfer; it only allows the transfer of photos from the Camera Roll. Here is how to load photos from iPhone to computer:
Step 1. Download and install the latest version of iTunes on your computer.
Step 2. Use a USB cable to connect your iPhone to the computer, and trust the connection on your device. Then, launch iTunes on your computer.
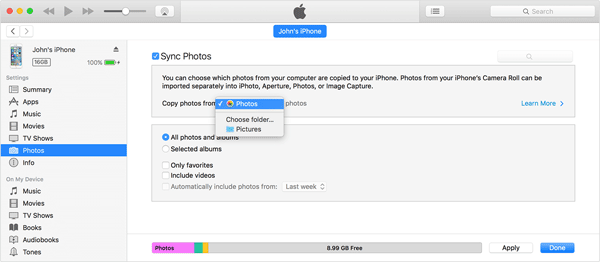
Step 3. Click on the iPhone icon in the top left corner of iTunes.
Step 4. In the left sidebar, click on "Photos" under your device's settings.
Step 5. Select "Sync Photos" and then choose the album or folder from the pop-up menu.
Step 6. Once you have selected the albums or folders for synchronization, click "Apply" to initiate the process.
Also Read: Click here to learn how to transfer photos from iPhone to PC without iTunes.
If you prefer not to use any apps or software, you can use the File Explorer in Windows 11/10 to transfer your iPhone photos to your computer. The advantage of this method is that you can directly browse all the photos and albums on your iPhone on the computer without the need for any third-party software. However, the drawback is that you cannot transfer photos from the iCloud Photo Library; it only allows the transfer of locally stored photos. Here is how to transfer photos from iPhone to PC on Windows 11/10:
Step 1. Connect the device to the PC using the original USB cable, then unlock the device by entering the password. (Why can't I transfer photos from iPhone to PC?)
Step 2. You'll be prompted to Trust the Computer. Click on the "Trust" or "Allow" option to share files between iPhone and computer.
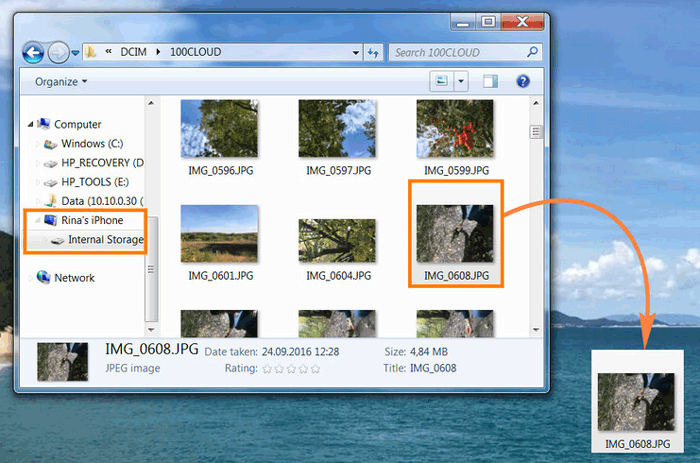
Step 3. Open File Explorer on the PC. You can find it on the taskbar in a folder-like icon. Or you can search for it from the search bar on the left bottom section of the screen. Click on it to open it.
Step 4. Find your iPhone from the Files Explore window below "This PC". Click on "This PC" to open a list of all connected devices. Your iPhone should be on the list. Click on the device to open it.
Step 5. Click twice on "Internal Storage" and head to "DCIM" to find the pictures on the iPhone. Select one image at a time by pressing the "CTRL" key and ticking the photos. Once done, right-click and choose "Copy".
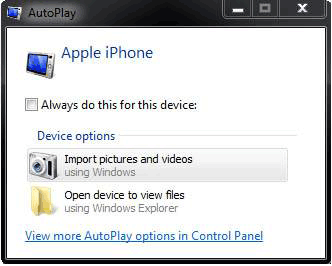
If you are using a computer with Windows 7 or an earlier version, you can use Windows AutoPlay to transfer your iPhone photos to the computer. Windows AutoPlay is an automatic playback feature in the Windows system. When you connect your iPhone, it can automatically recognize and pop up transfer options. With a simple click, you can import the photos to your computer. Here is how to get photos from iPhone to computer using AutoPlay:
Step 1. Use a USB cable to connect your iPhone to your Windows PC. Unlock your iPhone and tap "Trust" if prompted.
Step 2. AutoPlay should open automatically; if not, open it manually.
Step 3. Click on "Import pictures and videos" in AutoPlay.
Step 4. Select the folder where you want to import photos or create a new one.
Step 5. Click "Import" to start transferring photos from your iPhone to your PC.
Step 6. Allow AutoPlay to complete the photo transfer process.
You May Like: How to Transfer Music from iPhone to Computer Effectively? (5 Tips)
Another method to move your photos to a PC is by using email. Email is a great service that allows you to transfer files to others. Similarly, you can use it to transfer any of your iPhone photos to your PC. The best part is that the process is entirely wireless. Only an internet connection is required to have your precious memories on the PC.
The only problem is that it takes a lot of time to download the images to the PC individually. Besides, ensure you send a few files that do not exceed the size limit. Here is how to transfer photos from iPhone to computer using email:
Step 1. Open the "Photos" app and choose the photos you want to send to the PC. Next, hit the "Share" option.
Step 2. Choose "Gmail", enter your email address, and wait for the photos to attach.
Step 3. After the photos have been attached, press the "Send" button.

Step 4. On your PC, open any browser and log into the email you sent the files. Enter the email address and password and sign in.
Step 5. Open the email to show the images and press the "Download" tab to download the photos to your PC.
That's all about how to transfer photos from iPhone to computer. You can choose the method that best suits your needs and preferences. However, if you are looking for the simplest, fastest, and most secure method, we highly recommend using Coolmuster iOS Assistant. It is a professional iOS data management software that makes it easy to transfer iPhone photos to your computer, whether you are using Windows or Mac. Feel free to download it and give it a try.
Related Articles:
3 Simple Ways to Back Up iPhone to Flash/USB/Thumb Drive [Reassuring Guide]
6 Easy Ways on How to Transfer Photos from iPhone to iPhone (100% Success Rate)
How to Transfer Photos from iPhone to Android? [Solved]
How to Transfer Photos from SD Card to iPhone in 4 Useful Ways [Ultimate Guide]


 Free Download for PC
  Free Download for Mac

