TL;DR:
Keeping your personal notes safe on iPhone or iPad is easier than you think. In this guide, you'll learn:
Have you ever written something in Notes on your iPhone or iPad and wished no one else could see it? Locking your notes is a simple way to keep your private thoughts, passwords, or important reminders safe. You can use a password, Face ID, or Touch ID to protect individual notes or all of them at once. In this guide, we'll show you step by step how to lock notes, remove locks, and handle common issues, so your personal information stays private.
Not every note needs to be protected, but some notes are simply too important to leave open. For example, you might keep Wi-Fi passwords, account details, travel plans, work information, or personal records in the Notes app. If someone borrows your device or gains temporary access to it, this information could be exposed.
Locking notes allows you to keep selected content private without affecting the rest of your notes. Instead of hiding your entire device, you can protect only the information that matters most. This makes the feature especially useful for people who use Apple Notes to store both everyday reminders and confidential information. (iPhone Notes Disappeared?)
Before you can lock individual notes, you first need to set up a password for the Notes app. You can also choose to use Face ID or Touch ID for quicker access. There are two ways to set up your Notes password.
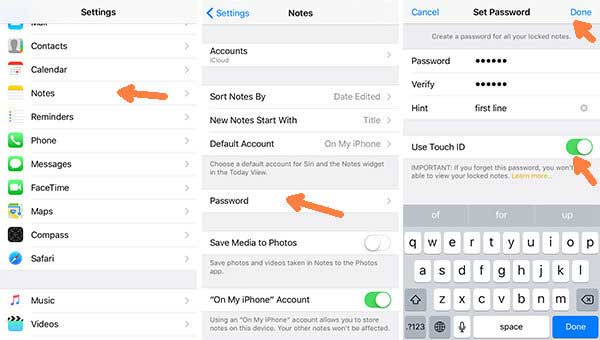
Once set, this password will be used to lock and unlock all your notes.
If you don't want to lock all your notes, you can lock individual notes instead. You'll need to use the password you set earlier. (How to Recover Deleted Notes on iPhone?)
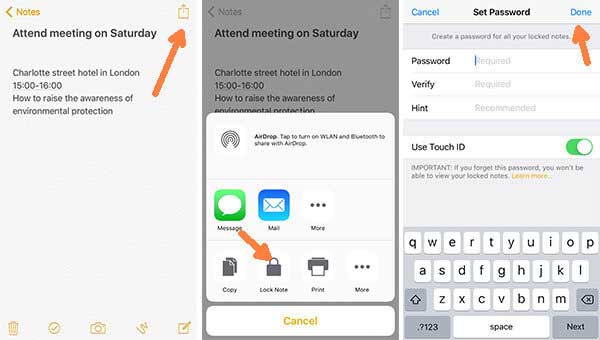
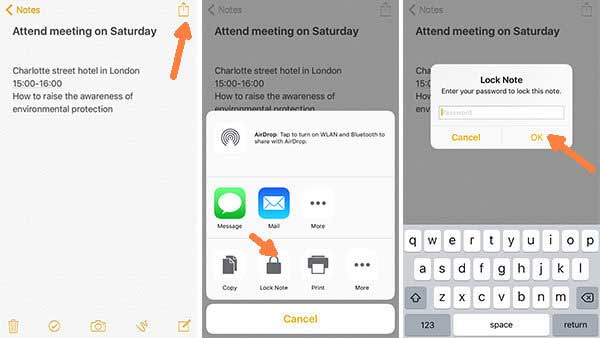
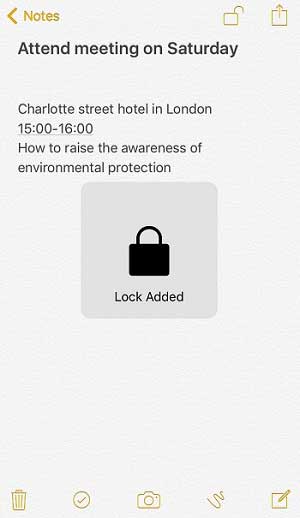
1. Open the Notes app and select the note you want to lock.
2. Tap the More (...) button in the top-right corner, then choose "Lock Note" from the menu.
3. Enter your Notes password, then tap OK.
4. You'll see a "Lock Added" confirmation, which means your note is now protected.
If a note is no longer sensitive, you can remove its lock and view it without a password or verification. Here's how:
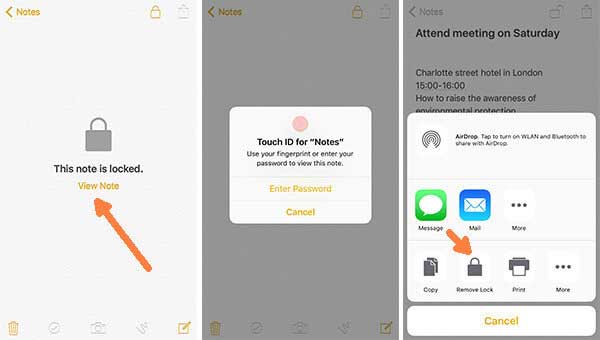
1. Open the Notes app and select the locked note. Tap "View Note".
2. Unlock the note using your password or Touch ID.
3. Once the note is unlocked, tap the More (...) button in the top-right corner, then choose "Remove Lock".
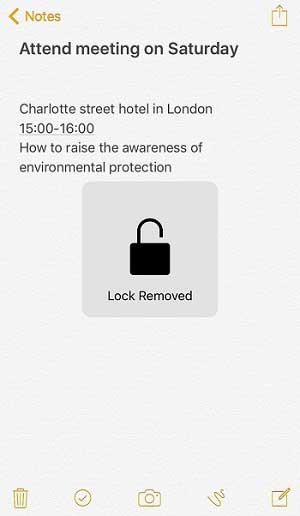
4. You'll see a"Lock Removed" confirmation on the screen. The note is now unlocked and can be accessed without a password. (How to Print Notes from iPhone or iPad?)
If you often use Notes on your iPhone or iPad, you may also want a simple way to back them up or transfer them to a computer. Coolmuster iOS Assistant is a helpful tool that lets you manage your iOS data more easily. Instead of relying only on iCloud, you can export your notes and keep a local copy on your computer for extra safety.
With this tool, managing your notes becomes much more flexible, especially if you switch devices or want to organize your data more freely.
Key features of Coolmuster iOS Assistant:
Free download Coolmuster iOS Assistant on your computer now:
How to Transfer Notes between iPhone/iPad and Computer Using iOS Assistant:
01 Download and install iOS Assistant on your computer. Launch the program and connect your iPhone or iPad using a USB cable. If prompted on your device, tap "Trust" to allow the computer to access your data.

02 Click "Notes" in the left panel. You can preview your existing notes and select the ones you want to transfer, back up, or manage.
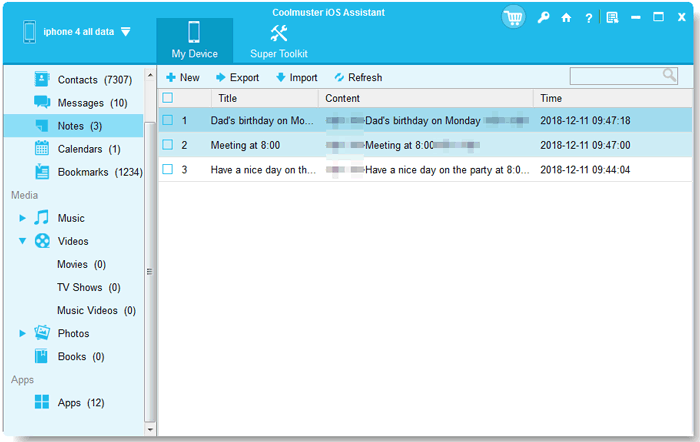
03Now you can manage your notes directly from the computer. Click "New" to create a new note on your computer, "Export" to save selected notes to a folder on your computer, or "Import" to transfer notes from your computer to your iPhone or iPad.
Video Guide:
Q1: Can I use Face ID or Touch ID instead of a password?
Yes. After setting up a Notes password, you can turn on Face ID or Touch ID. This way, you can unlock your notes just by looking at your iPhone or placing your finger on the sensor, no need to type your password every time. It's fast and convenient.
Q2: Why can't I lock a note on my iPhone or iPad?
Usually, this happens because you haven't set a Notes password yet. Make sure you go to "Settings > Notes > Password" and create one first. Also, some notes, like shared notes, cannot be locked, so check if the note you're trying to lock is eligible.
Q3: What happens if I forget my Notes password?
If you forget your password, you won't be able to unlock notes that were locked with it. The good news is you can reset your Notes password in Settings, but this only applies to notes you lock going forward. Unfortunately, old locked notes remain inaccessible without the original password.
Q4: Do locked notes sync across iCloud devices?
Yes! If you use iCloud Notes, your locked notes will appear on all your Apple devices. However, you'll still need your password, Face ID, or Touch ID to open them on each device, so your private content stays secure. (iCloud Notes Not Syncing?)
Locking notes on your iPhone or iPad is a simple but effective way to keep your personal information safe. Whether you choose to protect a single note or all of them, the process is quick and easy once you've set up your password. With options like Face ID and Touch ID, accessing your locked notes is also very convenient. By following the steps above, you can better manage and protect your private information every day.
Related Articles:
How to Export Notes from iCloud: A Step-by-Step Guide
4 Ways to Fix No Recently Deleted Notes Folder on iPhone


 Free Download for PC
  Free Download for Mac

