TL;DR:
This guide explains how to transfer an iTunes library from a Windows PC to a Mac without losing music, playlists, or library data. It covers two main methods - using an external drive and transferring over a local network - both of which help ensure a complete and secure migration.
You will also learn how to prepare your iTunes library properly before transfer and how to open it on a Mac using the Music app or iTunes. In addition, a bonus section introduces a simple way to manage iTunes and iOS data more efficiently on your computer.
Switching from a Windows PC to a Mac is an exciting upgrade, but moving your iTunes library can seem challenging. Many users worry about losing their music collections, playlists, ratings, or purchased content during the transfer process. Fortunately, transferring an iTunes library from PC to Mac is easier than it may appear. Whether you prefer using an external hard drive or a local network, there are reliable ways to move your entire library while keeping your media files organized. In this guide, we'll walk you through the most effective methods to transfer your iTunes library from a Windows PC to a Mac without losing your valuable data.
Before transferring your iTunes library from a PC to a Mac, it's important to prepare your files properly. Taking a few minutes to organize and back up your library can help prevent missing songs, broken playlists, or other transfer issues.
1. Update iTunes to the Latest Version
Make sure you're running the latest version of iTunes on your Windows PC. An updated version helps ensure better compatibility with the Music app or iTunes on your Mac.
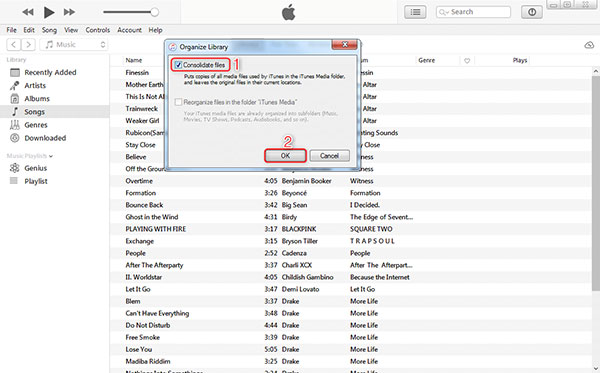
2. Consolidate Your iTunes Library
If some of your music files are stored in different folders, consolidating the library will gather all media files into a single iTunes Media folder. To do this, open iTunes and go to:
File > Library > Organize Library > Consolidate files
This step makes the transfer process much easier and reduces the risk of missing files.
3. Back Up Your iTunes Library
Before making any changes, create a backup of your iTunes library. You can copy the entire iTunes folder to an external hard drive or another safe location. If anything goes wrong during the transfer, you'll still have a complete copy of your library.
4. Check Available Storage on Your Mac
Ensure that your Mac has enough free storage space to accommodate the entire iTunes library. You can check the size of your iTunes folder on your PC and compare it with the available storage on your Mac before starting the transfer. (Top 10 iTunes Scripts You Should Still Use in 2026?)
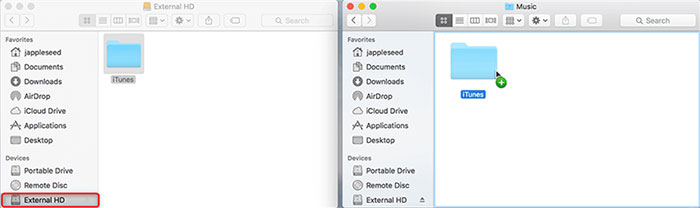
An external drive is one of the most straightforward ways to transfer an iTunes library from a Windows PC to a Mac. By copying your entire library folder, you can preserve your music, playlists, ratings, and other library information.
Step 1: Consolidate Your iTunes Library
Before copying your files, make sure all media is stored in the iTunes Media folder.
This ensures that all songs, videos, and other media are collected in one location. (How to Transfer Videos from iTunes to iPhone?)
Step 2: Copy the iTunes Folder to an External Drive
Wait until all files have been copied successfully.
Step 3: Move the iTunes Folder to Your Mac
The transfer time will depend on the size of your library. (How to Transfer Music from iTunes to iPhone?)
Step 4: Open the Transferred Library on Mac
Your music library should now appear in the Music app with its playlists and library data intact.
Step 5: Confirm Everything Was Transferred
Take a few minutes to review your library. Check that:
If everything looks correct, you can continue using your iTunes library on your Mac.
If you don't have an external hard drive available, you can transfer your iTunes library from a PC to a Mac over a local network. This method allows you to copy your library directly between computers, although it may take longer for large music collections. (How to Refresh iTunes Library?)
Step 1: Share the iTunes Folder on Your PC
Step 2: Connect to the Shared Folder from Your Mac
Step 3: Copy the iTunes Library to Your Mac
Step 4: Open the Library in the Music App
The Music app will load your transferred library and display your songs, playlists, and other library information.
Step 5: Check the Transferred Content
After the library opens, verify that your music files, playlists, album artwork, and purchased items are available. Try playing several songs to confirm that all media files were copied successfully.
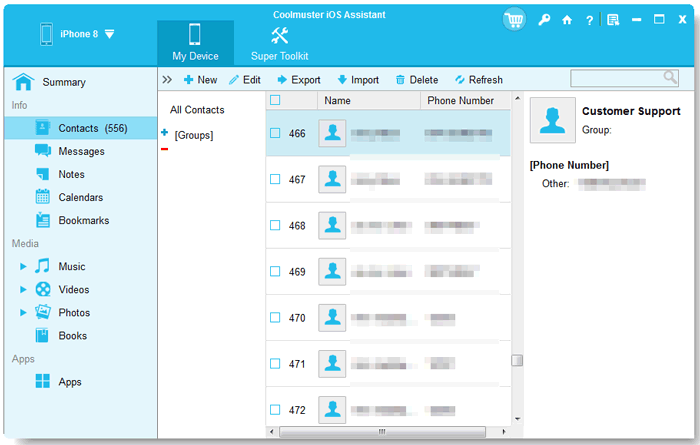
For users who want a simpler way to handle both iTunes library content and iOS device data on a computer, Coolmuster iOS Assistant can help streamline the management process. It allows you to preview, organize, back up, and export different types of iOS data, making it easier to keep your music, playlists, and other files well organized on PC or Mac. It also supports managing iTunes backup files and transferring selected data between your iPhone, iPad, and computer without overwriting existing content.
Key Features of Coolmuster iOS Assistant:
Free download Coolmuster iOS Assistant on your computer now:
How to access iPhone files on PC without iTunes:
01 Download and install Coolmuster iOS Assistant on your Windows PC or Mac, then launch it. Use a USB cable to connect your iPhone or iPad to the computer. Tap "Trust This Computer" on your device if prompted.

02 Once connected, the software will automatically scan and display your iOS data categories on the main interface. You can preview files, select items, and click "Delete" to remove useless files, click "Export" to save them to your computer, or use "Import" to add supported files back to your device.
03 Go to the "Super Toolkit" section to back up iOS data to iTunes or your computer, or choose "Delete" to delete unwanted backup files, manage existing iTunes backup files by restoring or exporting them as needed.

Video Guide:
Q1. Can I transfer my entire iTunes library from PC to Mac?
Yes. You can transfer your full iTunes library, including music, playlists, ratings, and media files, by copying the iTunes folder via an external drive or network. Once moved, you can open it using the Music app (or iTunes on older macOS versions).
Q2. Will my playlists and play counts be preserved?
If you copy the complete iTunes library folder (not just individual songs), your playlists, play counts, ratings, and album artwork will usually remain intact after the transfer.
Q3. Why are some songs missing after transferring to Mac?
Missing songs usually happen when:
Q4. Do I need to install iTunes on Mac?
Not necessarily. On macOS Catalina and later, Apple uses the Music app instead of iTunes. Your transferred library can be opened directly in the Music app.
Q5. Can I use AirDrop or cloud services to transfer the iTunes library?
Technically possible for small libraries, but not recommended for large iTunes libraries due to file size limitations and risk of incomplete transfers. External drives or network sharing are more stable.
Transferring an iTunes library from PC to Mac is not complicated when you follow the right steps. Whether you choose an external drive for a faster and more stable transfer or a network connection for convenience, both methods can help you move your entire music collection safely. Proper preparation, such as consolidating your library and creating a backup, is essential to avoid missing files. Once the transfer is complete, you can easily open your library in the Music app and continue enjoying your music seamlessly on your Mac.
Related Articles:
[Guide] How to Add Videos to iTunes Library in Simple Steps
2 Simple Ways to Transfer iPhone Purchases to iTunes


 Free Download for PC
  Free Download for Mac

