Imagine suddenly losing all your important photos, contacts, and files on your iPhone. This is a common and worrying situation more than you think. Your iPhone may slip from your hands, get soaked in water, or simply stop working without warning. Since we rely so heavily on our phones to store personal memories and important information, losing this data can be a big hassle.
The good news? It's easy to avoid this kind of disaster. The key is to back up your iPhone regularly. In this guide, we'll walk you through the most effective ways to back up your iPhone to ensure your data is always protected and ready to be restored.
Using iCloud to back up your iPhone is one of the easiest and most convenient methods. It works by storing a copy of your data—like photos, messages, app data, and settings—in the cloud, so you can restore everything if something goes wrong. The main advantage is that it runs automatically when your device is charging and connected to Wi-Fi. However, iCloud only offers 5GB of free space, so you may need to purchase more iCloud storage for full backups.
Refer to the following steps to back up iPhone to iCloud:
1. Connect your iPhone to a stable Wi-Fi network.
2. Go to "Settings" > tap your name at the top > select "iCloud".
3. Tap "iCloud Backup".
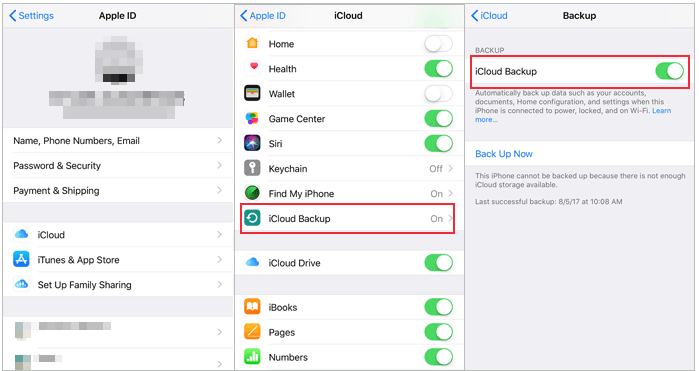
4. Turn on "Back Up This iPhone" if it's not already enabled.
5. To manually back up now, tap "Back Up Now" and wait for the process to complete.
Make sure your device stays connected to Wi-Fi until the backup finishes.
Using Finder to back up iPhone data to Mac is a simple and reliable method that is suitable for users using macOS Catalina or later. This method can completely back up iPhone data to the computer without network connection or any other tools. Before starting the backup, make sure your Mac has enough storage space, and be sure to safely disconnect the device after the backup.
1. Connect your iPhone to your Mac using a USB cable.
2. Open the Finder app on your Mac.
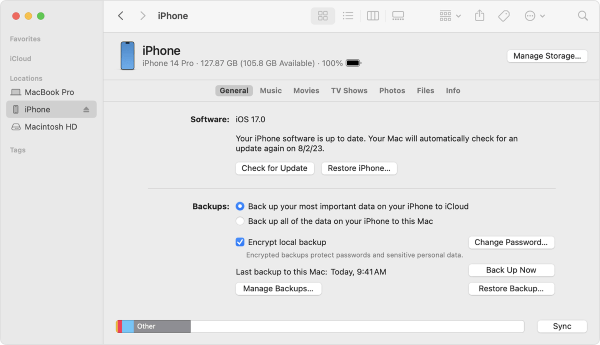
3. In the Finder sidebar, select your iPhone under "Locations."
4. If prompted, click "Trust" on both your iPhone and Mac, then enter your passcode.
5. In the "General" tab, choose "Back up all of the data on your iPhone to this Mac."
6. (Optional) To encrypt your backup, check the box for "Encrypt local backup" and create a password.
7. Click "Back Up Now" to start the backup process.
8. Wait for the process to complete, then safely disconnect your iPhone.
Backing up your iPhone to a computer is easy with Apple's official tool—iTunes if you want to back up iPhone without iCloud. It lets you save nearly all your iPhone data to your PC. Later, you can use that backup to restore your device or move everything to a new iPhone.
However, iTunes does have some downsides when used on Windows. While you can find where the backup is stored, the files inside are not readable or user-friendly. You won't be able to view or open specific files from the backup. Also, when restoring, you can't pick and choose what to recover—it replaces all current data on your iPhone with what's in the backup.
Still interested in using iTunes for backup? No problem. Just follow the simple steps below to get started.
1. Connect your iPhone to your Windows PC using a USB cable.
2. Open iTunes. If prompted, tap "Trust This Computer" on your iPhone and enter your passcode.
3. In iTunes, click the device icon at the top left of the window.
4. Under the "Summary" section, choose "This Computer" as the backup location.
5. (Optional) Check "Encrypt local backup" if you want to protect your data with a password.
6. Click "Back Up Now" to begin the backup process.
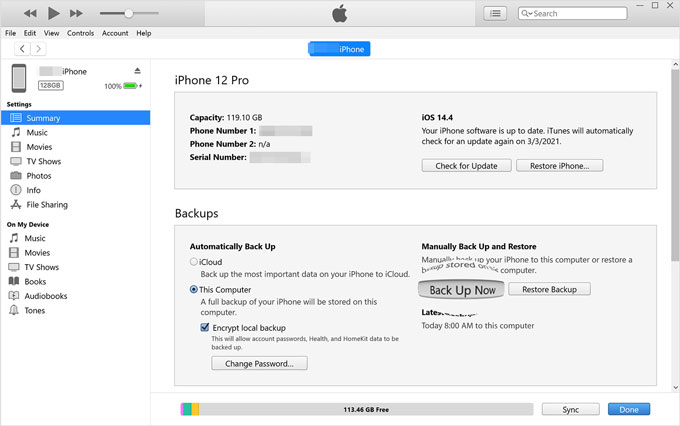
7. Wait for the backup to finish. You can check the latest backup time under the "Latest Backups" section.
If you are looking for an easy way to backup and restore specific data from your iPhone and want to access the backup files on your computer at any time, Coolmuster iOS Assistant is a good tool to try. This user-friendly software allows you to easily transfer data from iPhone to Windows PC or Mac and restore the backup in one click when needed. It supports almost all types of iOS data and gives you full control over what to back up or restore. It saves storage space on your iPhone while keeping important files safe.
Why Choose Coolmuster iOS Assistant:
Follow the steps below to see how to use iOS Assistant to back up iPhone to computer:
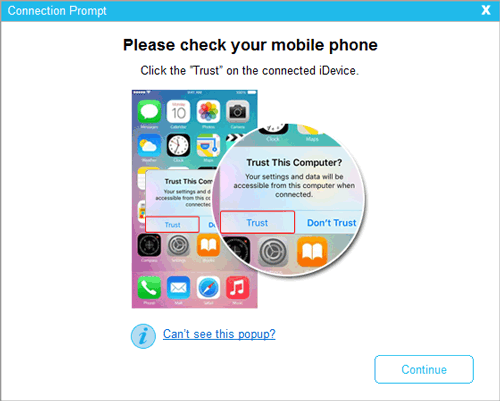
01After successfully downloading and launching the software, follow the on-screen instructions to connect your device to your computer via a USB cable. A prompt will appear on your computer; select "Trust" on your device and click "Continue" to proceed.
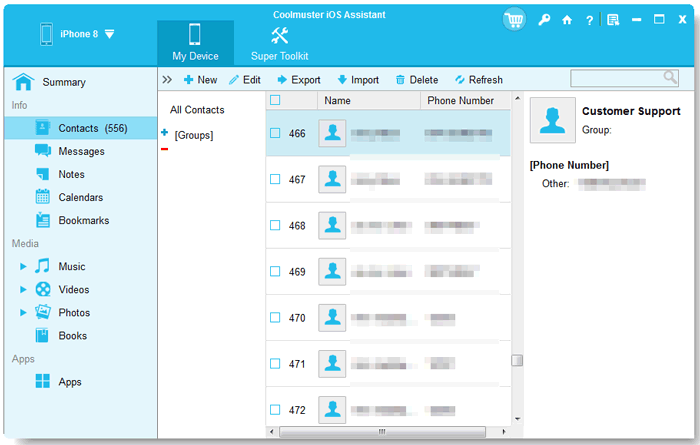
02After the software detects your device, it will display the main interface as shown. All folders are now neatly arranged in the left column of the main interface. Click on the corresponding folder for the category of files you want to back up.

03The software will scan all the data contained in the folder. Now, you can preview the detailed file information and select the ones you want to back up. Finally, click "Export" and select the appropriate output location to start the transfer process.
Back up everything from iPhone to computer at once:
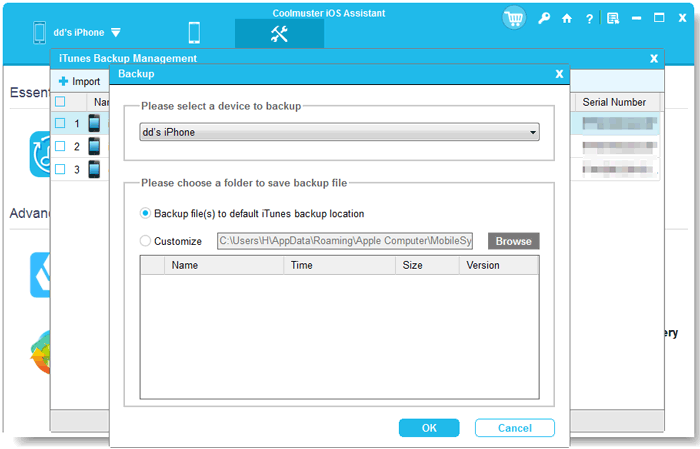
Once your device is detected by the software, go to the "Super Toolkit" section and select "iTunes Backup & Restore". Click the "Backup" tab and choose the device you want to back up from the drop-down list. Then, decide where to save the backup by clicking "Browse". Confirm your choice with "OK", and the backup process will begin automatically.
Video Guide:
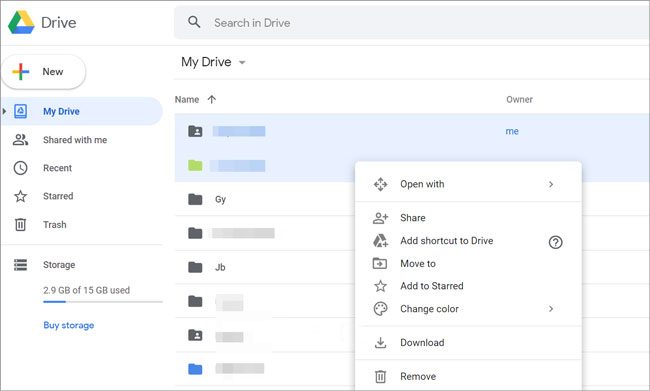
Google Drive is a popular cloud storage option that gives you 15GB of free space to store your files, including photos, videos, emails, and documents. Once your iPhone data is backed up to Google Drive, you can easily access it from any device, including a Windows computer.
Google Drive lets you save user-created files from your iPhone, such as photos and videos, but it doesn't back up system data. Also, you'll need an internet connection to access your files.
How to back up iPhone to Google Drive:
1. Log into the same Google account on both your iPhone and PC.
2. Open Google Drive on your iPhone and tap the "+" button.
3. Select "Upload" > "Photos and Videos", then choose the files you want to back up.
4. Once uploaded, open Google Drive on your PC to view the files.
5. To keep a copy on your PC, simply download the files from Google Drive.
Backing up your iPhone is essential to avoid losing important data due to device issues or accidental deletion. While you can use built-in options like iCloud, iTunes/Finder, or services such as Google Drive, third-party tools offer more control and flexibility.
After comparing several methods, we recommend Coolmuster iOS Assistant as a top choice. It's user-friendly and packed with helpful features. You can easily transfer data between devices, create backups, and restore them when needed. It also allows you to preview and choose specific files to back up, which saves time and storage space. Download it now and try it out.
Q1. How long does it take to back up an iPhone?
There's no exact time—it varies. But in most cases, backing up an iPhone can take anywhere from 30 minutes to 2 hours. The time depends on things like how much data you have, your internet speed (if using iCloud), and the backup method you choose.
Q2. Can I back up my iPhone to my iPad?
Yes, but it's not a direct transfer. You'll first need to back up your iPhone to iCloud. Then, you can set up your iPad using that backup. Keep in mind: you'll need enough iCloud storage, and your iPad will need to be reset to factory settings to restore the backup.
Q3. How do I move everything to a new iPhone?
Use Apple's Quick Start feature. Just place your new iPhone near your old one. Make sure Wi-Fi and Bluetooth are on. Then follow the onscreen steps to transfer your data wirelessly.
Related Articles:
7 Best iPhone Backup Software in 2025 [In-Depth Review]
How to Back Up iPhone Text Messages to Gmail in 5 Easy Ways?


 Free Download for PC
  Free Download for Mac

