iPhone storage space tends to run out quickly, especially when storing a lot of high-resolution photos and videos. In order to free up iPhone storage space and easily manage, store or edit media on a computer, many people choose to transfer multimedia files from iPhone to Windows 11/10 PC. In this article, we will show you four easy and quick ways to transfer photos from iPhone to Windows 11/10 PC, whether you want to use USB or a wireless way and method 1 might be the best option.
With the help of Coolmuster iOS Assistant, transferring photos and other files from iPhone to computer is no longer a frustrating and time-consuming task. iOS Assistant provides you with a fast and reliable transfer process without any complicated operations. It supports the recognition and transfer of various image formats, including jpg, jpeg, png, bmp, gif, heic, heif, webp, etc. With a user-friendly interface and advanced features, the software has a very high data transfer success rate without any data loss or security compromise.
Key Features of Coolmuster iOS Assistant:
Below are the steps to follow when using Coolmuster iOS Assistant to copy photos from iPhone to Windows 11/10:
01Begin the process to transfer photos from an iPhone to a Windows 11/10 computer by downloading, installing, and launching Coolmuster iOS Assistant on your computer. Connect your iPhone to the computer using a working lighting cable.

02 Go to the "Photos" section where you'll find all the pictures from your iPhone neatly organized into different categories. You can easily browse through the images and pick the ones you want to import by selecting them.
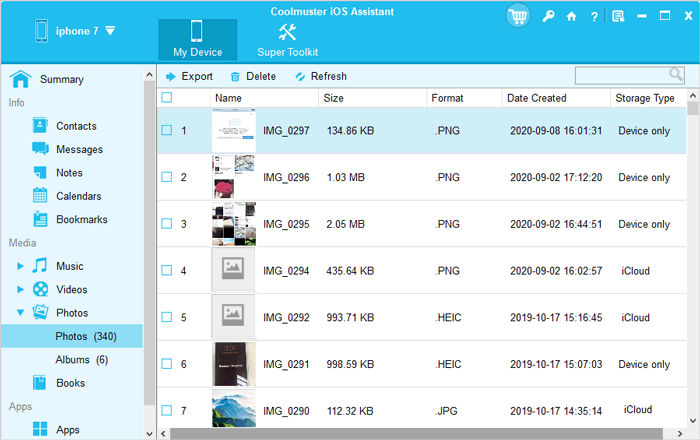
03 Once you've chosen your photos, simply click the "Export" button at the top of the screen. Then, pick a folder on your computer where you'd like to save the pictures. This will transfer the selected photos from your iPhone to your computer.
Video Guide:
You can easily transfer photos and videos from your iPhone to a Windows 11 PC using the built-in Microsoft Photos app, without needing any third-party software. Just follow these simple steps:
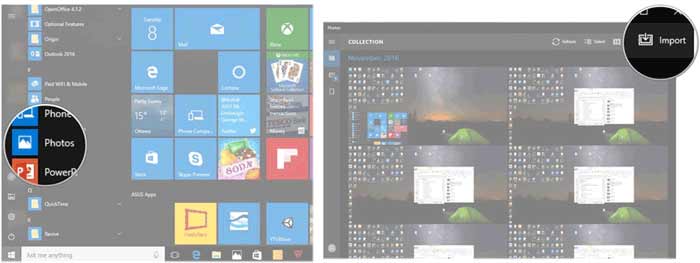
This will allow you to view iPhone photos on PC, access them anytime and provide extra protection for your media.
Besides using the Microsoft Photos app, you can also use File Explorer on Windows 11 to transfer photos and videos from your iPhone to your computer. File Explorer reads your iPhone's storage and puts all media files into the DCIM folder, making it easy to copy them over. Here's a simple guide to do it:

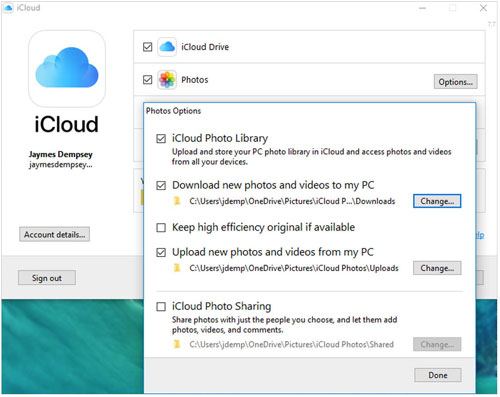
If you want to transfer photos and videos from your iPhone to a Windows 11 computer without using a USB cable, iCloud is a great option. It's Apple's built-in cloud service that helps you store and manage files online. Once iCloud Photos is turned on, your pictures will automatically sync between your iPhone and PC over Wi-Fi.
The nice thing about using iCloud is that it keeps your photo quality intact during the transfer. Just keep in mind that iCloud only gives you 5GB of free storage. If you have a lot of photos, you might need to buy more space. ( How to fix not enough iCloud storage?)
Here's how to get started:
1. On your iPhone, go to "Settings" > [your name] > "iCloud" > "Photos", and make sure "Sync this iPhone" is turned on.

2. On your Windows 11 PC, open a browser and go to icloud.com. Sign in with your Apple ID.
3. Click on the "Photos" icon to see your iPhone pictures.
4. Select the ones you want to save to your computer.
5. Click the "Download" button in the top-right corner to download them.
Alternatively, iCloud Photos is now built right into the Microsoft Photos app on Windows 11. You can open the app, connect your iCloud account, and access your iPhone photos directly from there.
Q1. What's the best way to transfer images from my iPhone to my Windows 10/11 computer?
The best way to transfer files from an iPhone to Windows 10/11 is using Coolmuster iOS Assistant. This program helps you transfer photos, contacts, messages, and other data from an iPhone to Windows 10 securely.
Q2. How long does it take to transfer photos from an iPhone to Windows 10/11?
It depends on the amount of data you are transferring. On average, it should take a few minutes for smaller data transfers. For larger transfers, it may take up to an hour or more.
Q3. Can I move my iPhone photos to a Windows PC without using a cable?
Yes, you can transfer photos wirelessly using cloud storage services like iCloud, Google Drive, OneDrive, or Dropbox. Just upload your photos from your iPhone to the cloud app, then sign in to the same account on your PC to download them. Another easy option is to email the photos to yourself and open the email on your computer.
Q4. Why can't my Windows 11/10 computer see the photos from my iPhone?
If your photos are saved in the HEIC format, Windows 11 might not open them unless you install a special extension called "HEIF Image Extensions." To avoid this problem in the future, you can make your iPhone save photos in a more common format like JPEG. Just go to:
Don't struggle with transferring your iPhone photos to your Windows 10/11 computer any longer! Our easy-to-follow guide will show you the most secure and efficient methods for importing your photos quickly. And for ultimate ease, we recommend using Coolmuster iOS Assistant. It makes the process a total breeze. Just remember to back up your data for extra peace of mind regularly.
Related Articles:
7 Quick Ways to Transfer Photos from PC to iPad (With or Without iTunes)
4 Ways to Transfer Contacts from iPhone to Computer? [Fast]
5 Ways on How to Transfer Photos from Computer to iPhone
How to Transfer Photos from iPhone to External Hard Drive in 5 Effective Ways


 Free Download for PC
  Free Download for Mac

