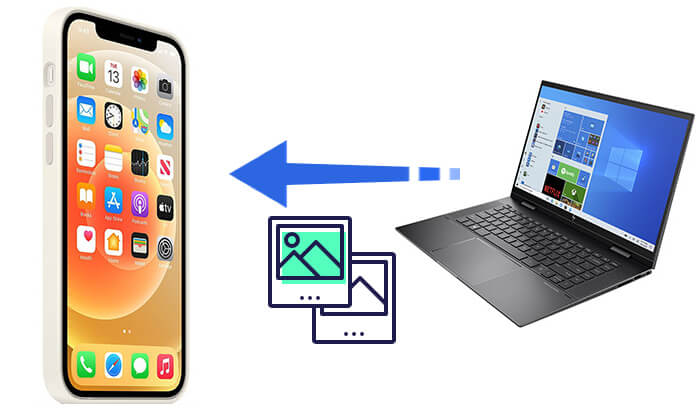
Do you have amazing photos on your camera that you'd love to see on your iPhone? Or maybe you've saved pictures from an old iPhone or Android phone onto your computer? Whatever the reason, the goal is the same - you want to transfer photos from PC to your iPhone.
Most people immediately think of iTunes, but let's be honest, it can be slow, complicated, and not always convenient. So, if you're looking for easier ways to import your pictures, you're in the right place.
In this guide, we'll explore several simple methods to transfer photos from your computer to your iPhone with and without iTunes. Keep reading to find the best way that fits your needs.
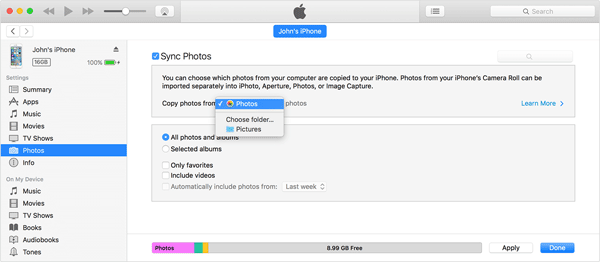
Want to move your photos from your PC to your iPhone with iTunes? It might not be the simplest option, but it's still a reliable and official method. Follow these steps to transfer your photos with iTunes:
Step 1. Launch iTunes on your PC. If you don't have it installed yet, head over to Apple's website to download and install the latest version.
Step 2. Connect your iPhone to your computer using a USB cable, then click the device icon that appears in iTunes. If you've enabled automatic syncing, your iPhone will sync right away. Otherwise, you can click "Sync" manually to start the process.
Step 3. Before transferring, you can choose to back up your iPhone by selecting "Back Up Now". You can back up to your computer or iCloud, depending on your preference.
Step 4. Once synced, you'll be able to import your selected photos from PC to iPhone.
While iTunes works for photo transfers, many users find it slow, rigid, and prone to overwriting existing data. If you'd rather avoid these hassles, there are several faster and easier alternatives, which we'll explore next.
First up is iOS Transfer, a powerful tool to move photos from your computer to your iPhone without using iTunes. It's designed to be user-friendly for beginners, yet robust enough for professionals. Beyond photos, it supports up to 18 types of data, including contacts, notes, music, and more. The software is fully compatible with all iOS versions and iPhone models, including the latest iOS 26 and iPhone 17, and works seamlessly on both Mac OS and Windows 7/8/10/11.
Key Highlights of iOS Transfer:
How do I transfer photos from my computer to my iPhone using a USB cable without iTunes?
01Download and install iPhone Photo Transfer on your computer. Next, you need to connect your iPhone to the computer via a USB cable. iPhone Photo Transfer will recognize your mobile phone in seconds.
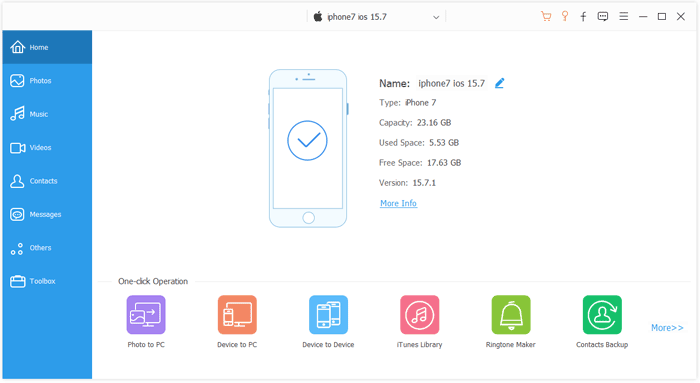
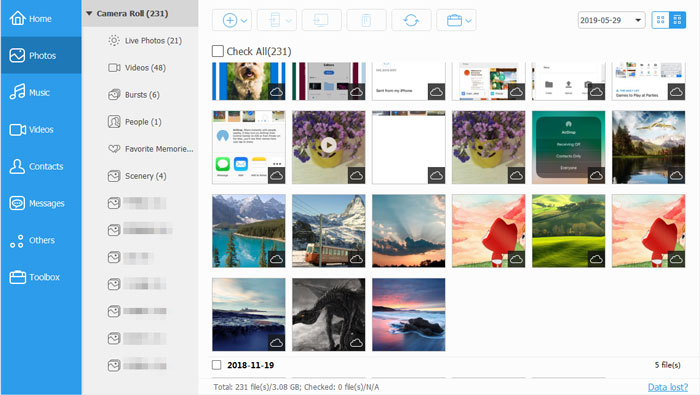
02On the main interface, click "Photos" on the left panel, and then you will see your photos folders in the middle part. Navigate the folder you want to transfer the photos and tap on the "Add" icon on the top menu.
03Open the photos folder on the computer, you can select the photos on the screen, and then click the "Open" icon. The selected photos will be transferred from the PC to your iPhone.
Another convenient way to transfer photos from a PC to an iPhone is by using cloud services. For iOS users, iCloud is the go-to option. It offers 5 GB of free storage per Apple ID (iCloud storage full?), making it an easy solution to upload and sync your photos from a Windows PC to your iPhone. With iCloud, you can move your pictures wirelessly without any cables. Here's a simple guide to transferring photos from your PC to your iPhone using iCloud:
Here is how to transfer photos from computer to iPhone wirelessly with iCloud:
Step 1. Open a browser on your computer, visit the official iCloud website, and log in with your Apple ID.
Step 2. Go to the "Photos" section and click the "upload" button.

Step 3. Select the photos you want to upload and wait for the upload to complete.
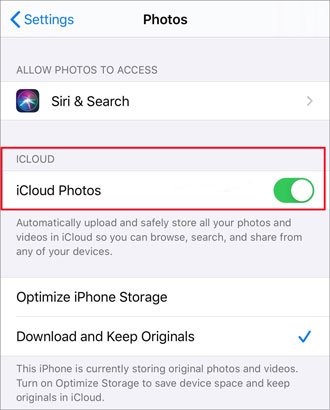
Step 4. Open "Settings" on your iPhone and tap your Apple ID at the top.
Step 5. Go to the "iCloud" section, select "Photos", and enable "iCloud Photos". Ensure your iPhone is connected to Wi-Fi, and after a short while,the photos will automatically sync to your iPhone.
If your iCloud storage is running low, Google Photos is a great alternative for moving photos from a Windows PC to your iPhone while keeping them safely in the cloud. Every Google account comes with 15 GB of free storage, which is more generous than iCloud, allowing you to transfer larger batches of pictures at once. Plus, your photos can be accessed from any device logged into your Google account. Here's how to move photos from PC to iPhone without iCloud using Google Photos:
Step 1: On your computer, go to Google Photos and sign in with your Google account. If you don't have one, you'll need to create an account first.
Step 2: Click "Upload" > "Computer" in the top-right corner. A file explorer window will open for you to select your photos.

Step 3: Choose the photos you want and click "Open" to upload them to Google Photos.
Step 4: Once the upload is complete, install and open the Google Photos app on your iPhone and sign in with the same account. Your PC photos will now appear on your iPhone.
The transfer time depends on your internet speed and the number of photos. Afterward, you can download any pictures from Google Photos directly to your iPhone if you like.
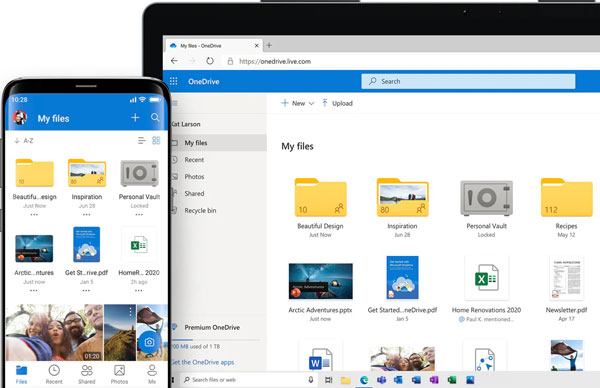
OneDrive makes moving photos from your computer to your iPhone quick and easy. Microsoft offers 5 GB of free storage for new accounts, which is usually enough for a small collection of images. This method is also wireless and keeps your photos accessible across devices. However, uploading large amounts of photos may take time, and additional storage requires a paid plan. Here's how to do it:
Step 1: Download and install the OneDrive app on your computer. Sign in with your Microsoft account, or create one if you don't have it.
Step 2: Open OneDrive on your PC and upload the pictures you want to transfer. Creating folders can help keep things organized.
Step 3: Install the OneDrive app from the App Store on your iPhone and sign in with the same Microsoft account.
Step 4: Navigate to the folder containing your photos. Select the images you want and tap the download button to save them to your iPhone.
Step 5: Once downloaded, your pictures are ready to view anytime on your iPhone, synced effortlessly from your PC through OneDrive.
Windows File Explorer offers a simple way to move photos from your PC to your iPhone without relying on iTunes. This method lets you directly access your iPhone's storage and copy pictures into the proper folder.
Step 1: Connect your iPhone to your PC using a USB cable.
Step 2: Unlock your iPhone and tap "Trust This Computer" when prompted.
Step 3: On your PC, open "This PC" and navigate to "Internal Storage" > "DCIM" (this is where your iPhone stores photos). Find the pictures you want to transfer, then drag and drop or copy and paste them into the folder.
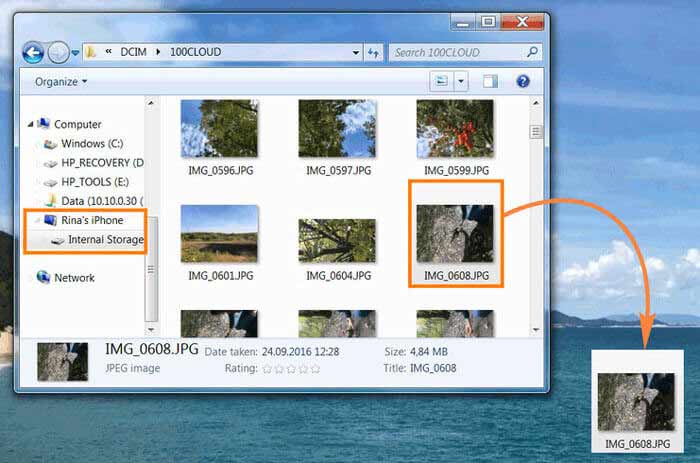
Step 4: Open the "Photos" app on your iPhone to view the transferred images.
If you only need to move a few photos, emailing them to yourself is a quick and easy option. This method works well for scattered images but isn't practical for large collections. Here's how to transfer photos from your PC to your iPhone using email:
Step 1. Open your email client (such as Gmail, Outlook, etc.) on your computer.
Step 2. Create a new email and attach the photos you want to transfer to this email and send it.
Step 3. Send the email to your own email address.
Step 4. Open the email on your iPhone, tap the attachment, and download the photos.

If you want to move photos from your Mac or MacBook to your iPhone, AirDrop is the easiest choice. This wireless method is ideal for transferring files between Apple devices, especially photos. As long as AirDrop is turned on for both your Mac and iPhone, you can quickly send pictures without needing a cable or even an internet connection.
Step 1. Open "Finder" on your Mac and click "AirDrop" on the left sidebar.

Step 2. Make sure AirDrop is enabled on your iPhone (turn on Bluetooth and Wi-Fi in the Control Center and set AirDrop to "Everyone" or "Contacts Only").
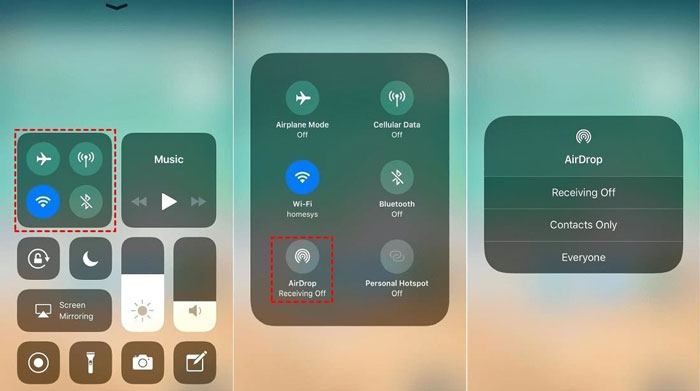
Step 3. Select the photos you want to transfer on your Mac, right-click, and choose "Share" > "AirDrop".

Step 4. Select your iPhone device, tap "Accept" on your iPhone, and the photos will be automatically saved to the "Photos" app.
There are several ways to move photos from a computer to an iPhone, so you can pick the method that works best for you. For a fast, reliable, and flexible transfer, iOS Transfer stands out. It allows batch transfers, works without iTunes, and won't overwrite your existing photos. It is perfect for anyone who wants an easy way to manage and transfer iPhone pictures.
If you found this guide useful, feel free to share it with your friends. We'd also love to hear your feedback. Just leave a comment below or reach out to us via email.
Related Articles:
How to Transfer Videos from PC to iPhone with or without iTunes
How to Transfer Files from PC to iPhone with or without iTunes?
How to Transfer Files from Mac to iPhone? Solved in 5 Proven Ways
How to Transfer Music from Computer to iPhone? [5 Ways Offered]


 Free Download for PC
  Free Download for Mac

