...

Transfer Photos from iPhone to PC Windows 7/8/9/10/11 in 9 Ways

...

"How do you easily transfer pictures from your iPhone to PC? I do not use iCloud and have tried multiple things. Clicking Import from Windows Explorer tells me there are no new pictures. When my PC finally recognizes my iPhone XR, I try to drag and drop but keep getting an error that a device attached to the system is not functioning. I've entered my passcode on my iPhone to trust this computer. All I want to do is put pictures from my iPhone on my PC. Thank you."

- Apple Support Community

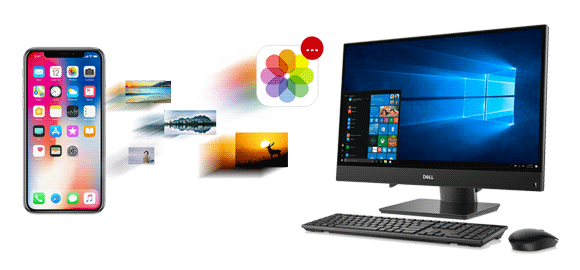
Generally, you may need to transfer photos from iPhone to PC Windows 7/8/9/10/11 to free up storage space or back up the precious data. Whatever reason it is, there is no difference in importing photos from iPhone to Windows 7 or above versions. So, how to transfer photos from iPhone to PC Windows 7? This post covers nine practical methods.

how to transfer photos from iphone to pc windows 7

Way 1. How to Get Photos Off iPhone without iTunes on Windows 7 Using the Photos App
Way 2. How to Transfer Photos from iPhone to Windows 7 without iTunes via Coolmuster iOS Assistant
Way 3. How to Transfer Pictures from iPhone to Computer Windows 7 with Windows AutoPlay/File Explorer
Way 4. How to Download iPhone Photos to Windows 7 with iCloud
Way 5. How to Transfer Photos from iPhone 7 Plus to PC Windows 7 via OneDrive
Way 6. How to Transfer Photos from iPhone 7 to PC Windows 7 via Dropbox
Way 7. How to Transfer Photos from iPhone 8 to PC Windows 7 via Google Drive
Way 8. How to Transfer Photos from iPhone to PC Windows 8/7 via Email
Way 9. How to Transfer Photos from iPhone to PC Using iTunes
Bonus: Why Can't I Transfer Photos from iPhone to Windows 7?

Way 1. How to Get Photos Off iPhone without iTunes on Windows 7 Using the Photos App

When you connect your iPhone to your Windows 7, the computer will recognize it as a digital camera, allowing you to import iPhone photos to the PC via the Photos app. You can also view the iPhone photos on the computer easily.

How to transfer a photo album from iPhone to PC for free?

1. Connect your iPhone to the computer using a USB cable and unlock your device.

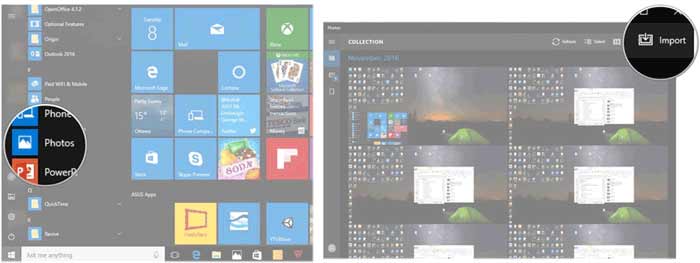
2. Run the Photos app from the Start menu and click Import > From a USB device on the screen.

3. Follow the instructions to select the desired photos and define the storage location.

4. Tap the Continue button to transfer photos from your iPhone to PC Windows 7.

get photos off iphone without itunes on windows 7 via the photos app

Way 2. How to Transfer Photos from iPhone to Windows 7 without iTunes via Coolmuster iOS Assistant

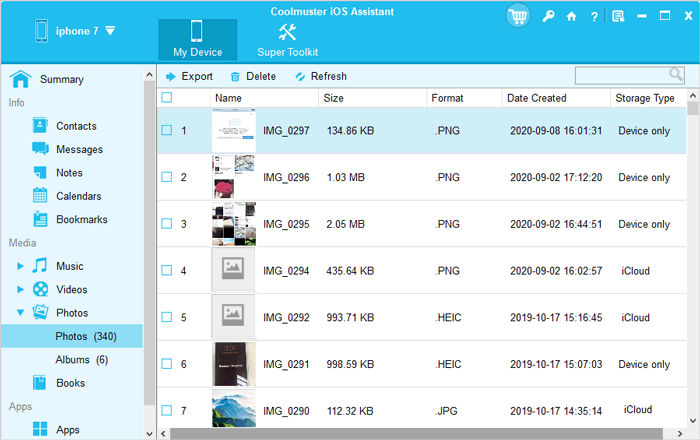
The best way to transfer photos from iPhone to Windows 7 is using Coolmuster iOS Assistant. You can preview all the image thumbnails and transfer the selected photos to the computer in various readable formats. Besides, it also provides other useful functions to manage your iPhone files on your Windows PC.

Key features of Coolmuster iOS Assistant:

  • Selectively export photos from iPhone to Windows 7.
  • Preview the photo albums on your iPhone and choose the desired images to transfer.
  • Support different photo formats, like JPG, HEIC, BMP, JPEG, PEG, PNG, GIF, etc.
  • Back up and restore all iPhone data to the PC in one click.
  • Delete unwanted photos in bulk, edit contacts, etc.
  • Fully compatible with the latest iPhone 14/SE (3rd generation)/13 Pro Max/13 Pro/13/13 mini and earlier models with iOS 5 to iOS 16.

coolmuster ios assistant windows versioncoolmuster ios assistant mac version

How to transfer photos from iPhone to PC Windows 7 selectively?

1. Install and open Coolmuster iOS Assistant on your computer.

2. Connect your iPhone to the PC using a USB cable and tap Trust on your iPhone if required.

trust the computer on your iphone

You will see the home interface with your iPhone's information when connected.

connect your iphone to the pc via usb

3. Select Photos on the left panel and preview all the thumbnails. Then, check the pictures you want to transfer and click the Export button on the top to download iPhone photos to Windows 7.

how to transfer photos from iphone to pc windows 7 selectively

You may like:

How to Convert HEIC to JPG on Windows 11/10/8/7 PC?

How to Transfer Large Videos from iPhone to PC? Try 8 Methods Here

Way 3. How to Transfer Pictures from iPhone to Computer Windows 7 with Windows AutoPlay/File Explorer

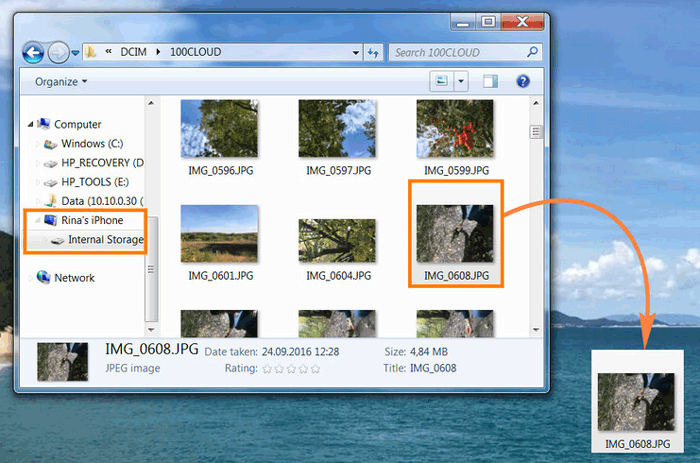
Generally, the computer will detect your iPhone as an external storage device when connected via USB. Then you can transfer pictures from iPhone to Windows 7 from the AutoPlay popup or File Explorer.

How do I import pictures on Windows 7 directly?

1. Plug your iPhone into the PC via a USB cable and wait for the AutoPlay window to appear.

2. Tap the Import pictures and videos option on the window and select or create a folder to save the photos in the Import Settings.

3. Pick the photos you want to import and hit the Import button.

transfer pictures from iphone to computer windows 7 via autoplay

You might like: If iCloud fails to back up the data on your iPhone, please take a look at this guide to work it out.

Way 4. How to Download iPhone Photos to Windows 7 with iCloud

You can also enable iCloud Photos on your iPhone and access and download the photos from iCloud on Windows PC. However, every iCloud account only offers 5GB of free storage for users, and you will need to upgrade your iCloud storage plan if the space is used up.

How to transfer photos from iPhone to PC Windows 8/7 via iCloud?

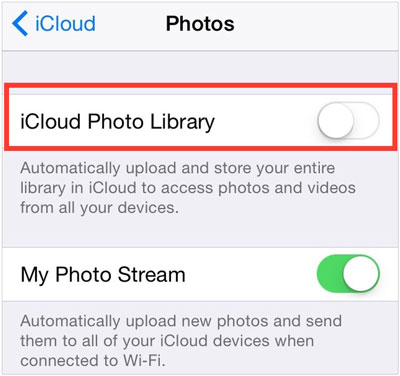
1. On Settings on your iPhone and click Photos > iCloud Photos or iCloud Photo Library.

2. Ensure to connect your iPhone to a stable Wi-Fi network.

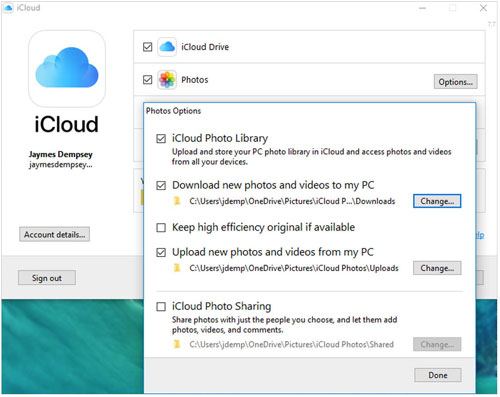
3. Install iCloud for Windows on your PC and sign in with the same Apple ID you use on your iPhone.

4. Check Photo > Download new photos and videos to my PC > hit Done > Apply.

5. Open Windows File Explorer on your PC, click This PC/My Computer, and double-tap iCloud Photos.

6. Double-click Downloads to view the photos from your iPhone.

download iphone photos to windows 7 with icloud

You may need: Want to move music files from a computer to your iPhone? That's easy. You can utilize these 5 ways.

Way 5. How to Transfer Photos from iPhone 7 Plus to PC Windows 7 via OneDrive

Microsoft OneDrive is a cloud backup service that works on iPhones and Windows PC. If you prefer a wireless way, you can upload your iPhone photos to OneDrive and download them to Windows 7.

How to get photos off iPhone without iTunes on Windows 7?

1. Install OneDrive on your iPhone from App Store and open it. If you don't have a OneDrive account, create one and sign in with your OneDrive account.

2. Click the Add icon on the top > Upload > select the wanted photos on your iPhone > hit Upload > Done.

3. Open the www.microsoft.com/en-ww/microsoft-365/onedrive/online-cloud-storage from your computer browser and log in with the same OneDrive account and password.

4. Click Folder > Download folder > extract the photos from the zip file to your PC.

transfer photos from iphone 7 to windows 7 pc via onedrive

See also: A powerful iPhone contact manager can help you organize your messy contacts in order.

Way 6. How to Transfer Photos from iPhone 7 to PC Windows 7 via Dropbox

Copying photos from iPhone to PC Windows 7 becomes easy if you have a Dropbox account. Before starting the process, ensure your Dropbox account has enough storage and expand the storage space if needed.

How to transfer photos from iPhone 8 to PC Windows 7 via Dropbox?

1. Install Dropbox on your iPhone and enter your Dropbox account to sign in.

2. Click Files and define a destination folder to save photos.

3. Tap the three-dot icon at the upper-right corner > Upload File > Photos > choose the photos you want to upload.

4. Visit dropbox.com from a computer browser and log in with the same Dropbox account.

5. Open the folders where uploaded photos are saved and download the desired photos to your computer.

transfer photos from iphone 7 to pc windows 7 via dropbox

Way 7. How to Transfer Photos from iPhone 8 to PC Windows 7 via Google Drive

Likewise, another way to transfer photos from iPhone to PC Windows 7 is using Google Drive, which provides15GB of free storage to sync and access iPhone photos wirelessly.

Here's how:

1. Install Google Drive from App Store on your iPhone.

2. Run the app and hit the + icon at the bottom > tap Upload > Photos and Videos > select the photos you wish to transfer.

3. Install Google Drive on your PC and ensure you have signed in with the same Google account.

4. Find the Google Drive folder under This PC and access the uploaded photos.

sync iphone photos to pc windows 7 via google drive

Way 8. How to Transfer Photos from iPhone to PC Windows 8/7 via Email

Assume you only transfer a few photos with no more than 25MB per photo to your computer. You can use email. But email has set a size limit for the attachments, and you may have to send them one by one.

Follow these steps to download iPhone photos to Windows 7:

1. Launch the Photos app on your iPhone and tap Camera Roll.

2. Choose no more than five pictures you want to send and tap the Share icon at the bottom.

3. Select Mail, sign in with your email account details, and send the email to yourself.

4. Log in the same email account on your PC and download the photos from the email attachments to your Windows 7.

send photos from iphone to pc windows 8 or 7 using email

Way 9. How to Transfer Photos from iPhone to PC Using iTunes

The last way to transfer photos from your iPhone to the PC is using iTunes. Let's see how it works.

1. Launch the latest version of iTunes on your computer and connect your iPhone to the PC via a USB cable.

2. Unlock your iPhone and trust the PC if prompted.

3. Click the iPhone icon at the top-left corner and tap the Photos tab.

4. Tick Sync Photos > select a photo source > select All photos and albums > hit Apply.

transfer photos from iphone to pc via itunes

Bonus: Why Can't I Transfer Photos from iPhone to Windows 7?

Encounter unexpected errors when importing photos from iPhone to Windows 7? Below are the common problems you may meet:

Don't panic if you are experiencing the above errors. You can check this guide to fix the "can't import photos from iPhone to PC" issue yourself.

Words in the End

This post teaches you how to transfer photos from iPhone to PC Windows 7 in nine effective ways. Among all options, Coolmuster iOS Assistant is the most user-friendly and straightforward method. You can view all the iPhone photos and selectively export the images you want. Moreover, it also allows you to manage the device data breezily. You can download it to have a try.

Related Articles:

A Complete List of the 9 Best Apps to Import Photos from iPhone to PC

[Hot Guide] How to Transfer Photos from iPhone to Lenovo Laptop?

How to Transfer Photos/Videos from iPhone to Dell PC Windows 11/10/8/7?

5 Tips: How to Transfer Videos from iPhone to PC Windows 11/10 Without Any Hassle?

[Fixed] How to Transfer Photo Albums from iPhone to PC with Ease?

[Solved] How to Transfer Text Message Photos from iPhone to Computer?

    iOS Transfer     Transfer Photos from iPhone to PC Windows 7/8/9/10/11 in 9 Ways
iOS Assistant
Back up and restore everything on iPhone/iPad/iPod with one click.
Freely manage iOS data and iTunes backup files on the computer.
Preview and selectively transfer files between iDevice and computer.
Widely support contacts, messages, photos, videos, music, notes, etc.
Terms & Conditions Privacy (UPDATED) License Agreement Uninstall Copyright © 2024 Coolmuster. All Rights Reserved.
feedbackFeedback