"Hi, I need to know how to transfer photos I have on my Macbook Pro to my iPad, via the USB? Please can someone help? Thanks! I'm new to Apple computers and the iPad."
- From Apple Support Community
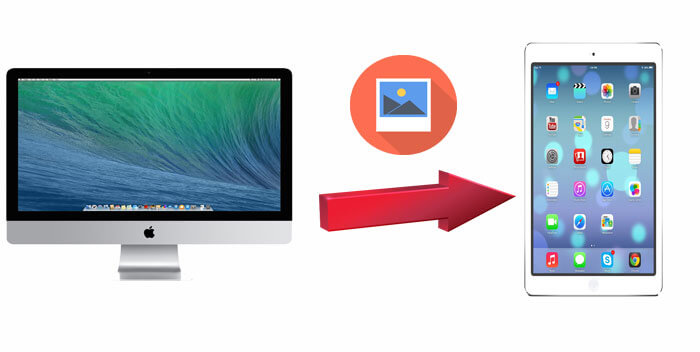
If you have a lot of photos stored on your Mac and want to access them wherever you go, you can transfer photos from your Mac to your iPad. But how do you do it? Transferring photos between a Mac and an iPhone or iPad can sometimes be tricky. But don't worry! In this guide, we'll walk you through five easy ways to move photos from a MacBook Pro, MacBook Air, or iMac to an iPad, whether or not you want to use iTunes. These methods also work for transferring photos from an iOS device to a computer.
At the thought of transferring photos from one Apple device to another, the first reaction for many people is to use iTunes. It is an official tool provided by Apple that helps users easily transfer photos from a Mac to an iPad. However, using iTunes to sync photos can lead to data loss on the target device. Exis ting media files on the iPad will be replaced by the items being synced.
If you don't mind, here is how to transfer pictures from MacBook to iPad using iTunes:
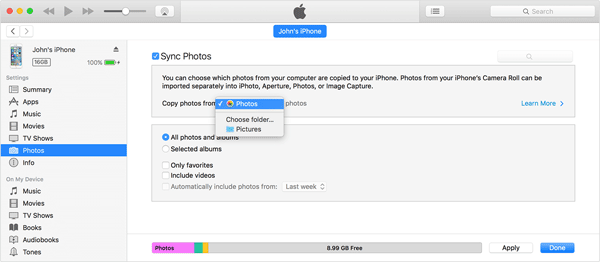
Step 1. Before we start, you should make sure you are using the latest iTunes version.
Step 2. Then, start the latest iTunes. Plug your iPad into a Mac with a USB cable.
Step 3. Choose "Photos" on the left sidebar to tick the "Sync Photos". Then, set or create a folder to export photos to iPad.
Step 4. You are required to choose "All photos and albums" or "Selected albums". Next, press "Apply" to transfer pictures from Mac to iPad.
In macOS Mojave and earlier, you can use iTunes to transfer photos from a Mac to an iPad. For Macs running macOS Catalina and later, iTunes has been replaced by Finder for this purpose. To copy photos from a Mac to an iPad using Finder in macOS Catalina and later:
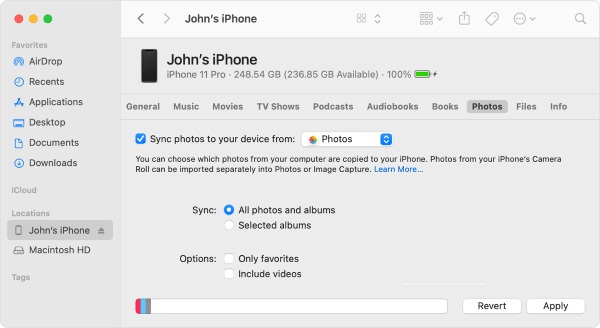
Step 1. Open Finder and connect your iPad to your Mac with a USB cable.
Step 2. Unlock your iPad and trust the computer; enter your passcode if prompted.
Step 3. In Finder, select your iPad and choose the category you want to share, such as Photos, Music, Movies, or TV shows.
Step 4. Check the "Sync" option and select the files you wish to transfer.
Step 5. Click "Apply" to begin transferring the files to your iPad.
If you don't want to use iTunes, the most effective and easiest way is using iPad Data Transfer. It is a powerful data management tool that helps users transfer data between iOS devices and computers. It supports various file formats and features a user-friendly interface, making it ideal for users who need to transfer photos in bulk without relying on iTunes.
Highlights of iPad Data Transfer:
Here is how to transfer pictures from Mac to iPad using this iPad Data Transfer:
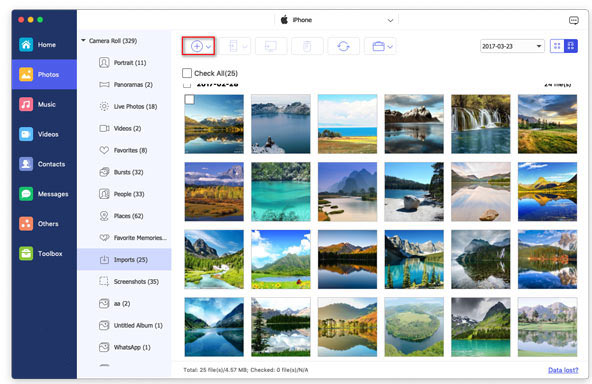
01Click the download button below to download the Mac version of this tool to your computer. Then, launch it.
02Plug your iPad into your MacBook with a USB cable. After the automatic detection, several data categories will show on the interface below.
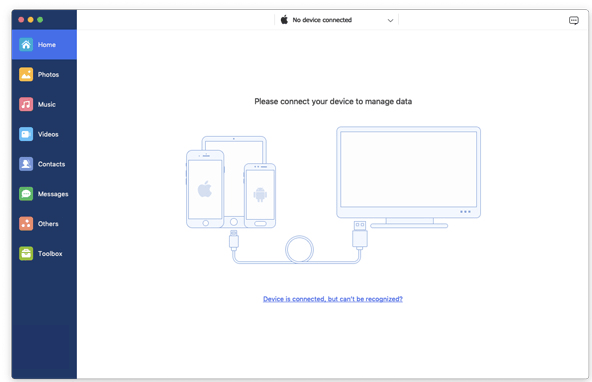
03Hit "Photos" and touch "+" in the top menu, browse for the pictures on your Mac that you want to upload, and transfer them to your iPad.
AirDrop is a wireless feature that lets you transfer photos from your Mac to your iPad effortlessly. It’s a file-sharing tool available on iPhone, iPad, iPod Touch, and Mac. Once AirDrop is turned on, you can easily share photos, videos, contacts, locations, websites, and more between your devices. (Is AirDrop stuck on waiting?)
Here is how to transfer photos from Mac to iPad via AirDrop:
Step 1. On your Mac, navigate to "Finder" > "Go" > "AirDrop" to enable Wi-Fi & Bluetooth to switch on AirDrop on Mac. Then opt for "Allow to be discovered by" as "Everyone" or "Contacts Only".

Step 2. On your iPad, slide up from the bottom of the device screen to enter into Control Center. Next, hit "AirDrop" and set the iPad to be discovered by "Everyone" or "Contacts Only" as above.
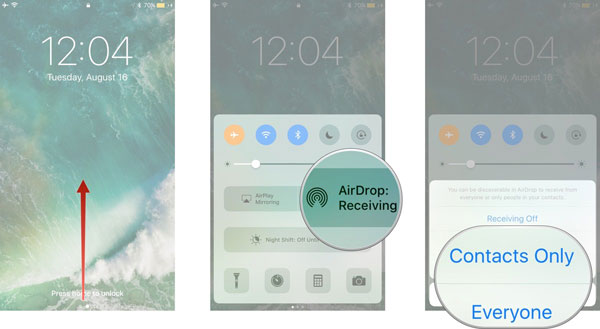
Step 3. To transfer photos from your Mac to your iPad:
If you are a Windows or Android user, are there AirDrop similar apps to transfer files? Read the following article to find the best AirDrop alternatives.
[2025 Updated] Top 10 AirDrop Alternatives for Windows/AndroidAnother way to wirelessly transfer photos from your Mac to your iPad is by using iCloud. iCloud syncs your photo library through Wi-Fi, allowing you to easily move photos between devices. Just make sure you're logged into the same Apple ID on both your Mac and iPad, and that you have enough iCloud storage space to hold all the photos you want to transfer.(iCloud storage is not enough?)
Here is how to export photos to iPad from Mac with iCloud Photos:
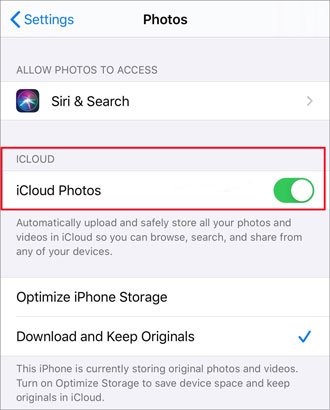
Step 1. On your iPad, Open "Settings" > tap your name > select "iCloud". Choose "Photos" and make sure "iCloud Photos" is enabled.
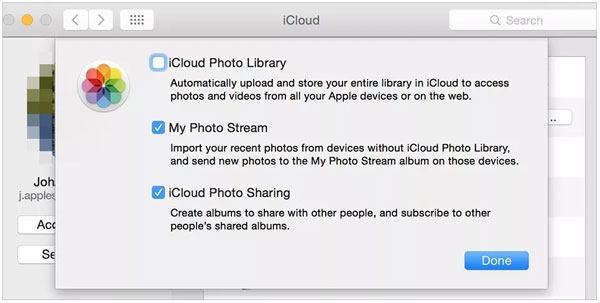
Step 2. On your Mac, click the Apple menu and select "System Preferences" > go to "iCloud" and sign in.
Step 3. Click "Options" next to "Photos" and check the box for "iCloud Photos". This will upload all the photos in the Photos app on your Mac to iCloud.
Once syncing is complete, you can access these photos from the Photos app on your iPad.
Sending photos via email is also a simple and straightforward method, suitable for quick transfers of a small number of photos. It doesn't require additional software or hardware support, but it may be limited by attachment size restrictions.
Here is how to send photos from Mac to iPad with iTunes:
Step 1. Open the Mail app on your Mac and compose a new email.
Step 2. Attach the photos you want to transfer to the email and send them to your own email address.
Step 3. Open the Mail app on your iPad, download the attachment, and save it to the Photos app.

The above 5 methods aim at how to transfer photos from Mac to iPad. Have you got the point? These solutions are summed up from the most commonly used ways of transferring photos between iDevices by Apple users. I believe you must be able to try them with ease. After all, sending photos and other files between Apple devices is relatively simple. Of these methods, personally, I prefer the first method - iPad Data Transfer. It supports the transfer of many files other than photos, and it is easy to operate, and there is almost zero negative feedback.
I hope these methods help you transfer photos from your Mac to your iPad smoothly. Whichever method you choose, I hope you enjoy a convenient experience.
Related Articles:
How to Transfer Files from Mac to iPad? 6 Ways for You
[Guide] How to Transfer iPad Photos to Mac via USB and Wirelessly?
Top 8 Ways on How to Transfer Files from PC to iPad (Step-by-step)
How to Transfer Videos from Mac to iPad? (Step-by-step Tutorial)


 Free Download for Mac
 Free Download for PC

