Putting an iPhone into Recovery Mode is a common solution when the device is not working properly. Many users encounter situations where their iPhone gets stuck on the Apple logo, fails to update, or cannot be recognized by a computer. In these cases, Recovery Mode allows the system to communicate with iTunes or Finder so that iOS can be repaired or reinstalled.
Recovery Mode plays an important role in fixing serious system issues. Knowing when and how to use it can save time and help avoid unnecessary device replacement. In the following sections, you'll learn what Recovery Mode is, when it is needed, and how to put your iPhone into Recovery Mode step by step.
iPhone Recovery Mode is a special troubleshooting state designed to fix serious iOS system issues. When an iPhone enters Recovery Mode, it can communicate with iTunes or Finder even if the system cannot start normally. This allows users to update or restore iOS when standard methods fail.
You may need to put your iPhone into Recovery Mode in the following situations:
Recovery Mode is an effective solution for many system-related problems. However, depending on the option you choose, it may result in data loss. For this reason, it's important to understand when to use Recovery Mode before proceeding to the next steps.
Before you start, make sure you have a computer ready. On macOS Catalina or later, use Finder. On Windows or older macOS versions, use iTunes. Connect your iPhone to the computer with a USB cable and keep it connected during the process.
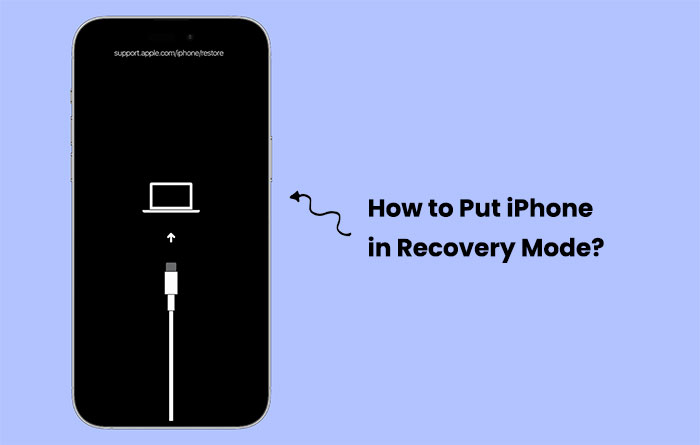
(iPhone 8, X, XR, XS, 11, 12, 13, 14, 15 and later)
Once the screen appears, release the button. Your iPhone is now in Recovery Mode.
If done correctly, iTunes or Finder will detect the iPhone in Recovery Mode.
(iPhone 6s, 6, 5s, SE 1st generation, and earlier)

At this point, the device has successfully entered Recovery Mode and is ready for further actions.
After entering Recovery Mode, iTunes or Finder will prompt you to "Update" or "Restore" the iPhone. In the next section, we'll explain what to do after your iPhone enters Recovery Mode and how to choose the right option without unnecessary data loss.
After your iPhone enters Recovery Mode, iTunes or Finder will display a message saying there is a problem with the device and offer two options: "Update" or "Restore". Choosing the right option is important, as it can directly affect your data.
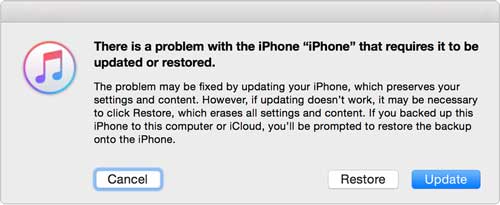
The "Update" option attempts to reinstall iOS without erasing your personal data. It is recommended as the first step when your iPhone has system issues but still contains important data. During this process, iTunes or Finder will download the latest iOS version and try to fix the system while keeping your files intact.
However, Update does not always work. If the system problem is serious or the update fails repeatedly, you may be forced to choose another solution.
The "Restore" option completely erases the iPhone and installs a fresh copy of iOS. This method is often used when Update fails or the device cannot function normally at all. While Restore is more effective for fixing severe issues, it will delete all data on the device unless you have a backup.
Because Restore carries a high risk of data loss, many users look for safer ways to recover or back up their data before proceeding. In the next section, we'll explain why an iPhone data recovery program can be helpful in these situations.
When you use Recovery Mode and then choose Restore in iTunes or Finder, all data on the iPhone can be erased. Even choosing Update does not guarantee that important files like contacts, photos, messages, or notes will be preserved. In situations where iPhone data is missing or inaccessible after a system restore-or if you didn't back up before attempting repair-a dedicated data recovery program can help you retrieve or extract important files before they are lost for good.
One reliable tool for this purpose is Coolmuster iPhone Data Recovery. It works with iPhone, iPad, and iPod to recover lost or deleted data from the device itself or from backups stored in iTunes and iCloud, giving you a second chance to save valuable content after a system issue.
Key Features of Coolmuster iPhone Data Recovery
How to use Coolmuster iPhone Data Recovery to recover lost data from iPhone:
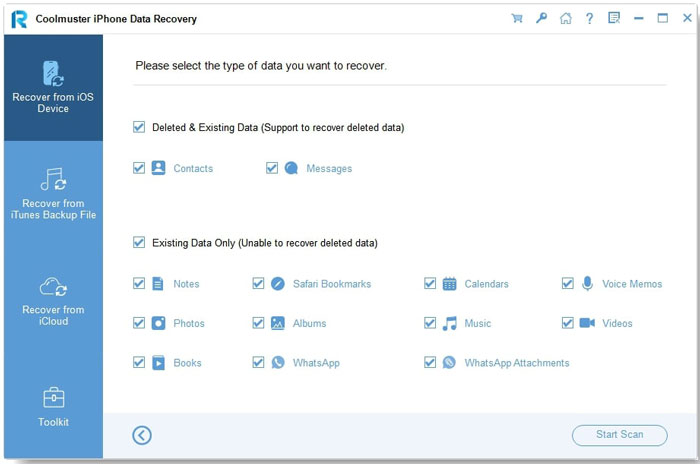
01Install Coolmuster iPhone Data Recovery on your computer (Windows or Mac). Select either Recover from iOS Device, Recover from iTunes Backup, or Recover from iCloud Backup, depending on where your data may be located.

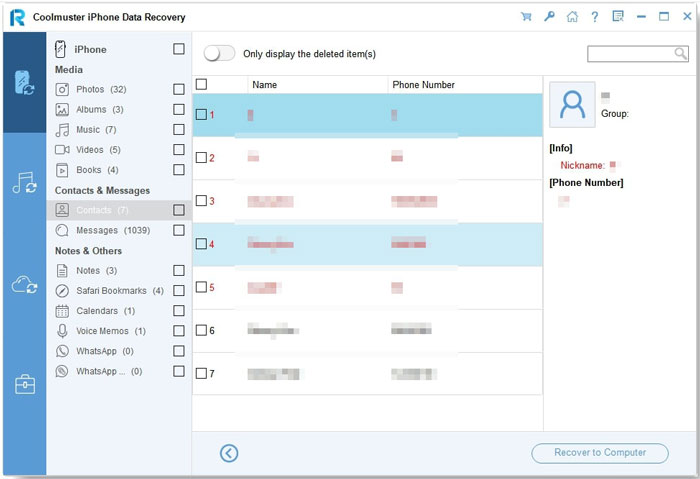
02Choose the types of data you want to retrieve and click Start Scan to let the program analyze your device or backup. After scanning, preview recoverable items-both deleted and existing.
03Select the files you want and click Recover to Computer to save them to a safe location.
Video Guide:
Q1. Does recovery mode erase iPhone data?
Recovery Mode itself does not erase iPhone data. Data loss depends on the option you choose after entering Recovery Mode. If you select "Update", iOS will try to reinstall the system without deleting personal data. However, choosing "Restore" will erase all content and settings on the iPhone unless a backup is available.
Q2. How long can an iPhone stay in recovery mode?An iPhone can stay in Recovery Mode for a limited time while connected to a computer. If no action is taken or the download takes too long, the device may exit Recovery Mode automatically and restart. In some cases, users may need to re-enter Recovery Mode to continue the process.
Q3. How to exit recovery mode without restoring?
To exit Recovery Mode without restoring, simply disconnect the iPhone from the computer and force restart the device. If the system issue is minor, the iPhone may boot normally. However, if the problem persists, Recovery Mode or other repair methods may still be required.
Q4. What if my iPhone is stuck in recovery mode?
If your iPhone is stuck in Recovery Mode, try force restarting it first. If that doesn't work, updating iOS through iTunes or Finder may help. When standard methods fail, third-party tools or data recovery programs can assist in exiting Recovery Mode or recovering important data before restoring the device.
Recovery Mode is an essential solution for fixing serious iOS issues when an iPhone cannot start or be recognized by a computer. It is especially helpful for problems like failed updates, system crashes, or devices stuck on the Apple logo. When using Recovery Mode, it's best to try the Update option first to avoid data loss.
If restoring the device becomes necessary, preparing a reliable data recovery tool like Coolmuster iPhone Data Recovery in advance can help protect important files. With the right approach, you can resolve iPhone issues more safely and efficiently.
Related Articles:
How to Back Up iPhone in Recovery Mode [Easy Guide]
[Answered] Does Recovery Mode Delete Everything on iPhone


 Free Download for PC
  Free Download for Mac

