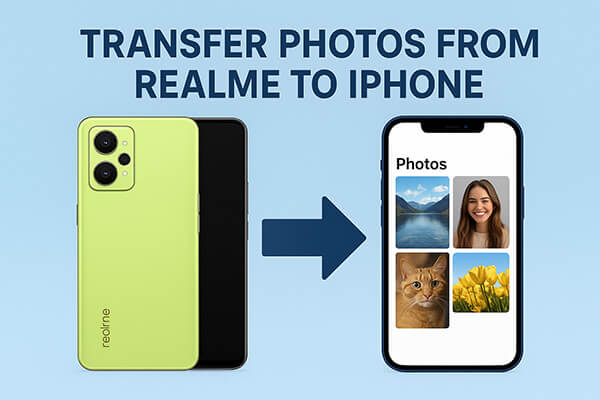
Switching from a realme Android phone to an iPhone is exciting, but transferring important files like photos can be a real concern. Since Android and iOS run on different ecosystems, many users wonder how to securely and efficiently transfer photos from realme to iPhone without losing quality. Fortunately, there are several proven ways to make the process smooth. In this guide, we'll walk you through the best methods and detailed steps to transfer photos from realme to iPhone/iPad.
If you're looking for an efficient, stable, and lossless way to transfer data, Phone Transfer is a highly recommended tool. It supports one-click transfers between Android and iOS devices, allowing you to move not only photos but also videos, music, contacts, and more. It doesn't rely on network speed and ensures no loss in photo quality. Even if you have no technical experience, you can use it with ease.
Main features of Phone Transfer:
How do I transfer photos from realme to iPhone/iPad?
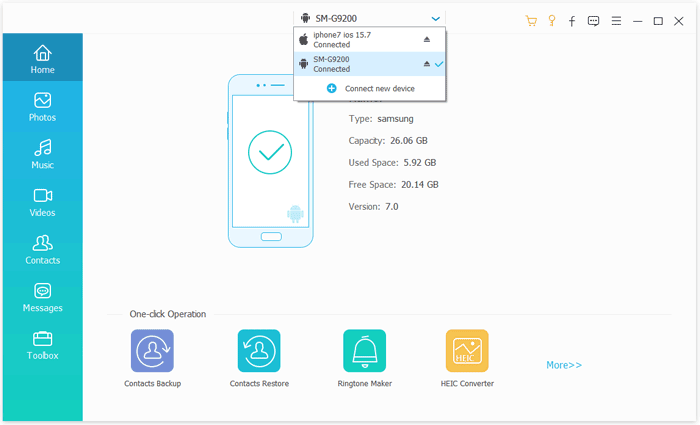
01Download, install, and launch Phone Transfer on your computer. Connect both your realme device and iPhone (or iPad) using USB cables.
02Once both devices are detected, they will appear on the screen. Make sure your realme device is set as the source. If it's not, use the drop-down menu to switch the source and destination devices.
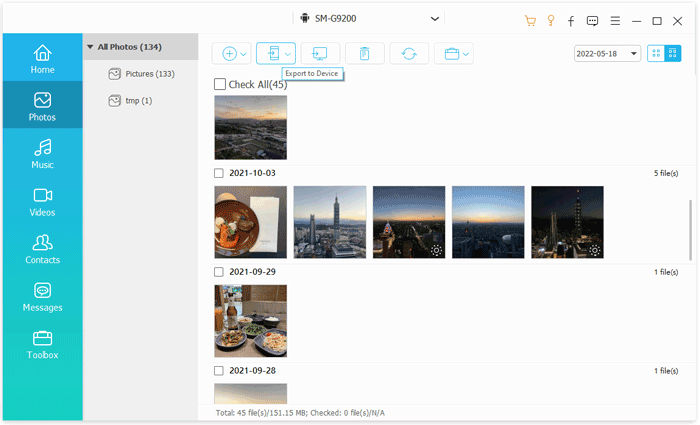
03Select the "Photos" option. Choose the photos you want to transfer, then click "Export to Device". The selected photos will be instantly transferred to your iPhone or iPad.
Apple provides the official Move to iOS app, designed specifically for Android users who want to switch to iPhone/iPad. It allows you to transfer data such as photos, messages, contacts, and more during the initial setup of your new iPhone/iPad. The downside is that this app only works when setting up a new iPhone/iPad and not after you've already been using it.
Here is how to transfer photos from realme to iPhone via Move to iOS:
Step 1. On your realme phone, go to the Google Play Store, search for Move to iOS, and download and install the app.
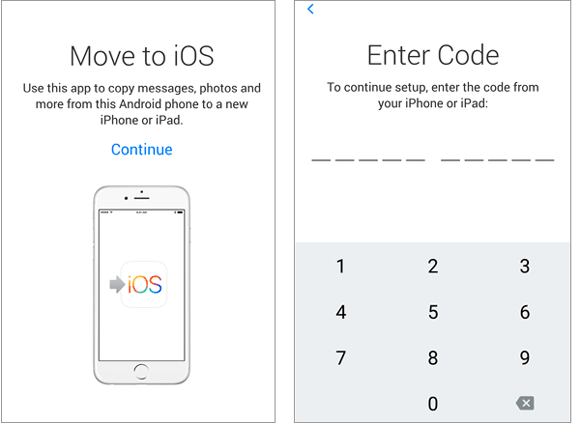
Step 2. Power on your new iPhone/iPad and start the setup process. When you reach the "Apps & Data" screen, select "Move Data from Android".

Step 3. A 6- or 10-digit code will appear on your iPhone/iPad screen. Keep it visible. (Move to iOS code not showing?)
Step 4. On your realme phone, open the Move to iOS app, agree to the terms and conditions, and then tap "Continue". Enter the code displayed on your iPhone/iPad.
Step 5. Once both devices are connected, you will see a list of content types you can transfer. Select "Photos" (and other files if needed), then tap "Next".
Step 6. The transfer process will begin. Keep both devices close together and connected to Wi-Fi until the loading bar on your iPhone/iPad is completed.
Step 7. After the transfer is finished, tap "Done" on your realme phone and continue setting up your iPhone/iPad until you reach the home screen.
If you prefer a cloud-based method, Google Photos is a great solution. By backing up your realme photos to Google Photos, you can easily view and download them on your iPhone/iPad as long as you're signed in with the same Google account. This method is simple and works seamlessly across devices. However, it requires a significant amount of data and is limited by your available Google cloud storage space.
Here is how to sync photos from realme to iPhone/iPad with Google Photos:
Step 1. On your realme phone, download and install Google Photos from the Google Play Store.
Step 2. Open the app and sign in with your Google account. If you don't already have one, create a new Google account.
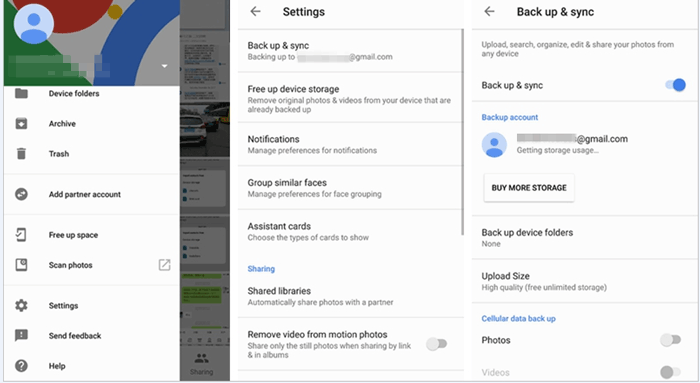
Step 3. In the Google Photos app, go to "Settings" and enable "Back up & sync". This will automatically start uploading all your photos and videos from your realme device to your Google cloud storage. Make sure your phone is connected to a stable Wi-Fi network to avoid excessive mobile data usage.
Step 4. Wait until the upload process finishes. The time required will depend on how many photos and videos you are backing up and your internet speed.
Step 5. On your iPhone/iPad, go to the App Store, download and install the Google Photos app, then log in with the same Google account you used on your realme phone.
Step 6. Once logged in, you can instantly view all your backed-up photos in the Google Photos app. They will be organized by date, just like on your old device.
Step 7. If you want to store certain photos locally on your iPhone, open the photo in Google Photos, tap the three-dot menu, and select Download to save it directly into your iPhone's Camera Roll.
For users who prefer a wireless transfer method without using cables or cloud storage, SHAREit is a handy app. It allows cross-platform file transfer between Android and iOS at much higher speeds than Bluetooth.
Here is how to move photos from realme to iPhone/iPad via SHAREit:
Step 1. On your realme phone, go to the Google Play Store and download the SHAREit app. On your iPhone, open the App Store and install the same app.
Step 2. Launch SHAREit on both devices. Make sure Wi-Fi is enabled on both your realme phone and iPhone/iPad. You don't necessarily need an active internet connection, but both devices must be able to detect each other.
Step 3. On your realme phone, tap the "Send" option, then go to your photo gallery within SHAREit. Select the photos you want to transfer to your iPhone/iPad.
Step 4. After selecting your photos, tap "Next" to allow SHAREit to start searching for nearby devices.
Step 5. On your iPhone/iPad, tap "Receive" in the SHAREit app so that it becomes discoverable to your realme device.
Step 6. Once your iPhone/iPad appears on your realme phone's screen, tap the device name to connect. Accept the connection request on your iPhone if prompted.
Step 7. The transfer will begin immediately. Keep both devices close to ensure a stable connection until the photos are completely sent.
Step 8. When the transfer finishes, open SHAREit on your iPhone to view the photos. You can then save them to your iPhone's Camera Roll for easy access in the Photos app.

If you only need to transfer a few photos, the simplest method is to send them via email. While it's not suitable for large files due to attachment limits, it's quick and requires no additional apps.
Here is how to send photos from realme to iPhone/iPad using email:
Step 1. Open the "Gallery" app on your realme phone and select the photos you want to transfer.
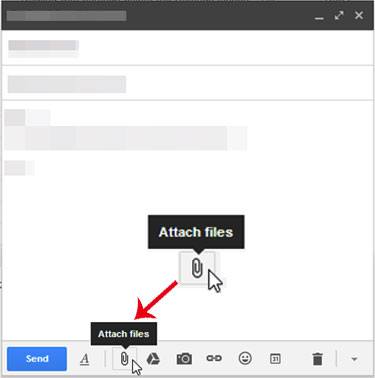
Step 2. Tap the "Share" button and choose "Email" or your preferred email app (e.g., Gmail).
Step 3. In the new email page, enter your own email address in the recipient field, so you can receive the photos on your iPhone.
Step 4. Tap "Add Attachment" and confirm that the selected photos are attached to the email. If the file size is too large, you can either compress the images or send them in multiple emails.
Step 5. Enter a subject for the email (e.g., "Transfer Photos to iPhone") and tap "Send".
Step 6. Open the "Mail" app on your iPhone or log in to the same email account using Safari/Chrome.
Step 7. Find the email you just sent and tap on the photo attachments.
Step 8. In the preview screen, tap "Save Image", and the photos will be automatically saved to your iPhone's "Photos" app.
There are multiple ways to transfer photos from realme to iPhone/iPad: Apple's Move to iOS is great for new iPhone setups, Google Photos offers a cloud-based approach, SHAREit works for quick wireless transfers, and email is convenient for small file sharing.
However, if you want the fastest, safest, and most efficient method for bulk photo transfer, the best solution is Phone Transfer. With just a few clicks, you can move all your photos and other data from realme to iPhone/iPad without hassle.
Related Articles:
[Step-by-Step Guide] How to Transfer Text Messages from realme to iPhone?
How to Transfer from iPhone to realme: 4 Easy Ways Explained
How to Transfer Music from realme to iPhone with/without iTunes?
How to Transfer Photos from realme to Computer with 5 Proven Ways


 Free Download for PC
  Free Download for Mac

