TL;DR: Learn how to zoom in on a video with 5 simple methods. This guide covers Video Converter Ultimate, CapCut, VLC, iMovie, and Clideo, helping you enlarge video areas, create zoom effects, and maintain high quality. Choose the best method based on your needs, whether for professional editing, social media videos, or quick online adjustments.
To highlight specific details in a video, focus on facial expressions, or create more engaging visual effects, zooming in on a video is a very useful editing technique. This article will introduce 5 effective methods on how to zoom in on a video. Whether you are a beginner or a professional video creator, you can find a solution that works best for you.
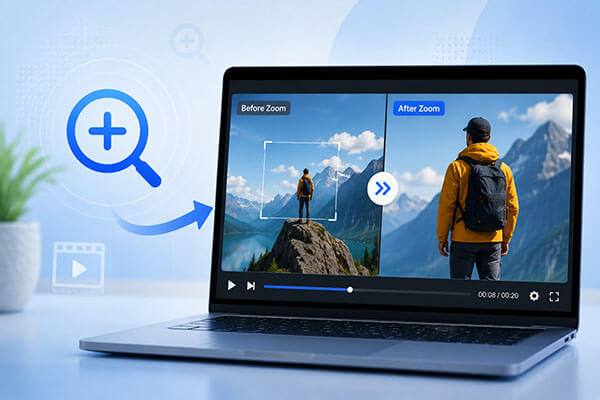
If you need a simple and efficient way to zoom in on a video, Video Converter Ultimate is a great choice. It allows you to zoom, crop, enhance video quality, and convert formats while keeping the original quality. You can easily enlarge specific areas, such as faces, products, or key objects, and it supports over 1,000 video formats for flexible editing.
The highlights of Video Converter Ultimate:
Here is how to zoom in on a video without losing quality:
01Download and install Video Converter Ultimate, then launch the program. Click the "Add Files" button to import the video you want to zoom in.
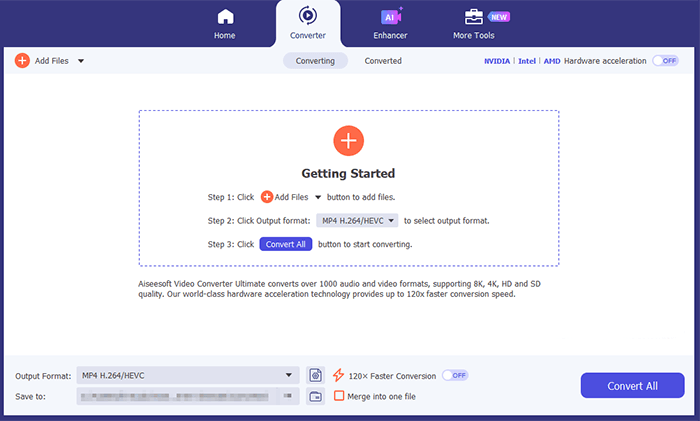
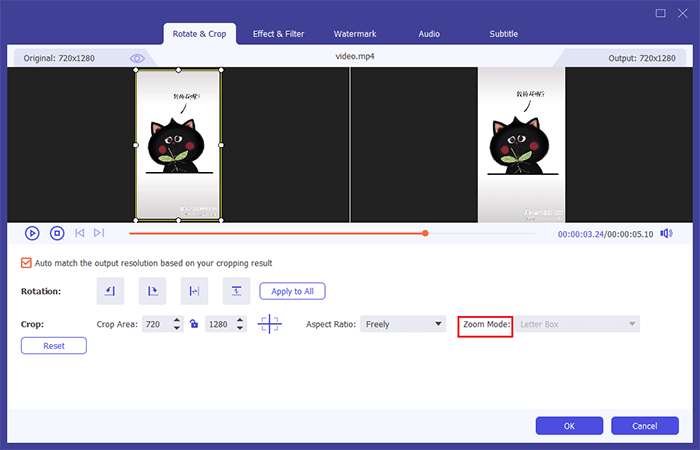
02lick the "Edit" button and open the "Rotate & Crop" window. Go to the "Crop" section and choose your preferred aspect ratio, such as 16:9, 4:3, 1:1, or 9:16. You can also select "Freely" to manually adjust the crop area and zoom in on a specific part of the video.
03Under "Zoom Mode", select "Full" to enlarge the selected area and fill the screen. Preview the zoom effect, adjust the settings if needed, then click "OK" to save the changes. Finally, export the video with the zoomed-in effect.
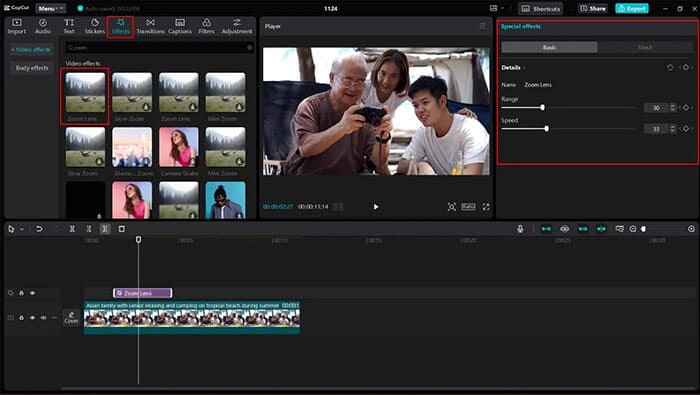
CapCut is one of the most popular video editing tools today, especially for creating short videos for TikTok, Instagram Reels, and YouTube Shorts. It offers an easy-to-use zoom feature, so even beginners with no professional editing experience can quickly create a zoom-in effect. In addition to zooming, CapCut also includes other editing tools such as cropping, transitions, video filters, and special effects.
Here is how to zoom in on a video in CapCut PC:
Step 1. Open CapCut Desktop and create a new project. Click the "Import" button to upload the video you want to edit. Once imported, drag the video clip to the timeline.
Step 2. Move the playhead to the point where you want the zoom effect to begin. Click "Effects" and search for "Zoom". Choose a zoom effect, such as "Optical Zoom" or "Zoom Lens", then drag it onto the video clip in the timeline.
Step 3. Adjust the zoom intensity and speed based on your needs. You can also modify the scale settings to create a smoother zoom-in effect. For a more natural transition between clips, apply zoom effects between scenes and adjust the start and end points by dragging the effect edges.
Step 4. When finished, click "Export" to customize settings like resolution and format. Preview the final result, then export the video and share it on your preferred platforms.
VLC Media Player is a free and open-source media player. Although it is mainly used for playing videos, it also provides a simple zoom feature. If you only want to enlarge a specific area while watching a video instead of permanently editing the video file, VLC is a convenient option. However, VLC's zoom function is mainly for adjusting the viewing experience during playback and does not modify the original video file. (How to compress a video using VLC?)
Here is how to zoom in on a video using VLC:
Step 1. Open VLC Media Player and play the video you want to zoom in on.
Step 2. Click "Tools" in the top menu and select "Effects and Filters".
Step 3. Go to the "Video Effects" tab and open the "Geometry" section.
Step 4. Check the "Interactive Zoom" option. A zoom window will appear on the video screen.
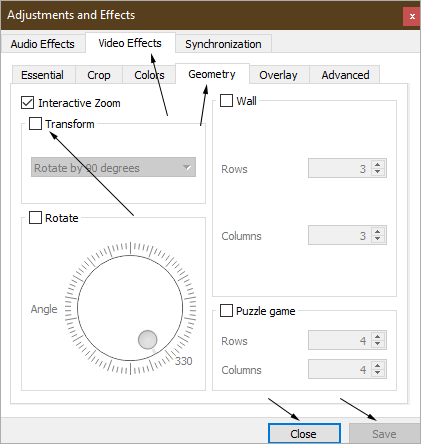
Step 5. Use the zoom controls to enlarge the video and move the selection box to focus on the area you want to view.
Step 6. Adjust the zoom level and position until you get the desired view. When finished, uncheck "Interactive Zoom" to return to the normal playback mode.
iMovie is a popular free video editing software for Apple users, available on Mac, iPhone, and iPad. It includes the Ken Burns effect, which makes it easy to create zoom-in and pan effects. iMovie's zoom feature is ideal for creating travel videos, family recordings, and simple video projects.
Here is how to zoom in on videos on iPhone/Mac in iMovie:
Step 1. Open iMovie on your Mac, iPhone, or iPad and create a new project. Import the video clip you want to edit and drag it to the timeline.
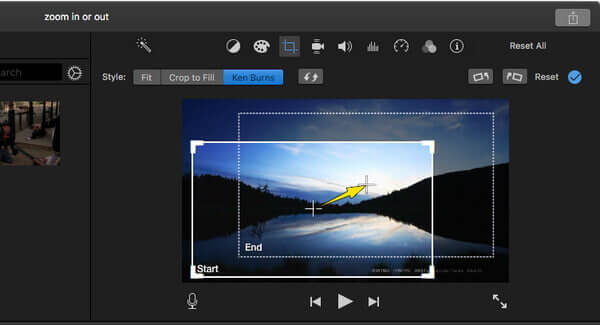
Step 2. Select the video clip in the timeline, then click the "Crop" button above the preview window. Choose the "Ken Burns" option to enable the zoom effect.
Step 3. Set the "Start" and "End" frames. Adjust the Start frame to choose the initial view and resize it to define where the zoom begins. Then adjust the End frame to select the area you want to zoom in on.
Step 4. Preview the effect to check the zoom movement. Adjust the frames if needed until you get the desired result.
Step 5. Click the "Apply" button or return to the timeline to save the changes. When finished, export the video by clicking "Share" and selecting your preferred output option.
If you don't want to install any software, you can use an online video editor like Clideo to zoom in on a video. Online tools are ideal for quickly editing small video files—you simply upload your video and adjust the zoom area. However, because they rely on an internet connection, upload and export speeds may vary, and the free version usually comes with certain limitations.
Here is how to zoom in on a video online for free with Clideo:
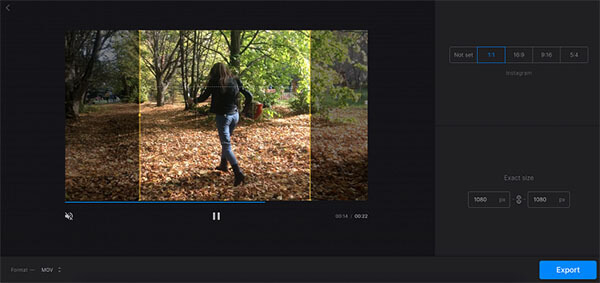
Step 1. Open Clideo's Video Zoomer in your web browser and click the " Choose File" button to add a video from your device. If your video is stored in a cloud service, open the drop-down menu on the right side of the upload panel and choose the platform you want to use.
Step 2. Next, select your preferred aspect ratio from the available options: 1:1, 16:9, 9:16, or 5:4. Adjust the selection box on the video preview by moving or resizing the grid to focus on the area you want to zoom in on. If you need a custom aspect ratio, choose the "Not set" option and enter your desired width and height manually, or adjust the grid freely until it matches your needs.
Step 3. After that, choose an output format. MP4 and MOV are widely supported by most social media platforms, but you can also select from over 20 other formats, including FLV, RMVB, and TS, if needed.
Step 4. Once everything is ready, click "Export" and wait for Clideo to process your video. When the export is complete, click "Download" to save the edited video to your device, Google Drive, or Dropbox.
After learning how to zoom in on a video, you can choose the right method based on your specific needs. If you only want to temporarily view details in a video, VLC Media Player is enough. For Apple users, iMovie is a convenient option. If you are creating short-form videos, CapCut is a great choice. For quick online editing, Clideo provides a simple and efficient solution.
However, if you are looking for a tool that is powerful, easy to use, and capable of maintaining high video quality, Video Converter Ultimate is a more recommended choice. It not only allows you to easily zoom in on videos but also supports video cropping, format conversion, quality enhancement, compression, and many other editing features. With this all-in-one software, you can complete your entire video processing workflow in one place. Whether you are a beginner or an experienced video creator, you can quickly create high-quality videos with ease.
Related Articles:
How to Improve Zoom Video Quality: 8 Easy Ways That Work
How to Add Your Own Sound to TikTok with Ease: 4 Easy Methods
How to Make a Reaction Video for YouTube, TikTok & Instagram
How to Trim Video on Windows 10/11? Solved in 5 Effective Ways




 Free Download for PC
  Free Download for Mac


