Authorizing your computer (Mac/Windows) means that you are giving this computer the permission to access all your files including apps, audiobooks, books, music, movies, and other content, since computers, unlike iPhone, iPad or iPod, are prohibited to access songs and videos purchased or rented through iTunes without authorization. Through iTunes, you can authorize up to 5 computers. Now, let's see how to authorize computer in iTunes.
Before authorizing your computer, you have to make sure iTunes has been downloaded and installed on your computer. If not, you can click here to download the latest iTunes.
Step 1. Open the installed iTunes on your computer, and hold the keys of Control and B on your keyboard to go to the iTunes menu bar. Then choose Store > Authorize This Computer.

Step 2. After that, just enter the next interface by logging into your Apple ID account. And then click Authorize option to finish.

(Note: The tutorial is for Windows users. For Mac users, just choose Store > Authorize This Computer from the menu bar at the top of your computer screen.)
Extra Bonus: How to Know the Number of Authorized Computers?
If you forget how many computers have been authorized, you can follow the below steps to know the number of authorized computers in Tunes:
> Open the installed iTunes on your compute, then sign in your Apple ID account. Then you will see the main interface as pictured in the below.

> Click on your name on the top window to show the drop-down list. Then just choose the "Account Info" option to continue.
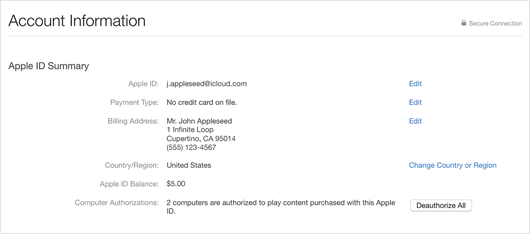
> Enter the password again and then you can clearly know how many computers have been authorized.
When you plan to sell your old computer to buy a new computer or give it away to charity; when you just need to authorize your computer temporarily; when you need to make major upgrades on your computer such as upgrade to Windows 10, you probably need to deauthorize your computers in iTunes before you take these moves so as to make sure that your privacy won't be leaked! In terms of deauthorizing one computer in iTunes, you can:
- Open iTunes on the computer you want to deauthorize.
- Choose Store > Deauthorize This Computer from the menu bar at the top of your computer screen.
- Enter your Apple ID and password as prompted. Finally, click Deauthorize option to confirm your action.

But, if you want to deauthorize computer in iTunes but has no access to your computer. For example, if you sell your old computer before the deauthorization, or if your authorized computer is out of work, you can solve this problem by deauthorizing all computers. As to the detailed steps, just follow the same steps as instructed in the part of how to know the number of authorized computers. Then in the last interface, you will see Deauthorize All Computers option in the right window. Tap on it and wait for the process to complete.
Till now, if you want to authorize or deauthorize computer using iTunes, just follow the steps as introduced in the above. And if you are looking for a reliable manager to organize your iPhone/iPad/iPod files in order, you can have a try of this Coolmuster iOS Assistant to your handy assistant!


Related Articles:


