"My Android phone is not turning on. It just remains at the booting level when I try to put it on, though it was off before for like 8 hours. What should I do?"
- From Quora
Are you experiencing the Android stuck boot screen problem while trying to turn on your Android device? This is one of the most annoying things that can happen to an Android user. This problem can occur at any time without giving you any warning. You will mostly experience this problem when trying to apply new updates or installing applications from an unknown source.
The Android stuck on the boot screen problem can arise from several causes, and some solutions exist. Although troubleshooting this problem might seem complicated, you still get past this problem. Continue reading through this article to learn how to fix an Android device stuck on the boot screen problem.
Why is my phone stuck on the startup screen? Several reasons can make your Android device get stuck at the logo startup screen of your phone. Below are some common causes of the phone stuck at the logo startup screen problem.
Android devices are great because their operating system and applications are highly customizable. An Android device can be flashed, rooted, unblocked, and tinkered with. The Android operating system is one of the most flexible operating systems available.
You will probably face this annoying problem when you change or tinker with the software. Software manipulation and customization can cause a phone to get stuck at the logo startup Screen, as it can lead to an incompatibility between hardware and software or corrupt files. This issue may occur when the phone is not properly shut down or restarted after installing a new program or application, which leaves the corrupted files in place.
Another common cause of phones stuck at the logo startup screen is bad or troublesome applications. If the phone has recently been loaded with apps that are not compatible with its operating system, or if a particularly large app has been installed, it can cause the phone to freeze up during startup.
One potential cause is a software glitch that prevents the phone from completing its startup process or crashes during startup.
If your Android device is stuck on the boot, it could be due to a malfunctioning memory card. The Android phone may be unable to boot up with the faulty card. The memory card stores important system data that allow your device to boot up and operate properly. If this data becomes corrupted or inaccessible, your phone may become stuck at the logo startup screen.
If you've recently performed a factory reset on your Android device only to find it stuck on the boot screen, there are some potential solutions that you can try. Factory resetting may cause Android phones to become stuck on the boot screen due to corrupted or outdated firmware.
Have you been facing the Android stuck on boot screen challenge and wish to know the possible solutions? You can easily apply the methods discussed below to fix an Android phone's stuck-on boot problem. Continue reading to understand more about the possible solutions:
This is the first procedure you should do when your phone is stuck on a boot screen problem. Rebooting the Android phone requires you to hold while pressing the "Power" button until a menu appears. Then choose the "Restart" option. Then, your Android phone will restart itself automatically.
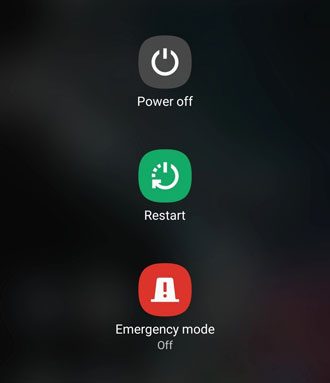
It is vital to ensure that all apps are completely shut down before rebooting your device. After rebooting, if the boot screen persists, then it's likely there is an issue with the operating system or hardware.
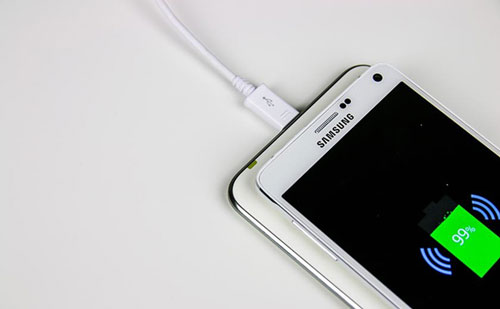
If the Android phone is stuck at the boot screen, it could indicate a power issue. You can try charging your phone to see if this resolves the issue. Connect your charger to the device and plug it into a working wall outlet or USB port. Keep the phone connected until it has charged enough that you can access it again.
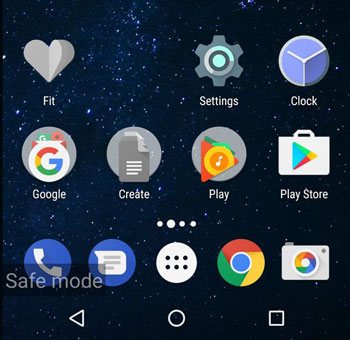
The safe mode feature of Android devices allows you to boot the device and identify potential issues with the operating system. If your phone is stuck on a boot screen, it could be due to a third-party application or something else causing an issue. Entering safe mode can help you diagnose the problem and possibly fix it.
Step 1. Press the "Power" button on your Android device for about 30 minutes until the device powers off completely.
Step 2. After a while, please press the "Power" button on your Android device until the logo appears.
Step 3. Press the "Volume Down" button after the logo appears.
Step 4. Your device will now boot into Safe Mode. You will see "Safe mode" in the bottom left corner of your screen. Then, you can uninstall apps that may have been causing issues and perform a factory reset if necessary.
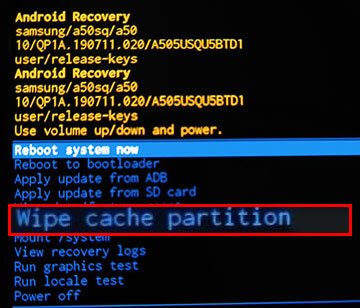
Deleting the cached data may be effective if your Android phone is stuck at the boot screen after a factory reset. Cached data can accumulate over time and cause problems with the proper functioning of your phone. This may also occur after a software update when the new version of the OS does not match the existing cached data. Follow the below steps to learn how you can delete cached data.
Step 1. Press the "Power" button to power off the phone and wait for the device to turn off completely.
Step 2. Press the "Volume Down" and "Power" buttons simultaneously until your Android device turns on.
Step 3. Once you are in "Recovery Mode", navigate to the "Wipe cache partition" option using the "Volume" buttons. Reboot your phone once you have cleared the data and see if the problem is fixed.
Is Android stuck on the boot screen? Please calm down. Factory resetting is the process of restoring an Android device to factory settings. This can help resolve issues with an Android phone, such as when it becomes stuck at the boot screen. Before factory resetting your device, it is important to back up all of your data and files that you want to keep. Once factory resetting is complete, your phone will no longer contain any data it had before the factory reset. Follow the below steps to factory reset the Android phone:
Step 1. Power off the Android phone and enter the "Recovery Mode" by pressing the "Volume Down" and "Power" buttons simultaneously.
Step 2. On the recovery screen, scroll through the menu using the "Volume" buttons. Select the "wipe data/factory reset" button by using the "Power" button to begin the process.
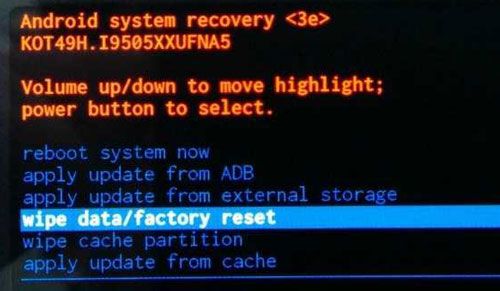
Step 3. Wait for some time for the process to complete. Your device will restart after completing the process, and it will look as new as you bought it.
If you've tried all the common methods and your Android phone is still stuck on the boot screen, it might be time to seek professional help. Professional repair services can help resolve deeper issues that are beyond simple software troubleshooting or factory resets. There could be underlying hardware problems, such as a malfunctioning motherboard or damaged storage, that require expert attention.
Here are a few options for getting professional support:
Authorized Service Centers: The safest route is to contact your phone's manufacturer or an authorized service center. They will have access to specialized tools and resources to diagnose and repair your phone. This could be particularly important if your phone is still under warranty.
Third-Party Repair Shops: If your warranty is expired or you prefer a quicker turnaround, local third-party repair shops are often equipped to handle boot screen issues. Make sure to choose a reputable service provider to avoid further complications.
Customer Support Lines: For some Android brands like Samsung, Google, or LG, you can reach out to their customer support team for troubleshooting advice or remote assistance. They may walk you through advanced steps or suggest repair options.
Online Communities: If you don't have immediate access to professional repair services, online forums and communities like Reddit, XDA Developers, or Stack Exchange often have experienced users who can provide helpful insights or recommend trusted repair centers.
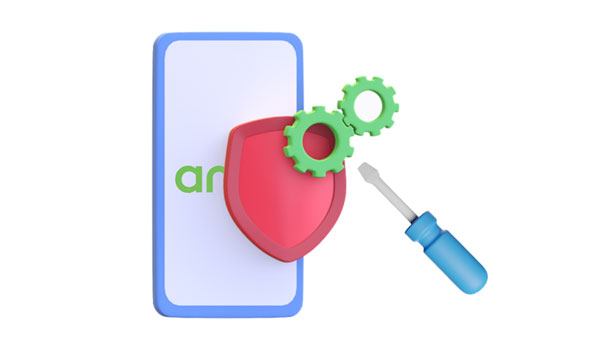
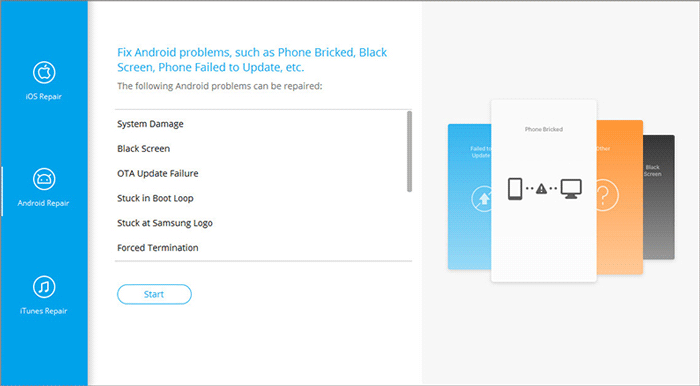
One of the biggest inconveniences that can befall an Android user is when their device gets stuck at the boot screen. It's like having a phone full of potential but unable to get it unlocked and explore all its features. Fortunately, now there's a solution, Android Repair. Perfect for anyone who needs to fix their Android phone stuck at the boot screen. Whether you're a tech-savvy user or a novice, it can help get your device fixed in no time.
Key features of this software
Download this Android repair program.
How do I get past the boot screen with this Android repair software?
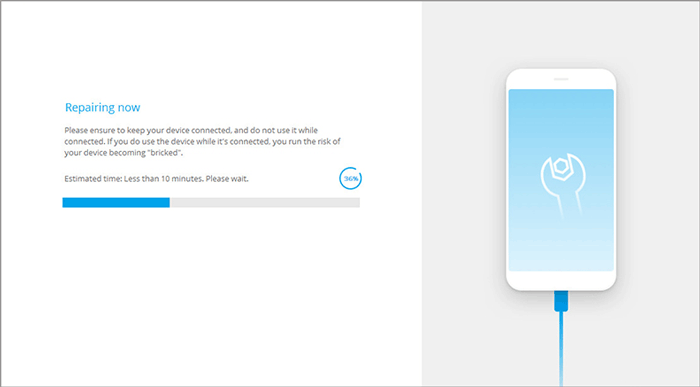
01Connect the Android phone to the computer after you have downloaded, installed, and launched the Android repair toolkit on your computer. Click the "System Repair" button that you will find in the main window. Choose the "Android Repair" option among the three options that appear, and tap the "Start" icon.
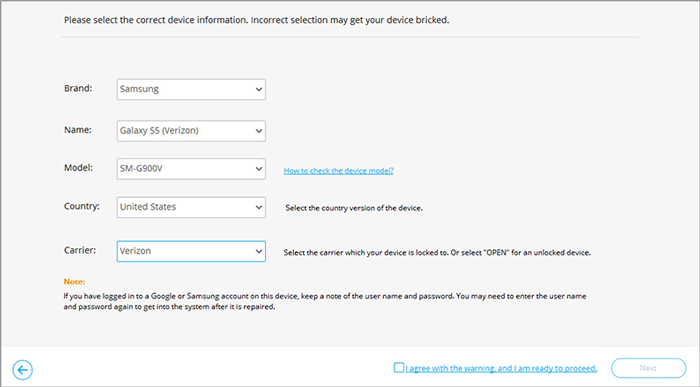
02On the screen that appears, select the correct model, name, brand, carrier details, and country/region, and confirm the details by clicking on the "Next" button. Your device's data might be erased. To proceed, type in "000000".
03Follow the guide on the interface to boot your Android device into "download mode" before repairing it. Click on the button named "Next" to begin downloading the firmware. The program will automatically start repairing your Android device once the firmware has been downloaded.
It's a good idea to be prepared and know how to fix an Android phone stuck on the boot screen. While you can do this in various ways, Android Repair is undoubtedly one of the easiest and most secure options. Its simple step-by-step guide and powerful features will help you get your Android device back and running in no time.
Related Articles:
How to Fix Android Boot Loop with Top 8 Solutions [Updated in 2026]
Samsung Stuck on Logo: Causes and 6 Effective Solutions to Fix It


 Free Download for PC

