"It has a message saying Phone not allowed for voice... why? And how do I remedy this?"
- From Android Community
When using an Android phone, you may suddenly encounter the error message "Phone Not Allowed for Voice". This prompt is frustrating because it directly prevents you from making or receiving voice calls, one of the most basic functions of a mobile phone. Many users mistakenly think this is a hardware failure, but in fact, it is mostly caused by software settings, SIM card issues, carrier restrictions, or device locks. This article will first analyze the common causes of this error, then provide step-by-step solutions to help you resolve the problem efficiently and restore normal voice call functionality.
The error "Phone Not Allowed for Voice" on Android phones essentially indicates that your device is restricted from accessing the carrier's voice call service. Below are the most common reasons for this issue:
Based on the above causes, we provide 8 step-by-step solutions, from simple to complex, to help you resolve the issue quickly. It is recommended to follow the order of the steps to avoid unnecessary operations.
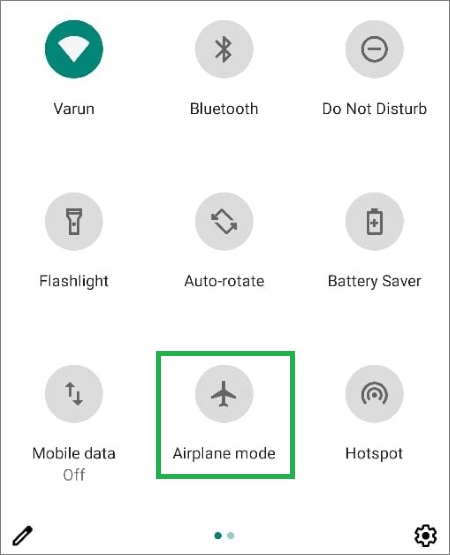
Airplane Mode is the most common cause of the "Phone Not Allowed for Voice" error. You can turn it off in two simple ways:
Method 1. Swipe down from the top of the screen to open the notification panel, find the "Airplane Mode" icon, and tap it to turn it off (the icon will change from highlighted to gray).
Method 2. Open "Settings" > select "Network & Internet" > find "Airplane Mode" and toggle the switch to the off position.
After turning off Airplane Mode, wait 1-2 minutes for the phone to reconnect to the carrier network, then try making a voice call to check if the issue is resolved.
Abnormal network settings or weak signals will affect the voice call function. You can check and adjust as follows:
Check the network signal: Move to an open area (avoid basements, elevators, or areas with thick walls) and check the signal bar in the upper right corner of the screen. If the signal is 1 bar or "Emergency Calls Only", it means the signal is too weak to make voice calls. Wait for the signal to recover or move to a place with a better signal.
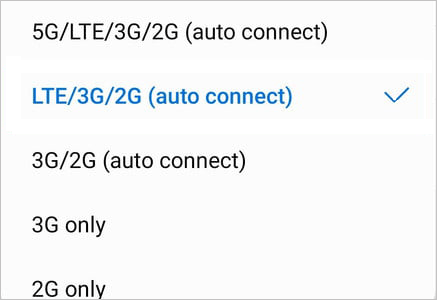
Adjust the network mode: Open "Settings" > "Mobile Network" > "Preferred Network Type". It is recommended to select "LTE/TD-SCDMA/GSM (Auto)" or "4G/3G/2G (Auto)". Do not select "Only 4G" or "Only 5G", because pure 4G/5G mode may not support voice calls (some carriers require VoLTE to be enabled for 4G voice calls).
Enable VoLTE (if supported): Open "Settings" > "Mobile Network" > find "Enable VoLTE HD Call" and toggle the switch to the on position. Note that some carriers need to activate the VoLTE service in the business hall first.
Temporary system glitches (such as abnormal operation of the call module) can be resolved by restarting the phone. Restarting can clear the phone's running memory and restore the normal operation of each functional module.
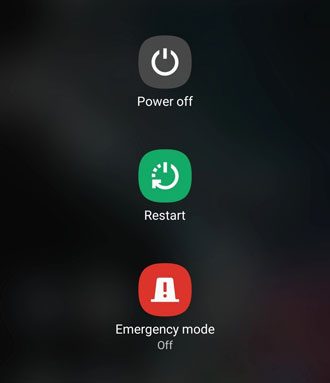
Just press and hold the "power" button of the phone until the power menu appears, select "Restart", and wait for the phone to restart automatically. After restarting, try making a voice call to check if the issue is resolved.
SIM card looseness, damage, or incompatibility is a common cause of voice call restrictions. You can troubleshoot by reinserting or replacing the SIM card:
Reinsert the SIM card: Turn off the phone > use the SIM card ejector to open the SIM card slot > take out the SIM card > gently wipe the metal contacts of the SIM card with an eraser (to remove dust or oxidation) > reinsert the SIM card firmly > turn on the phone. After booting, check if the voice call function is normal.
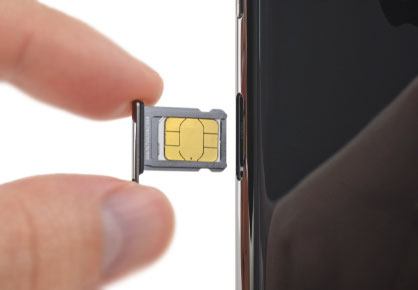
Check for SIM card damage: Observe the SIM card for scratches, cracks, or deformation. If the SIM card is damaged, go to the carrier's business hall to replace it with a new one (the phone number remains unchanged).
Replace with a normal SIM card: Insert a SIM card that can make normal voice calls into your phone. If the voice call function is restored, it means the original SIM card is abnormal; if not, the problem may be with the phone itself.
Outdated Android system versions may have bugs that cause conflicts with the voice call function, leading to the "Phone Not Allowed for Voice" error. Updating the system to the latest version can fix these bugs and improve the stability of the phone's functions.
Step 1. Open "Settings" > select "System" > "System Update" > the phone will automatically check for available updates.
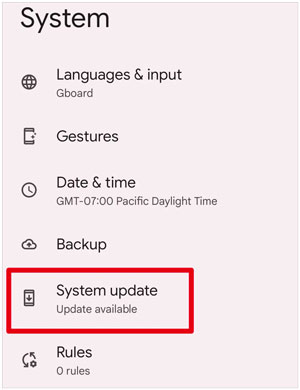
Step 2. If there is an update, click "Download and Install" (ensure the phone has sufficient power and network traffic). After the update is completed, the phone will restart automatically. Then check if the voice call function is normal.
If your phone is a carrier-locked device or the IMEI number is blacklisted, the voice call function will be restricted. You can check and confirm as follows:
Check the IMEI number: Dial *#06# on the phone, and the phone will display the IMEI number (a 15-17 digit number). Record this number.
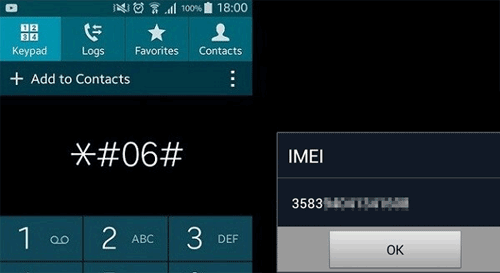
Contact the carrier: Call the carrier's customer service, provide your phone number and IMEI number, and ask the customer service to check:
If the IMEI is blacklisted, you need to go through the unblocking procedures as required by the carrier; if it is a carrier-locked device, you can contact the original carrier to unlock it, or use a SIM card of the corresponding carrier.
If you've tried all the previous methods and the issue still persists, the problem may be related to deep system issues, such as corrupted files or system crashes. At this point, using a professional Android system repair tool can be a reliable solution. Tool like Android Repair is specifically designed to fix various Android system problems without requiring technical expertise. This tool can address issues such as network-related failures or the "Phone Not Allowed for Voice" error, restoring the phone to normal functionality.
Key features of Android Repair:
How to use Android Repair to fix "Phone Not Allowed for Voice"?
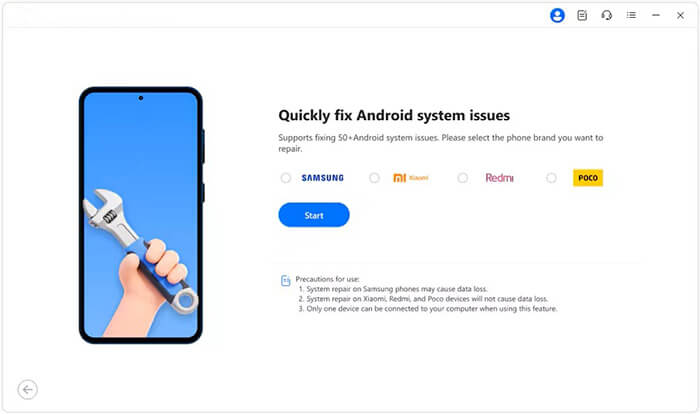
01Launch the Android Repair software on your computer. From the main interface, select the "System Repair" option and then click on Android Repair to access the Android system repair module.
02Use a USB cable to connect your phone to the computer. Once your device is connected, select the "Android Repair" option and then click on "Repair Now" to proceed.
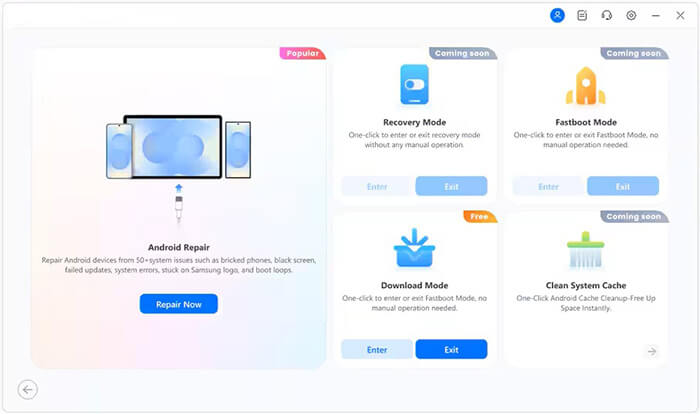
03When prompted, select your device brand and click "Start" to continue. The software will ask for additional device details such as model, country, and carrier.
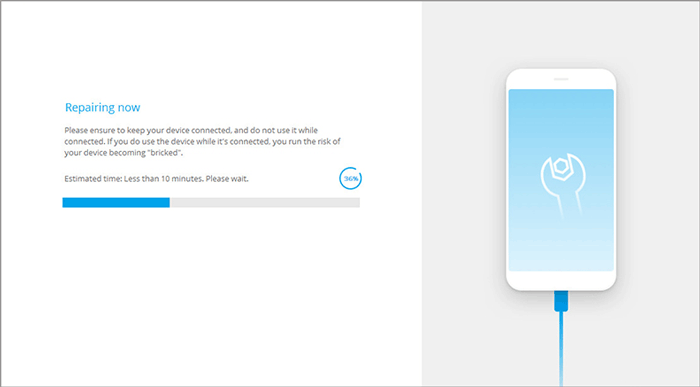
04Follow the on-screen instructions to put your device into Download Mode (Odin Mode). Click "Next" to continue.
05The software will automatically download the correct firmware for your device and begin the repair process. Once done, your phone will restart, and the issue should be fixed.
If all the above methods are tried and the issue still persists, the problem is likely to be on the carrier's side (such as restricted voice permissions, account abnormalities, or network failures). At this time, you need to contact the carrier's customer service for help.
When contacting customer service, you can explain the error message "Phone Not Allowed for Voice" and provide your phone number, IMEI number, and the steps you have tried. The customer service will check the status of your account, voice permissions, and network side, and help you resolve the issue (such as activating voice services, unblocking accounts, etc.).
The "Phone Not Allowed for Voice" issue can be frustrating, but following the troubleshooting steps in this article will help you resolve it in most cases. If the problem persists due to system-related issues, using a professional tool like Android Repair is a reliable solution. It can fix this error and a variety of other system problems without needing technical skills. With Android Repair, you can quickly restore your phone's voice call functionality and enjoy normal use again. If the issue continues, contacting your carrier for assistance is a good next step.
Related Articles:
SIM Card Data Recovery: How to Retrieve Data from SIM Card
How to Fix No Sim Card Error on Android Smoothly? 12 Helpful Solutions
Phone Broken SIM Transfer: How to Switch and Transfer SIM Card Data Safely
Troubleshooting Guide: How to Fix Android Phone Says No Service


 Free Download for PC

 Download for Mac
