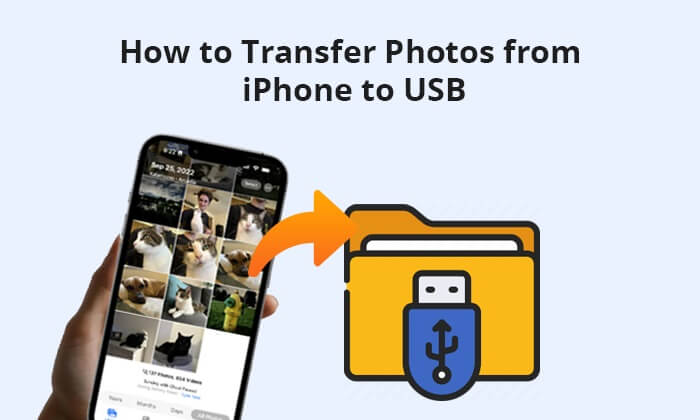
Over time, your iPhone might accumulate thousands of photos and videos, taking up so much space that there's no room left for other apps or data. Deleting important photos could mean losing precious memories. That's why many people consider transferring photos from their iPhone or iPad to a USB flash drive and other external devices. But how can you do this?
Don't worry. While the iPhone doesn't have a standard USB port to directly connect a USB drive, we've found some simple ways to link your iPhone to a USB drive and transfer your data. Let's get started!
As many marvelous ways are completed on a computer, we will introduce how to transfer photos from iPhone to flash drive on a Windows/Mac computer this part. You have got 6 easy options.
To transfer photos from iPhone to flash drive, Coolmuster iOS Assistant is the safest and easiest iPhone photo USB transfer tool. This method does not require a network connection, and the quality of the photos will not be compromised. What's more, compared with other methods, it just needs one click to transfer your photos.
Key Features:
This software supports both Windows and Mac operating systems. Click the download button below to download the correct version to your computer.
Follow the steps below to transfer pictures from iPhone to flash drive using iOS Assistant:
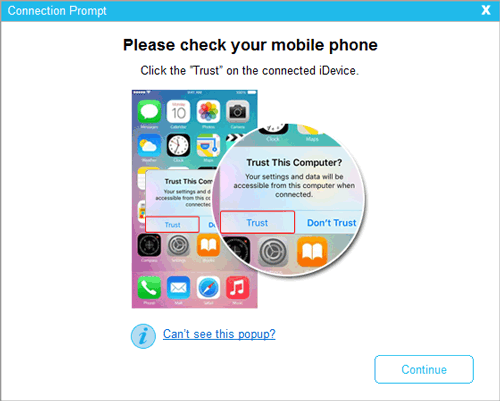
01Launch iOS Assistant, connect your iPhone to the computer with a USB cable and insert the flash drive into the computer's USB port. The program will automatically detect your devices. If a pop-up window appears on your iPhone, hit the "Trust" option on your iPhone and click the "Continue" option on this program to move on.
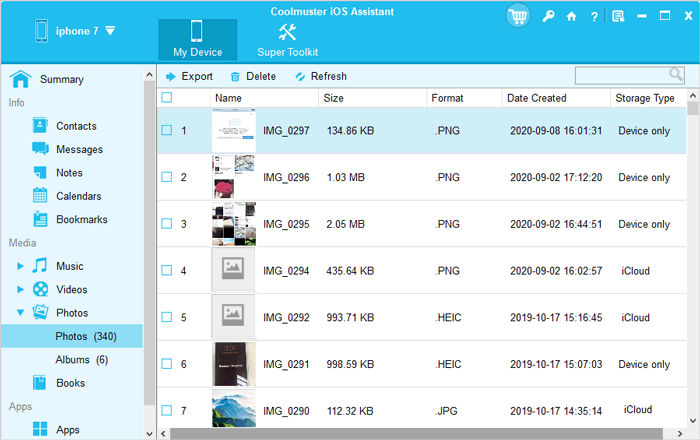
02Once the program detects your devices successfully, all data types will be listed on this program. At present, you can observe the organization of various file folders on the main interface.

03Select the "Photos" option from the left panel, preview, and tick the photos you want to transfer. Next, tap the "Export" option on the top menu and choose the flash drive from the pop-up window to save photos.
Video Tutorial:
iCloud is another way to import iPhone photos to USB. Of course, you cannot directly transfer photos from iPhone to memory stick with iCloud. Instead, you need to sync iPhone photos to iCloud, download iCloud photos to your computer, and move them from the computer to the flash drive. Sounds complicated. Anyway, if you select this way, you will have to be patient enough. Here is how to transfer photos from iPhone to USB stick via iCloud:
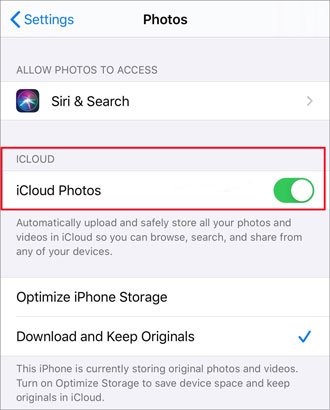
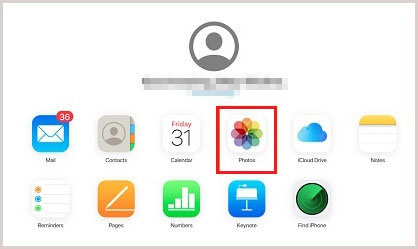
Step 1. Navigate to "Settings" and access your profile, then go to "iCloud". Select "Photos" and activate the "iCloud Photos" option. Once enabled, your photos and videos will be automatically backed up to iCloud. Allow some time for the backup process to conclude.
Step 2. Sign in to iCloud on your Mac or Windows PC and click on "Photos". Locate the photos you wish to transfer to a USB drive and download them.
Step 3. Insert the USB drive and commence the copying and pasting of photos onto the USB drive. Please be patient and wait for the transfer process to reach completion.
The built-in Photos application on both Windows and Mac can also assist you in exporting Camera Roll photos from your iPhone to your computer. Subsequently, you can save them to an external USB drive. Here is how to transfer photos from iPhone to thumb drive using the Photos app:
For Windows:
Step 1. Connect your phone, unlock it, and click "Trust". If prompted, enter the password to establish trust with this computer.
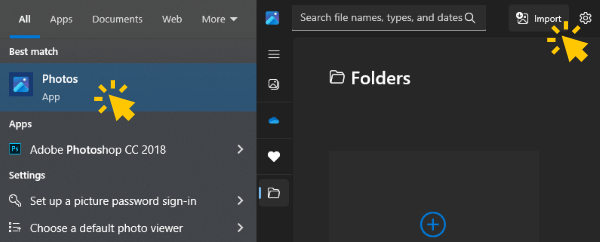
Step 2. Click on "Import" and choose "From a USB device". The software will automatically detect your iPhone photos; please wait for a few minutes.
Step 3. Choose the photos you wish to exclude from the import process, as all new photos are selected by default. Click "Import Selected". Once the operation reaches 100% completion, you can find the imported photos in your Pictures folder.
For Mac:
Step 1. Connect your iPhone to your Mac with a USB cable, and make sure that you have the latest version of iTunes on your Mac.
Step 2. The Photos app will automatically launch. If it doesn't, you can manually open it. Then, click the "Import" option, select the photos you want to transfer, and tap the "Import Selected" or "Import All New Photos" option to bring them onto your computer.
Step 3. To transfer photos to the flash drive, connect the USB flash drive to your Mac, find it in Finder, and open it. Next, run another Finder window, navigate to the "Pictures" option, and open the "Pictures" folder. Then, copy and paste the photos to the flash drive.

For MacBook users, you can also utilize the native Image Capture software to transfer iPhone photos to a USB flash drive. Here is how to transfer photos from iPhone to USB flash drive with Image Capture:
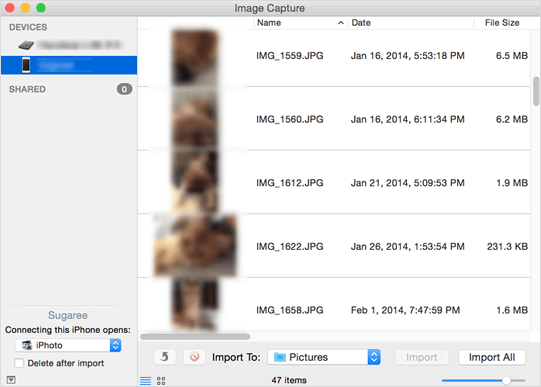
Step 1. Ensure that your iPhone and flash drive are connected to your Mac. Launch Image Capture on your Mac.
Step 2. In the interface, select your iPhone from the "Device" section on the left side. Allow Image Capture to import your photos.
Step 3. At the bottom of the Image Capture window, choose a location to save your photos. Then, click "Import All" to initiate the process.
Note: If you are interested in how to transfer photos from iPhone to Mac, you can read this article to learn more about it.
File Explorer provides another effective method for transferring photos from your iPhone to a USB stick. This pre-installed feature on Windows PC allows you to access photos from your iPhone's DCIM folder, facilitating the transfer of iPhone photos to a USB flash drive through simple copy-and-paste actions. However, if the photos extend beyond your iPhone camera roll, including those from media albums, iOS Assistant may be a good choice. Here is how to copy pictures from iPhone to flash drive using File Explorer:
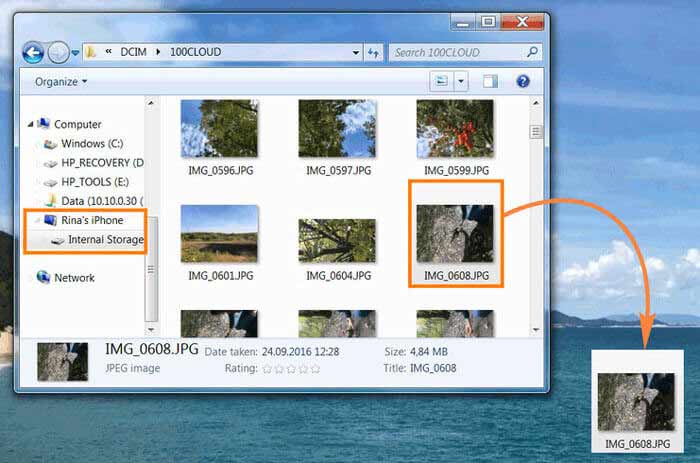
Step 1. Connect your iPhone and flash drive to your PC. Next, go to the "This PC" directory.
Step 2. Your connected iPhone should be visible in the list of devices. Click on your iPhone and choose "Internal Storage". Locate the "DCIM" folder and click to open, granting access to all your photos.
Step 3. Open a new Windows Explorer tab and locate the directory of your flash drive. To transfer your photos, simply drag any desired image from your iPhone and drop it into the USB flash drive directory, effectively backing up your files within seconds.
To learn more about how to transfer photos from iPhone to Windows PC, read the following article.
How to Transfer Photos from iPhone to PC Windows 10/11 in MinutesEmail is an all-purpose way to transfer data from device to device. However, as many email services limit the size of attachments to no more than 25MB per email, like Gmail, photos larger than 25MB may not be transferred. Therefore, to begin with, make sure that the photos you wish to transfer meet the requirements. Here is how to transfer photos from iPhone to USB with email:
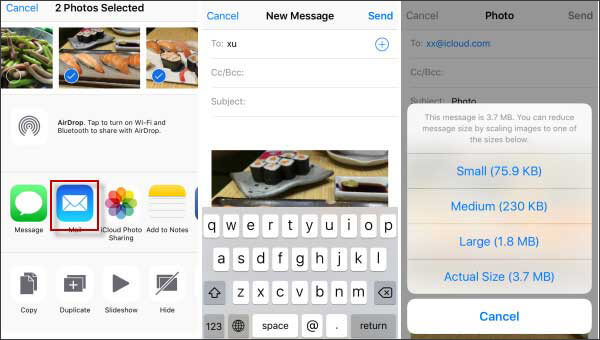
Step 1: Open the "Photos" app on your iPhone and tap the "Select" button to choose the photos you want to transfer.
Step 2: From the pop-up window, tap "Share" > "Mail" and log into your email account. Then, send this email after filling in another email account of you.
Step 3: Visit the email service website on your computer and enter the same email account to log in. Next, find the email you sent out a moment ago in the Outbox and download the attached photos to your computer. Once done, connect the flash drive to the computer and copy photos to it.
If you're looking to back up your photos before upgrading to a new iPhone and don't have a computer handy, transferring them directly to a USB flash drive is a great solution. All you need is a Type-C OTG adapter (or a lightning to USB adapter) and a flash drive. Once you have these items, follow these simple steps to move your iPhone photos to the USB:
Step 1: First, check that your USB flash drive has available space. Then, connect it to your iPhone using either a Type-C OTG or lightning to USB adapter. Open the "Photos" app on your iPhone, and select the photos you want to transfer.
Step 2: Tap the "Share" icon, and choose the "Save to Files" option. This will open the Files app on your iPhone. Next, go to the "Browse" section and select your USB drive under "Locations." Finally, tap "Save" at the top right to start transferring your photos to the flash drive.
Also Read: You can transfer photos from iPhone to external hard drive directly. Check the guide to learn the detailed steps.
Transferring photos from iPhone to USB can not only release more storage on the iPhone but also back up your photos to prevent data loss. After reading this guide, you have learned how to transfer photos from iPhone to USB. To fulfill this task successfully, I highly recommend you try Coolmuster iOS Assistant since it is the easiest and safest to use, user-friendly, fast, and, most importantly, widely compatible with all generations of iPhone, iPad, and iPod.
If you get into difficulties when using, please leave a comment below.
Related Articles:
How to Transfer Photos from Flash Drive/USB/Thumb Drive to iPhone
How to Transfer Photos from iPad to External Hard Drive with/without Computer?
[Solved] How to Use iPhone as USB Drive in a Few Simple Steps
How to Transfer Videos from iPhone to USB Stick with or without a Computer?


 Free Download for PC
  Free Download for Mac

