TL;DR:
To back up your iPad to a Mac, you can use Coolmuster iOS Assistant, Finder, iTunes, or iCloud, depending on your backup needs.
An iPad can hold years of photos, messages, notes, documents, and other important files. Whether you're preparing to upgrade to a new device, making room for more storage, or simply keeping your data safe, having a reliable backup is essential. If you own a Mac, you have several ways to save your iPad data, including Finder, iTunes, iCloud, and third-party software. But which method should you choose? This guide walks you through four practical ways to back up your iPad to a Mac, so you can find the one that best fits your needs.

One of the easiest ways to back up your iPad to a Mac is with Coolmuster iOS Assistant. This third-party tool offers a convenient way to back up and manage iOS data without relying on Finder or iTunes. Its built-in "iTunes Backup & Restore" feature lets you back up your iPad data, including contacts, messages, notes, videos, music, and photos, to your Mac in one go. You can also use it to transfer individual files between your iPad and Mac.
Highlights of Coolmuster iOS Assistant:
Follow the steps below to back up your iPad to your Mac using iOS Assistant:
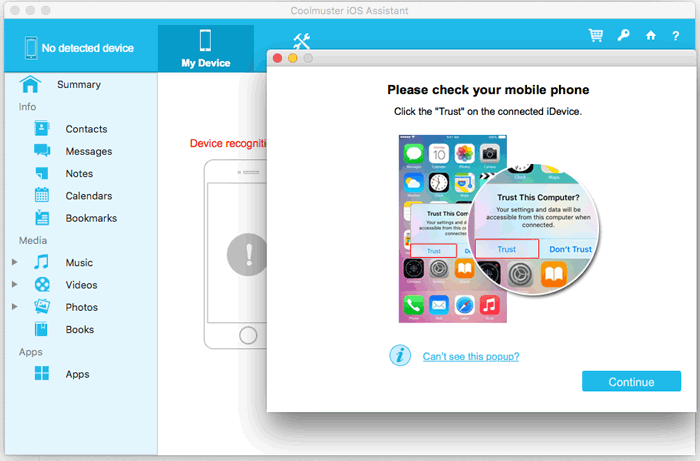
01Install and launch the software on your Mac, then connect your iPad to the Mac using a USB cable. When prompted, tap "Trust" on your iPad and click "Continue" on your Mac to proceed.
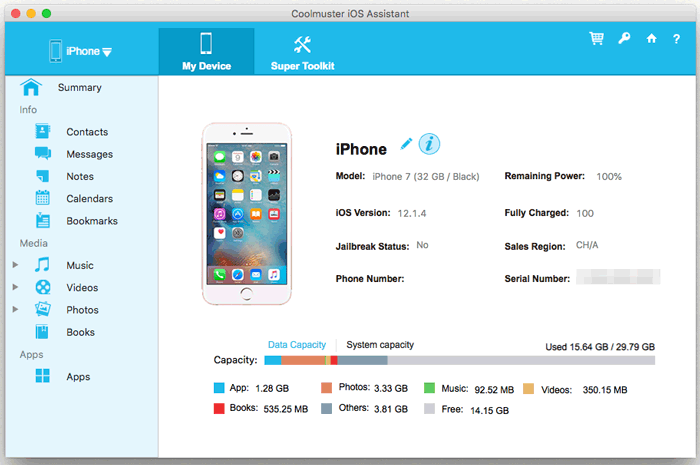
02Once the software detects your iPad successfully, its main interface will appear on your Mac screen.
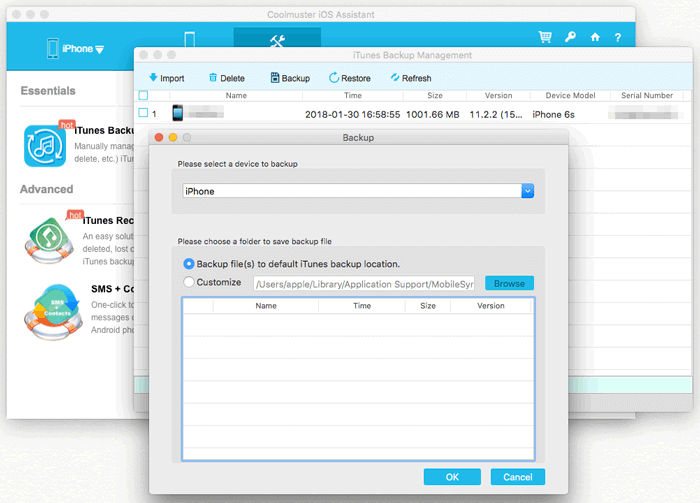
03Navigate to "Super Toolkit" and select "iTunes Backup & Restore". Click "Backup", choose your iPad from the drop-down menu, and select a folder on your Mac to save the backup. Finally, click "OK" to start the backup process.
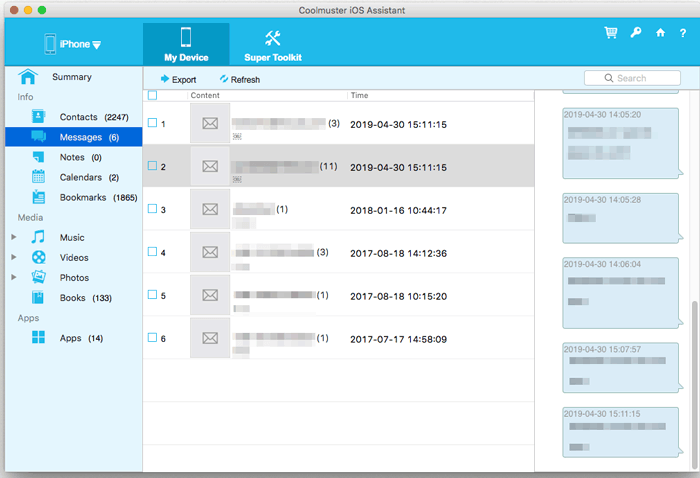
If you only want to back up specific types of data, go to the "My Device" section and select the desired file category. Preview and select the items you want to save, then click "Export" to transfer them to your Mac.
Video Guide:
If your Mac is running macOS Catalina or later, you may notice that iTunes is no longer available. Fortunately, you can use Finder to back up your iPad directly to your Mac. Finder lets you create a local backup of your iPad and choose whether to encrypt it for additional data protection. Here's how:
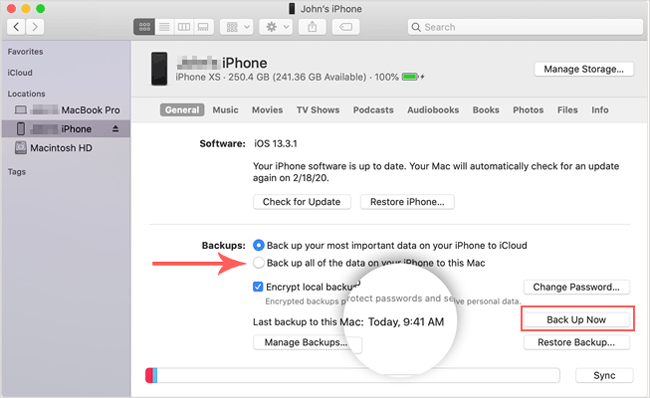
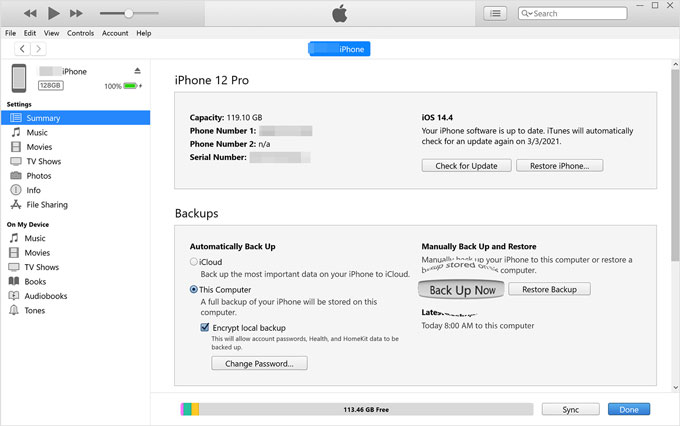
If your Mac is running macOS Mojave 10.14 or earlier, you can still use iTunes to back up your iPad. Before proceeding, make sure you have the latest version of iTunes compatible with your Mac. Follow these steps to back up your iPad to your Mac:
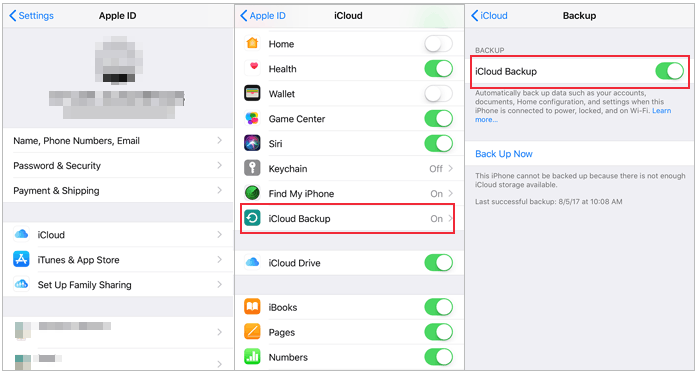
If you prefer a wireless backup method, iCloud is a convenient option for backing up your iPad without connecting it to a computer. Your backup data is stored in Apple's cloud storage rather than on your Mac's hard drive, saving local storage space. However, Apple only provides 5GB of free iCloud storage, which may not be enough for a complete iPad backup. You may need to upgrade your iCloud storage plan for additional space. (iCloud storage is full?)
Follow these steps to back up your iPad using iCloud and download available files to your Mac:
Q1. How Long Does It Take to Back Up an iPad to a Mac?
The time required depends on how much data your iPad contains, the backup method, and the connection speed. A small backup may take just a few minutes, while a large backup containing photos, videos, and app data may take considerably longer. Using a stable USB connection and closing unnecessary background apps can help avoid delays.
Q2. Where Are iPad Backups Stored on a Mac?
By default, Finder and iTunes store iPad backups in a hidden folder on your Mac. You can access it by opening Finder, pressing "Command + Shift + G", and entering this path:
~/Library/Application Support/MobileSync/Backup/
You can then view the available backup folders. Avoid moving or modifying their contents manually, as this may affect backup integrity.
Q3. Can I Back Up Multiple iPads to the Same Mac?
Yes. You can back up multiple iPads to the same Mac using Finder or iTunes. Each device has its own backup, so you can manage and restore them separately. Make sure you select the correct iPad before starting a backup or restoration to avoid choosing the wrong device data.
Q4. How Do I Check Whether My iPad Has Been Successfully Backed Up to My Mac?
Open Finder, select your iPad, and go to the "General" tab. Under the backup section, check the date and time of the latest backup. If you use iTunes, open the device summary page and check the latest backup information. You can also open the backup management window to view the available backups.
Q5. Can I Restore My iPad from a Mac Backup Without Losing Existing Data?
Restoring an iPad from a Finder or iTunes backup generally replaces the existing device data with the contents of the selected backup. Any new data created after that backup may be lost. Therefore, back up your current iPad data before restoring an older backup. If you only need a few files, consider using Coolmuster iOS Assistant to extrac them individually rather than restoring the entire backup.
Backing up your iPad to a Mac doesn't have to be complicated. Whether you prefer Finder or iTunes for a local device backup, or iCloud for wireless storage, the right method depends on your needs and available storage space. However, if you want more control over your iPad data, Coolmuster iOS Assistant is worth considering. It lets you back up and restore your device while also allowing you to preview, transfer, and manage individual files on your Mac. Give it a try to make your iPad data management easier and more flexible.
Related Articles:
How to Transfer Photos from iPad to External Hard Drive with/without Computer?
How to Backup iPad to Computer? [Can't Miss]
How to Back Up iPad to External Drive with/without Computer?
How to Fix iPhone Backup Not Enough Space on Computer Issue (Proven Tips)







 Free Download for Mac
 Free Download for PC


