iCloud Drive is Apple's cloud storage service that lets you store and access your files across all your devices. On your iPhone, it makes managing documents, photos, and other files easy and convenient. Whether you want to upload important files, share them with friends, or keep them safe in the cloud, understanding how to use iCloud Drive on your iPhone or iPad can greatly improve your productivity and organization.
iCloud Drive is Apple's cloud storage solution that lets you store all kinds of files securely online. It works across iPhone, iPad, Mac, and even Windows computers, so you can access your documents, photos, videos, and more from anywhere. Unlike iCloud Backup, which saves device settings and app data, iCloud Drive focuses on files and folders that you create or save.
With iCloud Drive, you can organize files into folders, edit documents in apps like Pages or Numbers, and keep everything synced automatically. It's like having a personal cloud-based filing cabinet that travels with you, ensuring your important files are always just a few taps away.
iCloud vs iCloud Drive: Key Differences & How to Use Them
Setting up iCloud Drive on your iPhone is simple and only takes a few minutes. Follow these steps to get started:
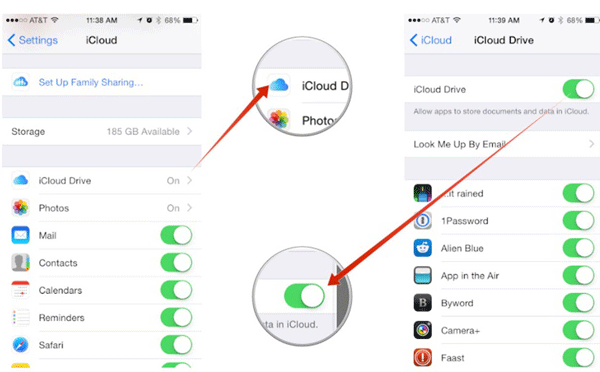
Step 1: Open Settings and Sign In
Go to "Settings" on your iPhone and tap your name at the top. Make sure you are signed in with your Apple ID. If you're not signed in, enter your Apple ID and password to log in.
Step 2: Enable iCloud Drive
Tap "iCloud", then find "iCloud Drive" and toggle it on. This allows your iPhone to store files and folders in iCloud and keep them synced across your devices.
Step 3: Select Apps to Sync
Under iCloud Drive settings, you can choose which apps can store files in iCloud Drive. Turn on the apps you want, like "Files", "Pages", "Numbers", or other compatible apps. (How to Transfer Photos from iPhone to iCloud?)
Step 4: Check Your Storage Plan
By default, iCloud provides 5GB of free storage. If you need more space, tap "Manage Storage" > "Change Storage Plan" to upgrade to a higher storage tier. (iCloud Storage Full?)
Once these steps are complete, your iPhone is ready to save files to iCloud Drive, and any changes you make will sync automatically across your Apple devices.
Uploading files to iCloud Drive on your iPhone is easy using the "Files app". Here's how you can do it:
Step 1: Open the Files App
Launch the "Files" app on your iPhone. Tap "Browse" at the bottom, then select "iCloud Drive" under "Locations". This shows all your iCloud Drive folders.
Step 2: Choose Where to Upload
Navigate to the folder where you want to save your file, or create a new folder by tapping the folder icon with a plus (+) at the top. Organizing files into folders helps you find them later.
Step 3: Upload the File
Tap the "…" (More) button, then select "Upload". You can upload files from your iPhone, other cloud services, or apps like "Photos". Once uploaded, your files are automatically synced to iCloud Drive and accessible on all devices.
Step 4: Quick Upload from Other Apps
Many apps allow you to save directly to iCloud Drive. For example, in "Photos", tap "Share" > "Save to Files", then choose your iCloud Drive folder. This method keeps all your important documents and media organized in one place.
With these steps, you can quickly upload and organize documents, images, and other files in iCloud Drive, making them available on your iPhone, iPad, or Mac anytime.
Once your files are in iCloud Drive, you can easily access and manage them right from your iPhone using the "Files app". Here's how:
1: Access Files
Open the Files app and tap "Browse" > "iCloud Drive". You'll see all your folders and documents stored in the cloud. Tap any file to open and view it instantly. (How to Access iCloud?)
2: Organize Your Files
3: Search for Files
Use the Search bar at the top to quickly find files by name, type, or app. This is especially helpful if you have many documents stored in iCloud Drive.
4: Edit Files Directly
Some file types, like documents in "Pages", "Numbers", or "Keynote", can be edited directly in iCloud Drive without opening another app. Changes are automatically saved and synced across devices.
By managing your iCloud Drive files efficiently, you can keep your documents, photos, and other important files organized and always accessible, whether on your iPhone, iPad, or Mac.
Sometimes, iCloud Drive may fail to sync your files due to storage issues, network problems, or software glitches. In such cases, using a reliable alternative backup method can help you securely save your iPhone files without relying on iCloud. Coolmuster iOS Assistant is a professional iPhone backup tool that lets you manage, transfer, and back up data directly from your device to your computer.
Key features of Coolmuster iOS Assistant:
Free download Coolmuster iOS Assistant on your computer now:
How to Back Up Your iPhone Using Coolmuster iOS Assistant:
01 Download and install Coolmuster iOS Assistant on your Windows PC or Mac. Open the program and connect your iPhone using a USB cable. If prompted on your iPhone, tap "Trust This Computer" to establish a secure connection.

02 From the main interface, click "Super Toolkit" > "iTunes Backup & Restore", then choose "Backup".
03 Choose the device you want to back up, and select a folder on your computer where you want to save the backup. This ensures your files are safely stored offline.
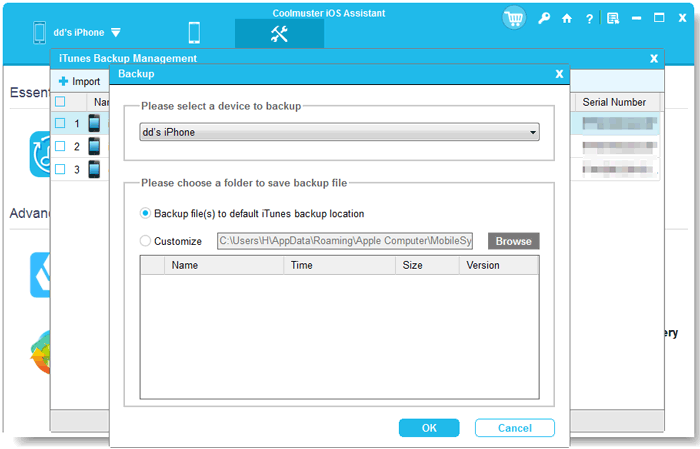
04 Click OK to begin the backup process. Once completed, all selected files will be saved on your computer and can be accessed anytime without relying on iCloud.
Video Guide:
iCloud Drive makes it easy to store, access, and manage your files on iPhone, keeping your documents, photos, and videos synced across all Apple devices. By learning how to set up iCloud Drive, upload files, manage folders, and share documents, you can fully utilize its cloud storage capabilities. If iCloud syncing fails, using a reliable alternative like Coolmuster iOS Assistant ensures your files remain safe, backed up, and easily accessible anytime. With these methods, you can confidently manage your iPhone data without worrying about lost or unsynced files.
Related Articles:
How to Fix iCloud Files Not Downloading? - 9 Effective Tips
How to Add Music to iCloud Storage: 4 Proven Methods


 Free Download for PC
  Free Download for Mac

