TL;DR:
This guide explains how to share and transfer an iTunes library between computers using different methods depending on your needs.
If you've ever switched to a new computer or tried to access your music on multiple devices, you've probably wondered how to share an iTunes library without losing playlists or music files. Managing an iTunes library can be confusing because songs, playlists, and media files are often stored in different locations, making manual transfer tricky.
In this guide, we'll walk you through several practical methods to share or move your iTunes library between computers, from Apple's official Home Sharing feature to manual transfer and a simpler third-party solution that saves time and avoids common errors.
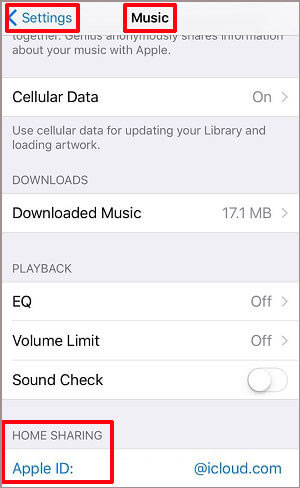
iTunes offers a built-in feature called Home Sharing that allows you to access your music library on another computer within the same network using the same Apple ID. It is an official iTunes File Sharing method for sharing music across devices, but it does not actually transfer or copy your music files permanently, and both computers need to stay connected for it to work.
Step 1: Enable Home Sharing in iTunes
Open iTunes on your computer, sign in with your Apple ID, and turn on Home Sharing from the File menu so your library becomes available for other devices.
Step 2: Sign in on the second computer
On the second computer, open iTunes and log in with the same Apple ID to link both devices under Home Sharing.
Step 3: Access the shared iTunes library
Go to the Music section and select the shared library to browse and play songs from the original computer.
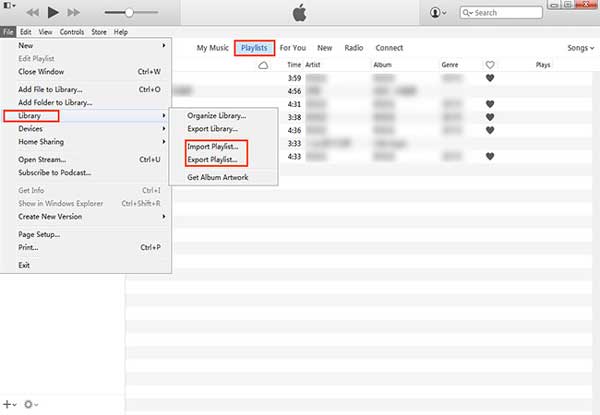
iTunes allows users to export and import playlists between computers, which is a simple way to share music lists without manually rebuilding them. This method is useful when you only want to transfer playlist structure, but it does not move the actual music files, so the songs must already exist on the target computer or be re-downloaded.
Step 1: Export iTunes playlist from the original computer
Open iTunes, go to your playlist, click "File" > "Library" > "Export Playlist", then save it as an XML file to your computer. (How to Transfer Playlists from iPhone to iTunes?)
Step 2: Transfer the playlist file to another computer
Use a USB drive, external hard drive, or cloud storage to move the exported XML file to the second computer.
Step 3: Import playlist into iTunes on the new computer
Open iTunes on the second computer, go to "File" > "Library" > "Import Playlist", then select the XML file to restore your playlist structure.
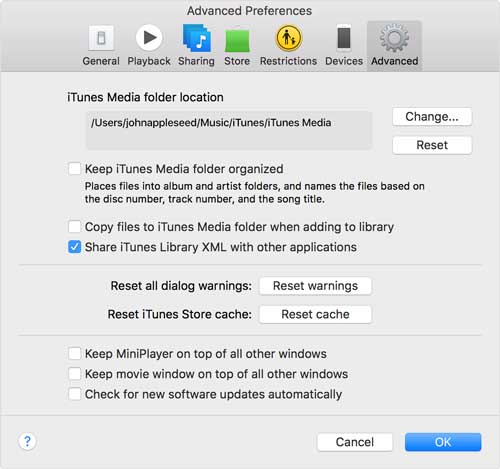
iTunes allows users to manually transfer the entire music library to another computer by copying the library files and media folder. This method gives you full control over your data, including music, playlists, and metadata, but it requires careful handling of file locations to avoid missing songs or broken links.
Step 1: Locate your iTunes library files on the original computer
Open your iTunes Media folder and find key files such as the iTunes Library file and the Music folder, which contain all your songs and library information.
Step 2: Copy the entire iTunes folder to an external drive
Use a USB drive or external hard drive to copy the full iTunes folder, making sure you include both the media files and library database to keep everything complete. (How to Transfer Music from iTunes to Flash Drive?)
Step 3: Transfer the files to the new computer
Move the copied folder to the same or a preferred location on the new computer to keep your library structure organized.
Step 4: Open iTunes library on the new computer
Hold Shift (Windows) or Option (Mac) when launching iTunes, then select the transferred iTunes Library file to load your music collection.
This manual method is effective for users who want a complete iTunes library migration without relying on third-party tools, but it requires attention to file paths to ensure all songs remain properly linked.
As mentioned earlier, some iTunes playlists may include songs imported from CDs or downloaded from different sources, which makes them difficult to share directly through iTunes. To make playlist sharing more flexible, you can use a third-party iOS data management tool such as Coolmuster iOS Assistant. It allows you to transfer music playlists from your iPhone or iPad to your computer, regardless of where the songs originally came from.
iOS Assistant - A Powerful iOS Data Manager for Windows and Mac:
Free download Coolmuster iOS Assistant on your computer now:
How to access iPhone files on PC without iTunes:
01 Install and launch the software on your computer
Download and install the tool on your Windows or Mac computer, then connect your iPhone or iPad using a USB cable so the device can be detected automatically.

02 Preview your music and playlists
Once the device is recognized, click the "Music" section on the left panel to view all available playlists and audio files on your iOS device.
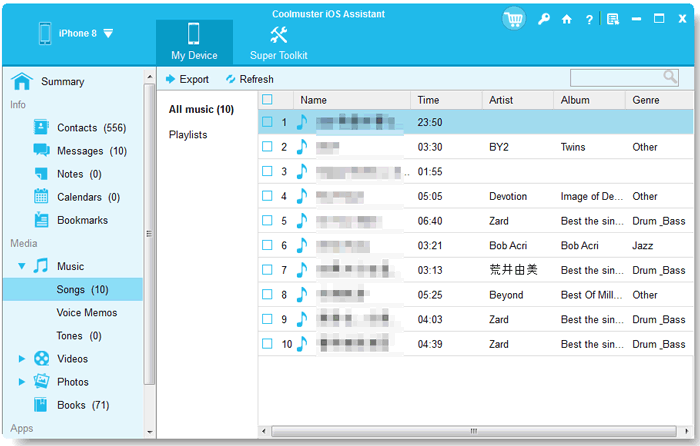
03 Export playlists to your computer
Select the playlists you want to share or back up, then click the "Export" button to save them to your computer, where you can store or share them freely.
Video Guide:
There are several ways to share or transfer an iTunes library between computers, including Home Sharing, playlist export, manual migration, and third-party tools. Each method serves different needs, from temporary access to full library transfer. While official and manual options work well, they can be limited or complex. For most users, a dedicated transfer tool like Coolmuster iOS Assistant offers the easiest and safest way to move music, playlists, and data without losing files or dealing with complicated settings.
Related Articles:
[Guide] Transfer Music between Windows Media Player & iTunes
How to Transfer Music from iPhone to iPad? Solved in 6 Ways
2 Simple Ways to Sync iPhone with Multiple Computers
How to Transfer Music from iPhone to Computer Effectively? (4 Tips)


 Free Download for PC
  Free Download for Mac

