Summary: If you're looking to move your iCloud photos to an external hard drive, here are 5 simple methods that work for both Mac and Windows users. Plus, we'll show you how to download all your photos from iCloud in one go.

iCloud is the go-to cloud storage for iPhone users, where they store their photos, videos, documents, and more. It gives 5GB of free space, allowing access to your data from any device, anytime. However, relying only on iCloud can be risky. For example, you might face issues like photos disappearing from iCloud or iCloud storage is not enough.
To keep your memories safe, it's a smart idea to move your photos to an external hard drive. External drives offer several benefits:
By transferring photos from iCloud to an external hard drive, you create an additional backup of your data. Want to know how to do this? In this guide, we'll walk you through the simple steps to move your photos from iCloud to an external hard drive.
Using Coolmuster iCloud Backup Recovery has become an increasingly popular way to transfer photos from iCloud Photos to external hard drives since it works quickly, safely, and efficiently. Coolmuster iCloud Backup Recovery is a powerful tool that provides access to your iCloud photos, contacts, and accounts with ease.
You can view all the files in your iCloud backup and move them to a computer or an external drive selectively. It is the perfect companion for your iCloud photos and allows you to quickly transfer all of them onto an external hard disk in no time.
Key Features of Coolmuster iCloud Backup Recovery:
Below is a step-by-step guide on how to transfer iCloud photos to external hard drive via Coolmuster iCloud Backup Recovery:
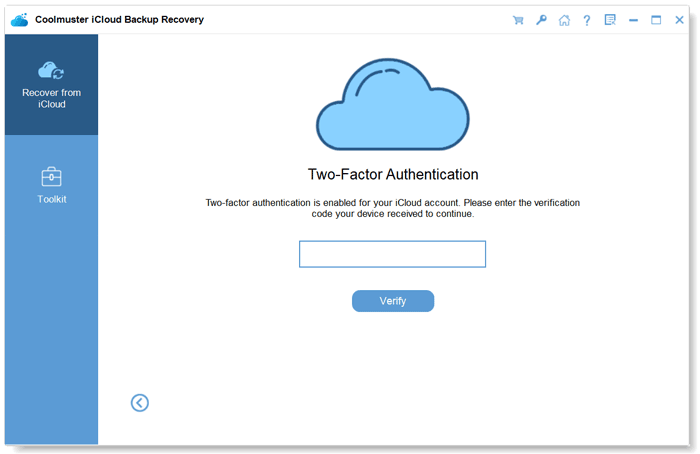
01Download and install the Coolmuster iCloud Backup Recovery on your computer. Connect the external hard disk to your computer. Launch the application and enter your Apple ID information on the sign-in page to connect with iCloud.
02Check the photos as the file types you wish to transfer and hit the "Next" button. After a few moments of scanning, all available iCloud backup photos will be shown on the screen.
03Select all the photos that need to be transferred and choose the location of your external hard disk as the recovery path, and hit the "Recover to Computer" button.

Video Guide:
Apple released iCloud for Windows, which allows users to transfer their photos from iCloud to an external hard drive through a Windows computer (download iCloud photos to computer). Follow the below simple steps to learn how to download iCloud photos to an external hard drive:
Step 1: Begin the procedure by downloading and installing iCloud for Windows application on your Windows Computer, log in using your Apple credentials to gain access to your iCloud account, then connect the hard drive.
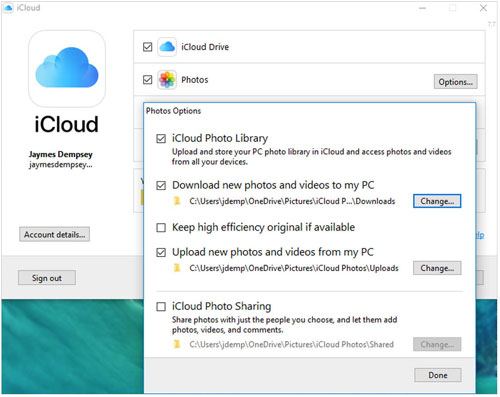
Step 2: Check the box beside Photos and select "Options" for further configuration.
Step 3: Make sure to check the box next to "iCloud photo library" and "Download new photos and videos to my PC" when a pop-up appears.
Step 4: To change your photos' destination, click "Change…" next to "Download new photos and videos from my PC". Afterward, select the external hard disk as the preferred path for downloads. Once you have finished, hit "Done" and choose "Apply" to save all changes.
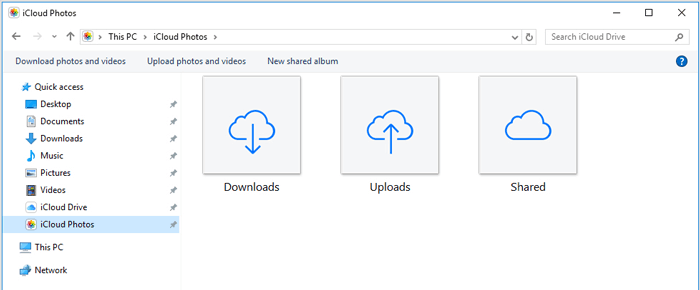
Step 5: Launch File Explorer and select the "iCloud Photos" option on the left side of your page. From there, choose the "Downloads" folder to browse for photos you wish to download to your external hard drive.
Step 6: The iCloud photos will be quickly transferred to your external hard drive, though the process could take a few minutes.
Now you have successfully moved photos from iCloud to an external hard disk.
Note: With Apple iCloud, you can't download more than 1000 images at once; thus, if the photos you seek to acquire are above this number, then repeating the procedure is necessary.
Mac Photos is an immersive and dynamic macOS program allowing you to view, edit, and export photos. With iCloud backup enabled on your device, transferring iCloud images from a Mac to an external hard disk can be completed in just a few straightforward steps. Here are the steps:
Step 1: To start, connect an external hard disk to a Mac computer. Then, create a folder on the hard drive for storing iCloud photos.
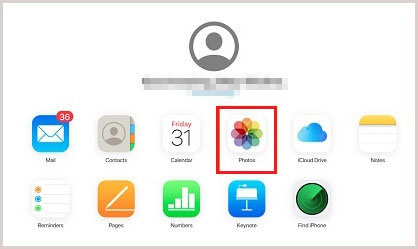
Step 2: Launch the "Photos" app on the Mac computer and select the images you wish to save onto the hard drive.
Step 3: Select the "Export" option beneath the File menu to transfer all the chosen photos. You can choose the "Unmodified Original" or "Export Edited options". The default option is to export Edited, while Unmodified Original is recommended. Finally, set your newly created folder on the external hard disk as the destination for all photos and data.
With iCloud's website readily available on any web browser, you can access your Apple data anytime with a few clicks (how to access iCloud backup). You can also quickly download photos from the iCloud website onto an external hard disk without installing extra tools, making the process more straightforward. Whether you run macOS or Windows, this method is recommended for fast and effortless photo downloading. Here are the steps on how to transfer iCloud photos to external hard drive:
Step 1: To start, navigate to iCloud's official website using your Mac or PC web browser. Once on site, log in using your iCloud Account credentials for further access.
Step 2: Sign in and select the "Photos" tab from the interface. To optimize selection time, utilize either "Command" (Mac) or "Ctrl" (Windows) key to select multiple images at once quickly.
Step 3: Once you've chosen all the photos that need to be transferred, click the "Download" icon to continue.
Step 4: Copy your photos from the Downloads folder on the computer and paste them to the external hard disk.
Note: All downloads will be in ZIP format to ensure your photos are efficiently stored. If you have a Mac and would like to transfer the images through a local program installed on your device, this is the ideal solution.
If downloading your photos repeatedly feels like a hassle, there's a more straightforward way to get all your Apple account data in one go. Here's how you can do it:
Step 1: Go to privacy.apple.com and sign in using your Apple ID email and password.
Step 2: Once you're on the Apple ID & Privacy page, click on "Get Started" under the section to get a copy of your data.
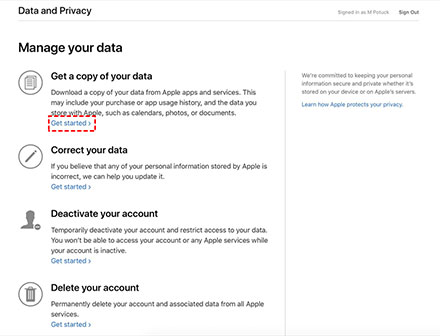
Step 3: You'll be presented with a list of data categories. Select "iCloud Photos" to export your photos to your PC.
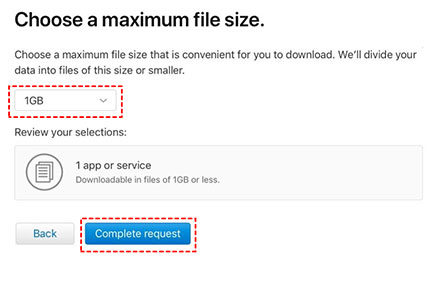
Step 4: Choose the file size for your download (options include 1GB, 2GB, 5GB, 10GB, or 25GB).
Step 5: After you start the data preparation process, Apple will send you an email to confirm the request and notify you that it might take up to seven days to complete. This time frame is in place for security reasons, ensuring that the request is genuinely from you.
Step 6: Once your data is ready, you can connect your external hard drive to your computer and easily transfer the photos to it.
Transferring photos from iCloud to an external hard disk is a straightforward process. You only need to follow the above-discussed methods, and you will be done transferring photos from iCloud to an external hard drive. However, the most efficient and reliable method is to use the Coolmuster iCloud Backup Recovery program, as it ensures safety, security, and efficiency. This robust tool lets you quickly transfer photos onto the external hard disk. So what are you waiting for? Download the program today and get started.
Related Articles:
How to Transfer Photos from Android Phone to External Hard Drive Directly?
How to Transfer Photos from iPhone to External Hard Drive in 5 Effective Ways?
How to Transfer Photos from Flash Drive/USB/Thumb Drive to iPhone
2 Easy Ways to Transfer Music from iPhone to an External Hard Drive


 Free Download for PC
  Free Download for Mac

