Apple Voice Memo is very useful in many scenarios. We can use it to record various things such as interviews, notes at work or during the class, or some crucial conversations for legal proof. After recording these important voice memos, you may need to transfer them to your computer for backup or other reasons. You may first think of iTunes to help you transfer them, but iTunes is user-unfriendly and you may come across some problems when using it.
So how to transfer voice memos from iPhone to computer without iTunes? Here we will explore 6 simple ways for you to get voice memos off iPhone without iTunes.

If you're looking to transfer voice memos from your iPhone to your computer without using iTunes, Coolmuster iOS Assistant is a handy option. This tool makes it easy to manage your iPhone data from your PC. You can back up and restore your device, as well as import or export various types of files, including voice memos. With just a few simple steps, you can view all your voice recordings, choose the ones you want, and copy them to your computer without any hassle. It's a user-friendly solution for organizing and saving your iPhone content.
Outstanding Features of Coolmuster iOS Assistant:
Now download the free trial version of it on your PC and see how to transfer voice memos from iPhone to computer without iTunes syncing.
If you are a Mac user, please download the Mac version of Coolmuster iOS Assistant and click here to know more about how to transfer voice memos from iPhone to Mac without iTunes.
Coolmuster iOS Assistant enables you to import voice memos from iPhone to PC selectively, or move all the voice memos from your iPhone to computer without iTunes in 1 click. In this part, let's see how to transfer voice memos individually to your PC.
01Run Coolmuster iOS Assistant on your PC and then connect your iPhone to PC with a suitable USB cable. Follow the instructions on screen to get your iPhone recognized by the program. Once your device is detected by the program, you will see the main interface as below.

02Click "Music" on the left sidebar and then click "Voice Memos" under it. Now you can preview all the voice memos from your iPhone.

03Select the voice memos you want (select one or batches), then click the "Export" button to transfer them from your iPhone to computer.
Using the "Backup & Restore" feature in Coolmuster iOS Assistant, you can transfer all files including voice memos from iPhone to computer without iTunes syncing.
01After your iPhone is detected by the software, go to the "Super Toolkit" section.
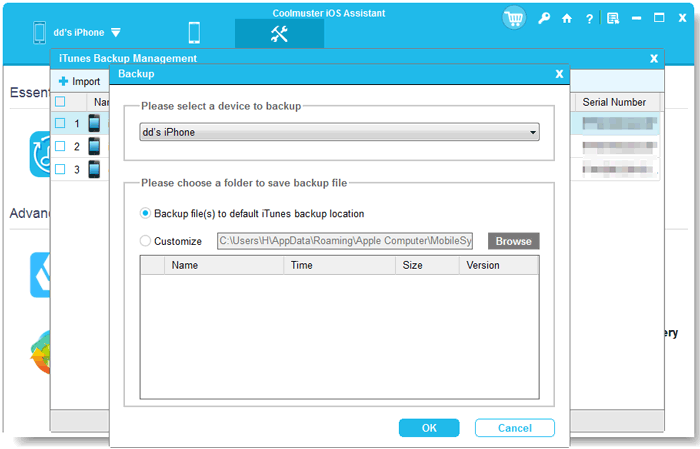
02Click "Backup & Restore" and then select "Backup".
03Select your iPhone from the drop-down menu, then choose the location on computer to store your backup files.
Video Guide:
See also:
3 Ways to Transfer Music from iPhone to Computer without iTunes
Email is a great solution to transfer the small size of files from iPhone to your PC. So if you have only a few voice memos and the sizes are small, you can use Email to send them to your PC one by one.
Guide on how to import voice memos from iPhone to PC with Email:
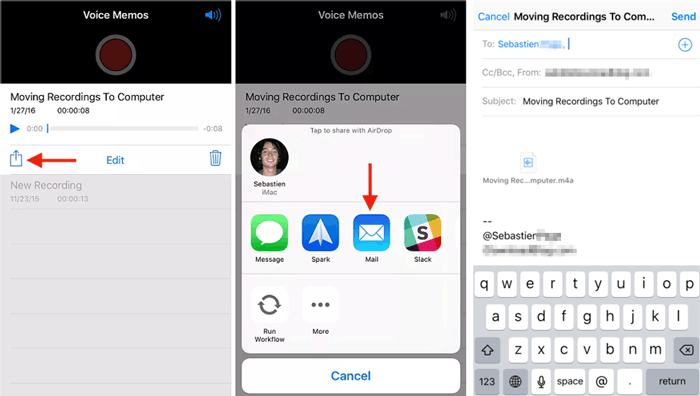
1: On your iPhone, open the Voice Memos app and select the one you need to transfer to your PC.
2: Tap the "Share" icon on under the voice memo.
3: Choose the "Mail" option and enter your email address, then tap "Send".
4: On your computer, log in to your email account and download the voice memos from iPhone to PC.
If iCloud Drive is enabled, you can easily access files across your Apple devices using WiFi. But when it comes to voice memos, iCloud only lets you download them one at a time, which can take a lot of time if you have many recordings. (iCloud Drive Not Syncing?)
Here's how to transfer voice memos from your iPhone to your computer using iCloud:
1. On your iPhone, go to the Settings app. Tap your name at the top, then select "iCloud." Make sure "Voice Memos" is switched on.
2. On your computer, open a web browser and go to iCloud.com. Sign in with the same Apple ID that's used on your iPhone.
3. Once you're signed in, click on the "Voice Memos" icon. You'll see a list of all your saved recordings.
4. Click on each memo to download them to your computer. Unfortunately, you'll need to do this one at a time.
Use the "Share" feature under the voice memo you selected can let you get voice memos off iPhone through various apps. Here we will talk about how to use the Dropbox and Google Drive to move voice memos from iPhone to computer without iTunes.
Dropbox offers 2 GB free space to transfer files, if the voice memos on your iPhone are not in a large size, you can try Dropbox to get voice memos off iPhone with Wi-Fi connection.
How to move voice memos from iPhone to computer without iTunes via Dropbox:
1. Download Dropbox on your iPhone and then create a Dropbox account.
2. Open your Voice Memo app and select the required voice memo to transfer.
3. Tap the "Share" icon and choose the "Dropbox" option to send the voice memo to Dropbox.
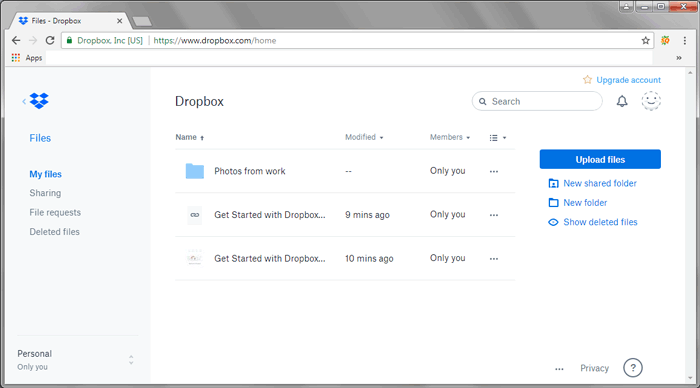
4. On your computer, log in to Dropbox website with your Dropbox account and download voice memo from iPhone without iTunes to your computer.
Many people use Google Drive to back up files on their devices, we can also make good use of it to transfer files between devices.
How do I get voice memos off my iPhone without iTunes using Google Drive? Here are the detailed steps:
1. Download Google Drive on your iPhone and log in to it with your Google account.
2. Open your Voice Memo app and tap the voice memo you need to import to your PC.
3. Tap the "Share" icon and select to share it with "Google Drive".
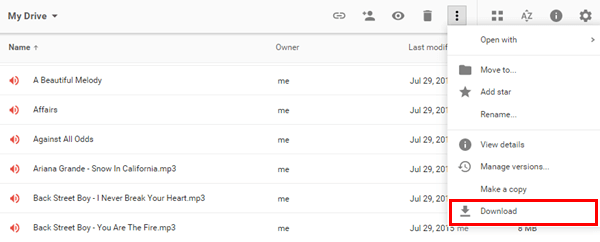
4. Log in to Google Drive website on your PC, and download the voice recordings you've sent from iPhone to your computer.
AirDrop is unavailable on Windows computers, but it works seamlessly on a Mac. This Apple feature lets you move data wirelessly between supported devices. Before you start, place your iPhone and Mac close to each other and make sure WiFi and Bluetooth are switched on. If you want to transfer voice memos from an iPhone 5, 6, 7, 8, or X to a Mac, follow these steps.
Step 1: Enable AirDrop on both devices
Open the Settings app on your iPhone, select AirDrop, and turn it on. You can also activate it from the Control Center. Set the visibility to everyone so your Mac can detect your device.
On your Mac, open the AirDrop window and switch it on. Set its visibility to everyone temporarily. Your iPhone should appear once both devices are ready.
Step 2: Send voice memos to your Mac
Open the Voice Memos app on your iPhone and choose the recordings you want to transfer. Tap the share icon and select your Mac under the AirDrop options. Accept the incoming files on your Mac to finish the transfer.
Q1. How can I transfer large voice memos from my iPhone to a computer?
If your recordings are large, consider using iTunes, iCloud, or Coolmuster iOS Assistant since these options handle bigger files well. Email usually has size limits, so it may not work for long voice memos.
Q2. What format does the iPhone use for voice memos?
Voice memos are generally saved as M4A files, a format that works with most media players on both Mac and Windows computers.
Q3. Can I transfer voice memos from one iPhone to another?
Yes. Any of the methods mentioned above can be used to move voice memos between iPhones. For more detailed steps, you can check the dedicated guide titled how to transfer voice memos from iPhone to iPhone.
After reading this post, do you know how to transfer voice recording from iPhone to computer now? If you only have a few voice memos with small sizes, you can consider using Email or cloud service to help you move them to the computer.
But to be honest, the best way to solve this problem is to use Coolmuster iOS Assistant. With it, you can get voice memos off your iPhone regardless of the number or the size of them. Besides, this software is also your good assistant for managing and transferring a variety of files on your iPhone, it definitely worth downloading and give it a go.
Related Articles:
7 Ways to Transfer Photos from iPhone to Computer without iTunes
3 Ways to Transfer Text Messages from iPhone to Computer


 Free Download for PC
  Free Download for Mac

