In the digital age, where attention spans are short and website loading times are critical, the size of images on a website plays a crucial role. Page loading can be hindered by large image files, impacting both user experience and search engine rankings. It's imperative to find the delicate balance between image quality and load time.
In this article, we delve into the art of reducing image sizes for websites - a key practice in optimizing performance, enhancing user experience, and ensuring that your online presence is both swift and visually compelling.
Before diving into the methods of reducing image size, it's essential to understand the ideal file size for website images. The file size of images for websites is an important consideration for web developers and designers. It affects the loading time of web pages, which is crucial for providing a good user experience. In general, it is recommended to keep image file sizes below 100 KB without compromising on quality. This ensures faster loading times and a smoother user experience.
Read More: Some may wish to compress image size offline. Here are the four dependable ways.
Now that we've established the importance of image size in web optimization, let's delve into a fundamental strategy: resizing images. The dimensions of an image directly impact its file size, and by adjusting them to match the requirements of your website, you can achieve significant reductions in loading times.
For Mac users seeking a seamless way to optimize images without the need for third-party software, the Preview app offers a straightforward solution. Follow these steps to efficiently reduce image size for the website:
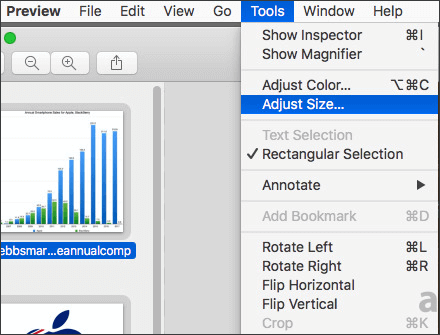
Step 1. Begin by locating the image you want to resize and open it using the Preview app on your Mac. Open the image file by right-clicking and choosing "Open With" followed by "Preview".
Step 2. Navigate to the "Tools" menu, choose "Adjust Size", and specify the desired dimensions. Ensure the aspect ratio is maintained to avoid distortion.
Step 3. After adjusting the size and format, click the "OK" button. Save the optimized image by selecting "File" > "Export" and choosing a location for the file.
For Windows users, Microsoft Paint provides a straightforward method. By leveraging the native capabilities of Windows Paint, you can quickly and easily resize and optimize images for your website. Follow these steps to reduce picture size efficiently:
Step 1. Open Paint and use the "File" menu to open the image.
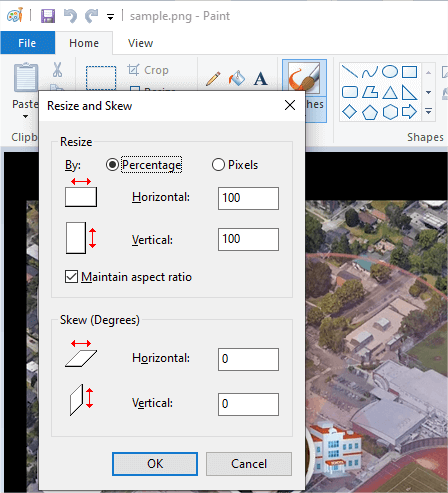
Step 2. Click on the "Resize" option in the toolbar. A dialogue box will emerge, enabling you to modify the dimensions.
Step 3. In the "Resize and Skew" dialog box, you can enter the desired percentage or pixel dimensions for the image. To maintain the original aspect ratio, ensure that the "Maintain aspect ratio" checkbox is selected.
Step 4. After adjusting the size, click the "OK" button. Save the resized image by selecting "File" > "Save As" and choose a location for the file.
Windows Photo is another option for resizing images. By utilizing the native capabilities of Windows Photos, you can effortlessly resize and optimize photos for your website. Follow these steps to compress image size for the website:
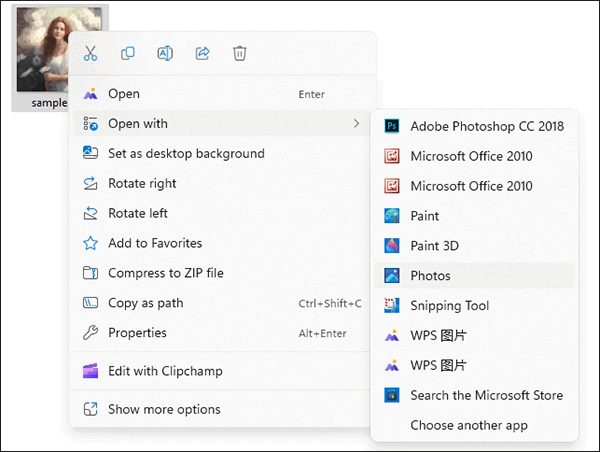
Step 1. Locate the photo you want to resize, right-click on it, and select "Open with" > "Photos".
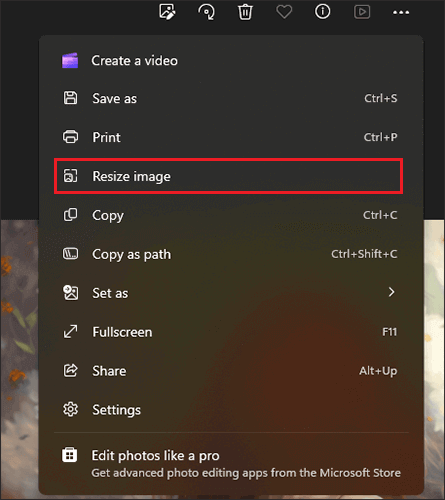
Step 2. Once the photo is open in Windows Photos, click on the three dots (ellipsis) in the upper-right corner to open the menu. Select "Resize image" from the drop-down.
Step 3. In the "Resize" menu, you'll be presented with pre-defined size options. Choose the one that aligns with your website's requirements. Additionally, you can select "Custom" to enter specific dimensions.
Step 4. After selecting the target size, click the "Save a copy" button to save the image. (Can you compress your photos on your iPhone directly? Discover the reliable means here.
For more advanced users, Adobe Photoshop provides extensive features for image resizing. Adobe Photoshop is a leading graphics editing software known for its versatility in image manipulation and graphic design. Widely used by professionals, it offers a comprehensive set of tools for tasks ranging from basic photo editing to intricate design projects. Follow these steps to reduce pictures for the website:
Step 1. Run Adobe Photoshop and open the image you want to optimize by selecting "File" > "Open" and navigating to the image file.
Step 2. Once the image is open, go to the "Image" menu and choose "Image Size". A dialog box will appear, displaying the current dimensions of the image.

Step 3. In the "Image Size" dialog box, you can enter the desired dimensions for the image.
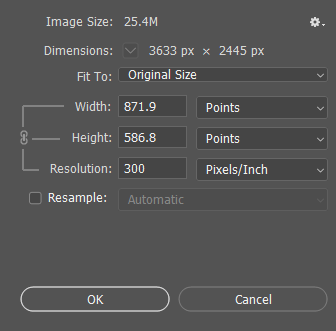
Step 4. After adjusting the settings, click "OK" to apply the changes. Save the optimized image by selecting "File" > "Save As" and choosing a location for the file.
For a quick and straightforward online solution to reduce picture size without the need for desktop software, ReduceImages comes to the rescue. This image compressor for website simplifies the image optimization process. Here's how you can reduce picture size using ReduceImages:
Step 1. Navigate to the ReduceImages website. Click on "Select Image" to upload the image you want to optimize. (Would you like to upload photos from Android to your computer before going to the website?) Alternatively, you may be able to drag and drop the image onto the website.
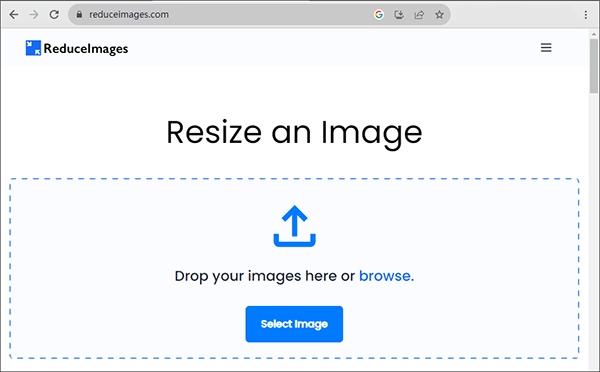
Step 2. ReduceImages often provides options to adjust compression levels. Choose the desired compression setting based on your preference for file size and image quality.
Step 3. Once you've selected your compression preferences, click the "Resize Image" button to initiate the compression process. The tool will process your image.
Step 4. After the compression process is complete, tap "Download Image" to download the reduced-size version to your computer.
In the realm of optimizing images for websites, compression stands out as a pivotal technique for achieving a delicate balance between visual quality and efficient file sizes. Compression reduces the amount of data in an image file, resulting in faster loading times without significant loss of image quality. The methods mentioned above can also be applied to compress images. In this section, we will primarily introduce two commonly used online compression tools.
TinyPNG is a popular online tool for image compression. TinyPNG's simplicity and effectiveness make it a popular choice for website optimization, especially when dealing with PNG and JPEG images. Follow these steps to compress images for your website using TinyPNG:
Step 1. Open your web browser and navigate to the TinyPNG website. On the TinyPNG homepage, either drag and drop your images into the designated area or click on the box to select and upload images from your computer.
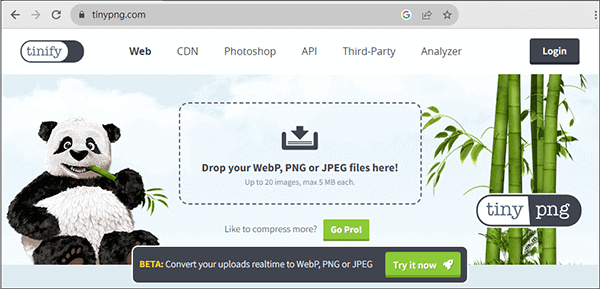
Step 2. TinyPNG will automatically start compressing your images. Once completed, click on the download link to retrieve the compressed images. Save them to your computer in a location of your choice.
Can't Miss: If you intend to convert image to PDF, don't overlook this expert tutorial.
Img2Go is another online platform that allows you to compress images easily. Img2Go's intuitive interface and comprehensive features make it a convenient choice for users seeking a reliable online tool to reduce image sizes. Here are the steps of how to compress pictures for the website:
Step 1. Open your web browser and go to the Img2Go website. Use the "Choose File" button to upload the image you want to resize. Alternatively, you may be able to drag and drop the image directly into the designated area.
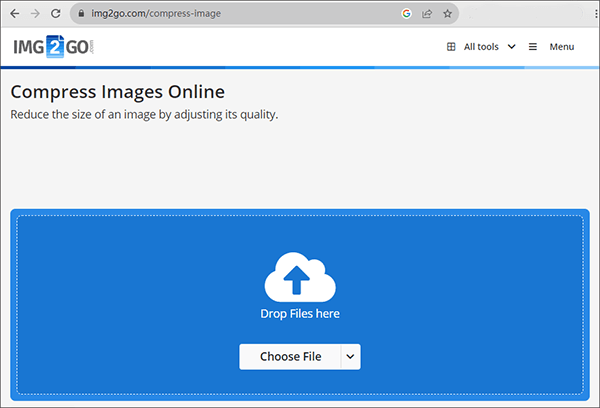
Step 2. Img2Go allows you to set specific dimensions for your image. Adjust the width and height as needed.
Step 3. After configuring the settings, click on the "Compress Image" button to start the compression process. Img2Go will process your image based on the specified parameters.
Step 4. Once the compression is complete, click the "Download" button to save the optimized image to your computer.
Changing the image format can also contribute to file size reduction. Consider converting images to more web-friendly formats like JPEG or WebP. Many of the methods mentioned earlier involve changing file formats. In this section, we'll illustrate this with an example using Windows Paint. Follow these concise steps for optimal results:
Step 1. Access the image you wish to modify using Windows Paint. Go to the "File" menu and select "Save as" to proceed with the editing process.
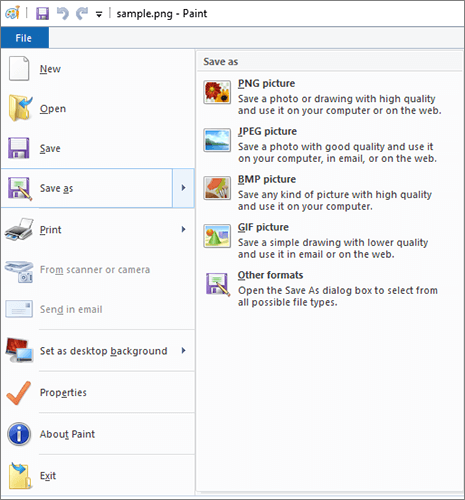
Step 2. Opt for an alternative file format that enables compression, like JPEG.
Step 3. Indicate the destination where you prefer to store the image in the updated format, then select "Save".
In conclusion, optimizing images for websites involves a combination of resizing, compressing, and changing the format. By following the methods outlined above, you can ensure that your website loads quickly and provides a seamless experience for visitors. Remember, finding the right balance between image quality and file size is key to a successful web presence.
Related Articles:
How to Solve Image Is Overly Compressed? [Tips & Tricks]
Unveiling the Visual Showdown: HEIC vs. PNG - Which Reigns Supreme?
How to Transfer Photos from Computer to Phone (Android & iPhone)? So Easy
How to Turn a Picture into a PDF for Free [Offline & Online Methods]


