Have you ever encountered the frustrating situation where you need to send a photo, but it's too large to be attached or uploaded? At this moment, you might need to resize it. Resizing a photo not only reduces its file size but also makes it easier to share or upload on various platforms, including social media, websites, or emails. (Can you copy photos to new iPhone without iCloud?) However, how to change file size of photo?
Fear not; here is a comprehensive guide on how to change file size of photo, covering various methods and techniques. And trust me, it's not as complicated as it sounds. So, let's dive into the world of resizing photos.
There are different methods available to change the file size of a photo on Windows. In this part, we will explore two of the most common methods: using Windows Paint and the Photos app. These built-in tools offer simple and effective ways to resize your pictures. Read on to learn more about each method and how to use them.
Windows comes equipped with a fundamental image editing tool known as Paint, which is pre-installed on the operating system. It offers a straightforward way to change image file size. You can easily resize and optimize your images for various purposes with just a few clicks. Here, we will walk you through the steps of using Paint to change file size of JPEG:
Step 1. Open Microsoft Paint, then go ahead and click on the "File" tab at the top left corner of the screen. From there, select "Open" and choose the picture you want to resize. (Can't find your desired images on Windows? Learn how to move photos from your phone to your computer)
Step 2. Click on the "Resize" button, which is conveniently located in the "Home" tab. A dialog box will emerge, providing you with the ability to adjust the dimensions of your image.
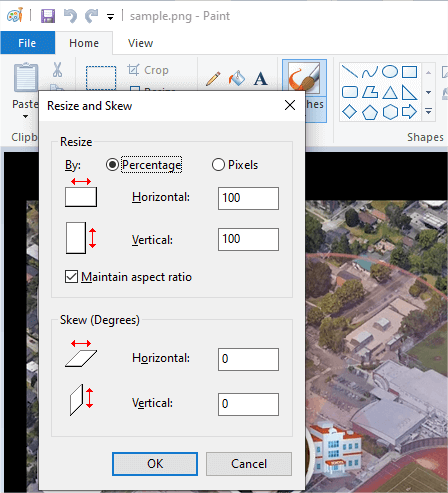
Step 3. Here, you have two options. If you choose to resize by percentage, you can enter a value in the "Horizontal" and "Vertical" fields. If you prefer to resize by pixels, you can enter the desired width and height values in the respective fields. Ensure you preserve the aspect ratio to prevent image distortion. Additionally, you can choose the unit of measurement, such as pixels or inches, from the drop-down menu.
Step 4. After adjusting the dimensions, click on the "OK" button to apply the changes. The picture will now be resized according to your specifications.
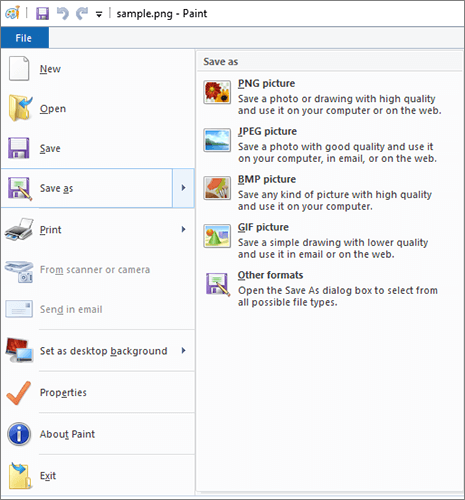
Step 5. Once more, navigate to the "File" tab and opt for "Save As". Choose a location on your computer to save the file and provide it with a name.
If you prefer a more user-friendly interface, the Photos app offers a convenient method to effortlessly resize the file size of your pictures. With its intuitive features and functionality, the Photos app provides a convenient way to adjust the file size of your pictures effortlessly. Here, we will guide you through the steps of using the Photos app to change file size of image:
Step 1. Open the image you want to resize in the Photos app. Double-click the image file to open it in the Photos app.
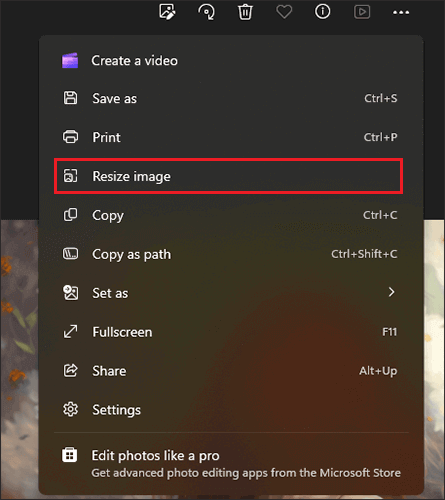
Step 2. Once the image is opened, click on the "three dots" in the top-right corner of the app window. This will open a drop-down menu.
Step 3. In the drop-down menu, select the "Resize image" option. This will open a dialog box with different size options.
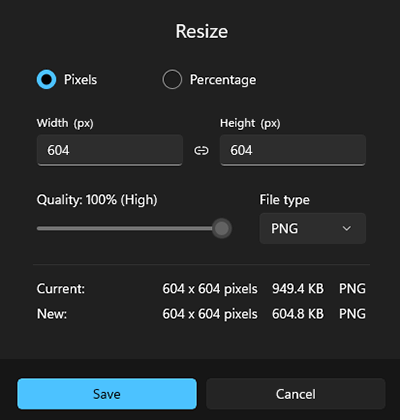
Step 4. Choose the desired size option to change the file size of the picture.
Step 5. After selecting the desired size option, click on the "Save" button to save the resized image as a new file.
You May Like: 3 Simple Ways on How to Transfer Photos from SD Card to Computer in 2024
If you are using a Mac computer, you can take advantage of the built-in Preview app to change photo file size. Preview offers a simple and straightforward method to resize images without the need for any additional software. Here is how to change file size of photo via Preview:
Step 1. Launch Preview and open the desired image for resizing by double-clicking on the image file.
Step 2. In the menu bar, navigate to "Tools" and choose "Adjust Size" from the drop-down menu.
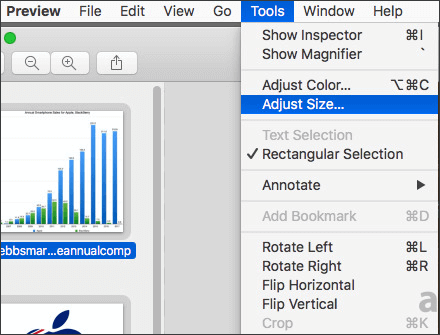
Step 3. A dialog box will appear with options to adjust the size of the image. Under the "Resolution" section, enter a smaller value to reduce the file size of the image.
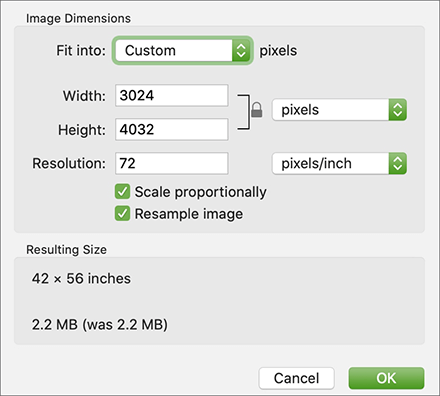
Step 4. As you make changes to the resolution, the new size of the image will be displayed at the bottom of the dialog box.
Step 5. Once you have set the desired size, click the "OK" button to confirm the changes and resize the image.
If you're looking for more control and advanced editing features, Adobe Photoshop is an excellent choice. With its robust editing capabilities, Photoshop allows users to resize photos while maintaining quality, adjust resolution and compression settings, and perform various other enhancements. Here, we will explore how to change photo file size using Adobe Photoshop, offering an alternative approach for those seeking more comprehensive editing options.
Step 1. Start by launching Adobe Photoshop and opening the image you want to resize.
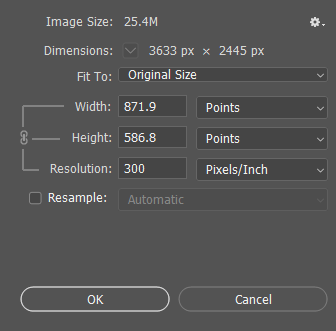
Step 2. Once your image is open, navigate to the top menu and click on "Image" > "Image Size". This action will prompt a dialog box showing various image size options.

Step 3. In the "Image Size" dialog box, you will find options to change the width and height of the image. You can resize the image by entering specific dimensions or by using a percentage scale. Remember to keep the "Constrain Proportions" option checked to maintain the image's aspect ratio.
Step 4. Finally, save the resized image by going to "File" > "Save As". Choose an appropriate file format (like JPEG or PNG) and specify the file name and location to save the resized image on your computer.
Further Reading: How to Convert Image to PDF with Ease: 7 Methods Unveiled
In addition to the methods discussed earlier, various online platforms offer convenient and user-friendly options for resizing and optimizing image files. In this section, we will explore two different online tools that allow you to change image file size with ease.
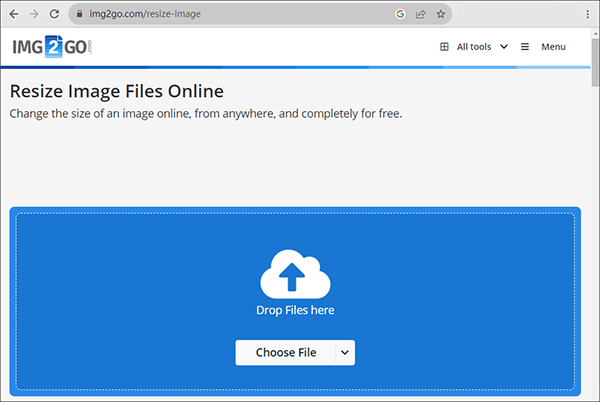
IMG2GO is a versatile online platform that provides multiple image editing options, including resizing, cropping, compressing, and converting images. Follow these steps to change file size of image using IMG2GO:
Step 1. Access the IMG2GO website using any web browser. Locate the "Resize image" tool and click on it.
Step 2. Click on the "Choose File" button and select the image you want to resize from your computer storage.
Step 3. Enter the new dimensions or percentage that you want the image to be resized to.
Step 4. After configuring the desired settings, click on "Start" to begin the resizing process. Upon completion, click on "Download" to save the resized image on your computer.
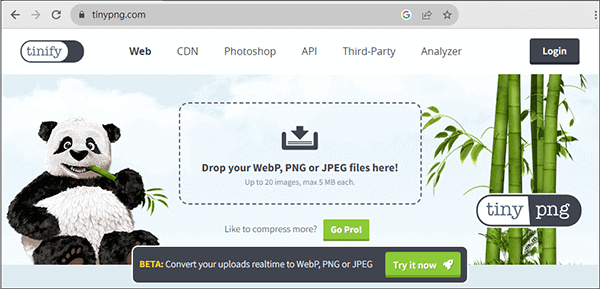
TinyPNG is a popular online solution for compressing and resizing images. Learn how to utilize this platform to reduce the file size of your pictures while preserving their quality. This method is particularly effective for web-based content and social media. Here is how to change the file size of a picture via TinyPNG:
Step 1. Launch your web browser and visit the TinyPNG website. Either select the "Drop your WebP, PNG, or JPEG files here!" box or effortlessly drag and drop your image file directly onto the webpage.
Step 2. TinyPNG will automatically compress your image, diminishing its file size. A progress bar will illustrate the compression process.
Step 3. Upon completion, TinyPNG will exhibit both the original and compressed file sizes. Additionally, it will present a download button. Simply click the "Download" button to store the compressed image on your computer.
With the methods and tools outlined in this article, readers now have a comprehensive understanding of how to change file size of photo efficiently. Whether using Windows, Mac, or online platforms, there are numerous options available to resize and optimize images based on individual needs and preferences. Feel free to give these methods a try and bid farewell to those cumbersome photo files.
Related Articles:
Effortlessly Reduce Image Size: How to Compress PNG Images
How to Solve Image Is Overly Compressed? [Tips & Tricks]
[Step-by-Step Guide] How to Convert HEIC to JPG Without Losing Quality
Effortless PDF Size Reduction: Reviewing Free PDF Compressor Software


