Android rooting is the process of gaining root access on an Android device. You can start a new world of possibilities of your Android phone or tablet after rooting and that's why more and more Android users, including Moto X users choose to root their devices. In this article, we will tell you what we can benefit from a rooted Moto X and how to root Moto X safely and easily.
Related Article: How to Check Android Root Status?
What You Can Do After Rooting Moto X?
After rooting your Moto X, you can find and install any apps you want and you can get the latest OS version installed on your phone as soon as it is available, without having to wait for a notification. You can optimize your phone in such a way that your battery life gets increased and your phone doesn’t lag in performing certain tasks. People also get this access to delete all the apps that are extra or “bloatware” and keep only the apps they want, thus speeding up their phone’s performance.
Fortunately, it's easy easy to root the Moto X, no matter what carrier you're using. We will share two efficient methods for rooting Moto X. Just follow these simple steps in the below. As a warning, please do not to update your device with any software updates after doing this rooting procedure in order to prevent the danger of losing root or causing the device to crash. Also, we suggest you backup your phone data on computer beforehand.
Solution 1. Root Moto X by Using One Click Root
OneClickRoot is workable for both Windows and Mac computers and allows you to root your Moto X in just a mouse click. It only runs on authorized devices that makes it easy-to-use. Below are the simple steps that can guide you through the Moto X rooting process.
Step 1. Download and install OneClickRoot on your computer. Launch it to get ready.
Step 2. Open USB debugging on your Moto X and connect it to computer with the USB cable. If you don't know how to do it, you can refer to the article: How to enable USB debugging on different Android devices.
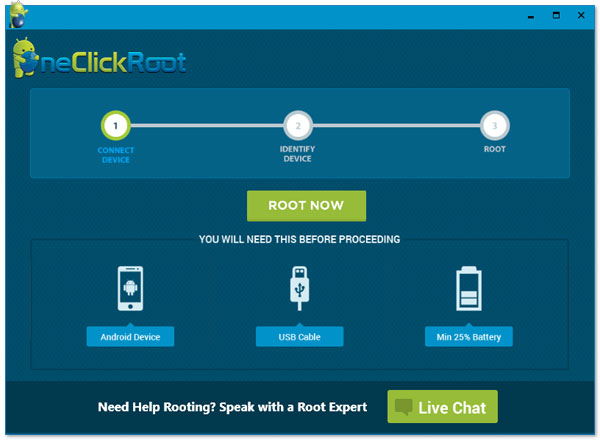
Step 3. OneClickRoot will begin to detect the connected Moto X and pop up you with the following interface. You only need to click on Root Now button to continue.
Step 4. Then just wait for a while until the rooting process is end and the connected Moto X will be rooted successfully.
Solution 2. Root Moto X by Using "MotoRoot" App
If your Moto X is running Android 4.3 or higher, you should follow the operations above to root it. And if your Moto X is in Android 4.2 OS, you can use the application - MotoRoot, to unlock it. Detailed steps are as follows:
Step 1: Download MotoRoot app on your Moto X phone. Here you should be attention that you can only download the app according to your carrier. For example, if you are using Verizon carrier, you should download the Verizon-based MotoRoot.
Step 2: Use a USB cable to connect your Moto X to the computer. Install the downloaded APK file on your device with the help of Coolmuster Android Assistant. Or, you can open the Command Prompt as an administrator and pressing Win+R. You can now proceed to type "adb install -r motoroot-.apk" and press Enter button.
Step 3: Launch the MotoRoot app on your Moto X and choose the option of "Setup".
Step 4: When your Moto X device reboots, you can find the Chainfire "SuperSU" app from the Play Store and just wait for the installation process completes.
Related Articles:


