TL;DR: Reset This PC not working on Windows 10/11? Find out why Windows reset fails and learn 5 proven fixes, including Startup Repair, DISM/SFC, System Restore, Clean Boot, and Windows reinstall. If you need to permanently erase your PC data before selling or disposal, Coolmuster Data Erasure offers a secure and reliable solution to protect your privacy.
Reset This PC is a highly useful system recovery feature in Windows 10/11 that can help users restore their system when it experiences serious problems, runs slowly, or is being prepared for sale. However, some users may encounter the "Reset This PC not working" issue, such as the reset process failing to start, getting stuck at a certain percentage, or displaying the message "Reset failed. No changes were made". This article explains the common causes of the Reset This PC not working issue and provides 5 effective solutions to help you successfully reset your PC.
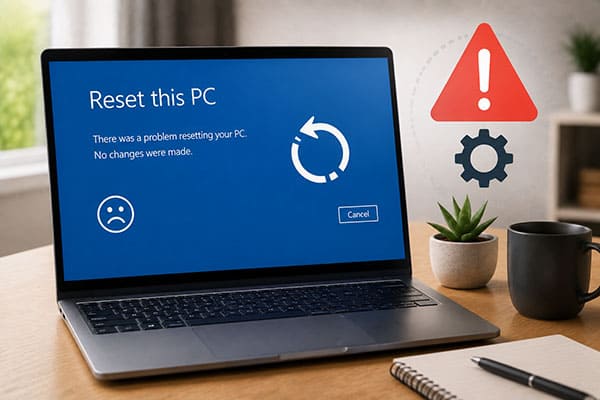
There are many possible reasons why Windows Reset This PC may fail. Common causes include:
Understanding the specific cause can help you choose the right troubleshooting method.
If Reset This PC is not working in Windows 10/11, you can troubleshoot the issue step by step using the methods below.
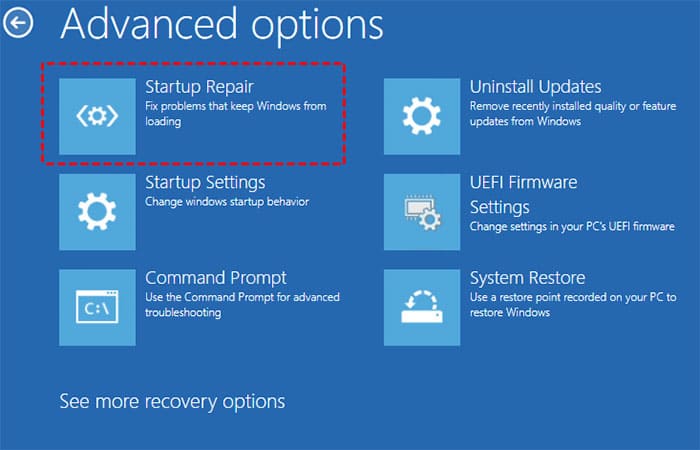
Startup Repair is a built-in Windows recovery tool that can automatically detect and fix various system issues. Give it a try to see if it can resolve the problem.
Here is how to do it:
Step 1. Access the Windows Recovery Environment.
On Windows 10, go to "Settings" > "Update & Security" > "Recovery", then click "Restart now" under "Advanced startup".
On Windows 11, go to "Settings" > "System" > "Recovery", then click "Restart now" next to "Advanced startup".
Step 2. In WinRE, select "Troubleshoot" > "Advanced options" > "Startup Repair".
Step 3. Once the repair is complete, try using Reset This PC again.
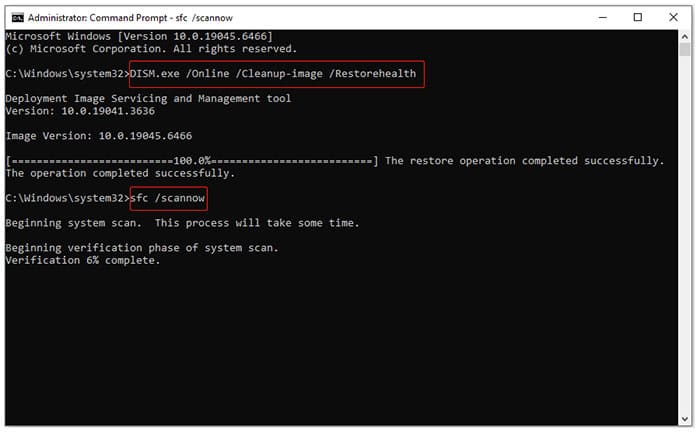
DISM and SFC are built-in Windows command-line utilities designed to detect corrupted system files and repair damaged Windows components. Running these tools can help resolve system-related issues and restore features like Reset This PC that are not working properly.
Here is how to fix Reset This PC not working:
Step 1. Search for "Command Prompt" in the Windows search bar, right-click it, and select "Run as administrator".
Step 2. Enter "DISM.exe /Online /Cleanup-Image /RestoreHealth" in the Command Prompt window and press "Enter" to start the repair process.
Step 3. After the DISM operation is finished, type "sfc /scannow" and press "Enter" to scan and repair corrupted system files.
Step 4. When both commands are complete, type "exit" and press "Enter" to close Command Prompt.
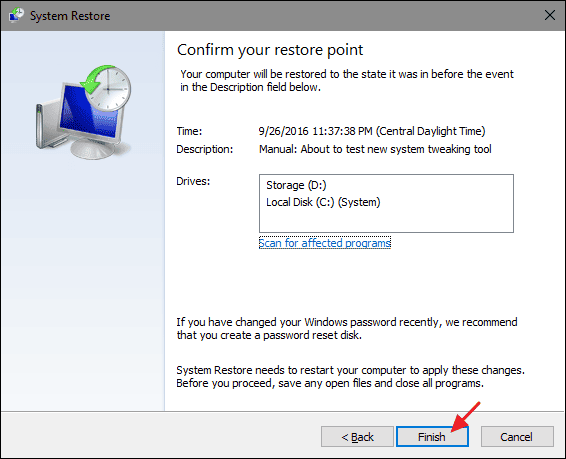
If you have previously created a system restore point, you can use it to resolve the "Reset PC not working on Windows 11" issue. System Restore allows you to roll back your computer to an earlier state when the reset function was working properly. To do this, follow the steps below:
Step 1. Press "Windows" + "R" to open the Run dialog box, type "rstrui.exe", and press "OK" to launch System Restore.
Step 2. In the System Restore window, click "Next" to view available restore points.
Step 3. Select a restore point created before the "Reset This PC not working" issue appeared, then click "Next".
Step 4. Review the restore point details and click "Finish" to start the restoration process.
Step 5. Wait for Windows to complete the system restore. Your computer will restart automatically during the process.
Step 6. After the restoration is finished, try using Reset This PC again to check whether the problem has been resolved.
Some background applications and startup services may conflict with Windows and cause Reset This PC not working errors. Performing a clean boot starts Windows with only essential services running, helping you identify and eliminate potential software conflicts.
Here is how to do it:
Step 1. Sign in to your computer with an administrator account.
Step 2. Type "msconfig" in the Windows search box and select "System Configuration".
Step 3. Go to the "Services" tab, check "Hide all Microsoft services", and click "Disable all".
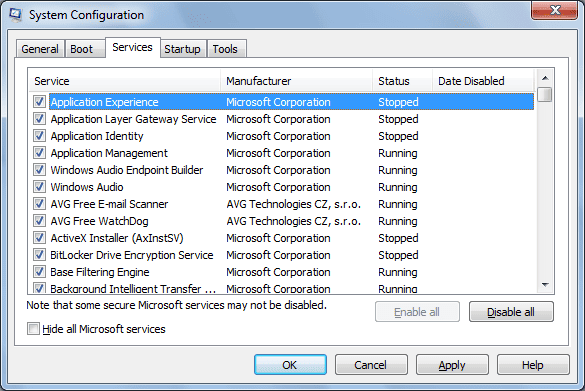
Step 4. Switch to the "Startup" tab and click "Open Task Manager".
Step 5. In Task Manager, select each startup item and click "Disable" to turn off all startup programs.
Step 6. Close Task Manager, click "OK" in the System Configuration window, and restart your computer.
After completing these steps, try using Reset This PC again to check if the issue has been resolved.
If the "Reset This PC not working" issue in Windows 10/11 still cannot be fixed after trying the previous methods, you can consider performing a clean installation of Windows as a final solution. However, this process will completely erase all data, applications, and settings on your computer, and the deleted data cannot be recovered easily. Make sure you have backed up important files before proceeding.
Follow these steps to clean install Windows 10/11:
Step 1. Boot your computer from the Windows 10/11 installation media. After selecting the required language and other settings, click "Install now" instead of "Repair your computer".
Step 2. When prompted to activate Windows, enter your product key. If you do not have one available, click "I don't have a product key" to continue.
Step 3. Select "Custom: Install Windows only (advanced)" in the installation options.
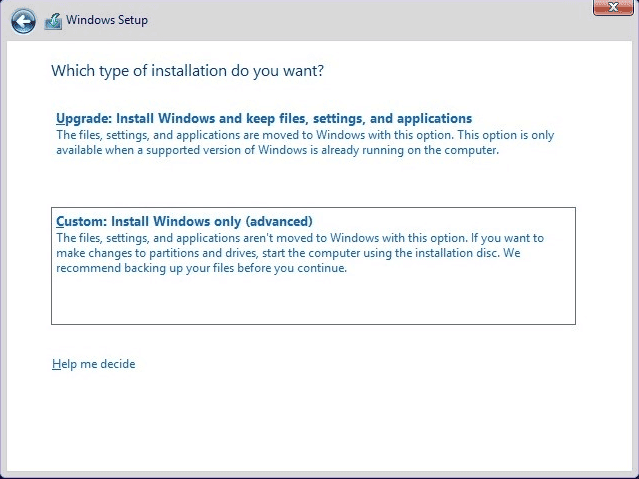
Step 4. Choose the drive where you want to install Windows, click "New" to create a new partition, and then click "Next".
Step 5. Wait for the Windows installation process to complete. Your computer will restart several times during the installation.
If Reset This PC is still not working, and you need to permanently erase all data from your computer, you can use Coolmuster Data Erasure as a reliable alternative. It is designed to securely wipe files and entire drives, ensuring that deleted data cannot be recovered. This makes it a suitable choice when you want to prepare your PC for sale, donation, or disposal without worrying about privacy leaks.
Key features of Coolmuster Data Erasure:
Here is how to wipe your Windows 10/11 using Coolmuster Data Erasure:
01Download and install Coolmuster Data Erasure on your Windows PC, then launch the program. From the main interface, select the "Drive Wiper" mode.
02Choose an erasure method, such as "Quick Erase" or "Deep Erase", and select the hard drive you want to wipe.
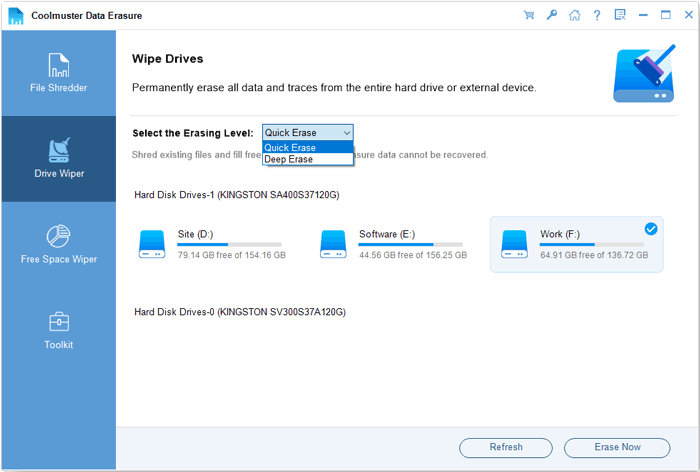
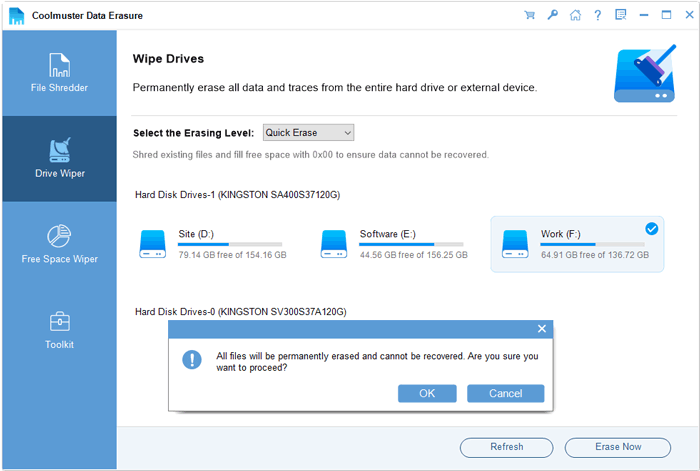
03Click "Erase Now" to start the wiping process. Confirm your selection when prompted and wait for the process to complete. Make sure you have backed up important files in advance, as all data on the selected drive will be permanently erased.
Video Tutorial:
When you encounter "Reset This PC not working on Windows 10/11", you can try the methods mentioned above one by one to troubleshoot and fix the issue. However, if your actual purpose of using Reset This PC is not to repair the system but to securely erase personal data before selling, transferring, or disposing of your computer, a dedicated data erasure tool may be a better choice. Coolmuster Data Erasure focuses on secure data wiping and can help you easily remove unwanted data while reducing the risk of personal information being recovered.
Related Articles:
File Shredder Not Deleting Corrupted Files: 4 Easy Fixes
How to Delete Files Without Sending to Recycle Bin: 5 Easy Ways
[Solved] How to Fix Windows Was Unable to Complete the Format?







 Free Download for PC


