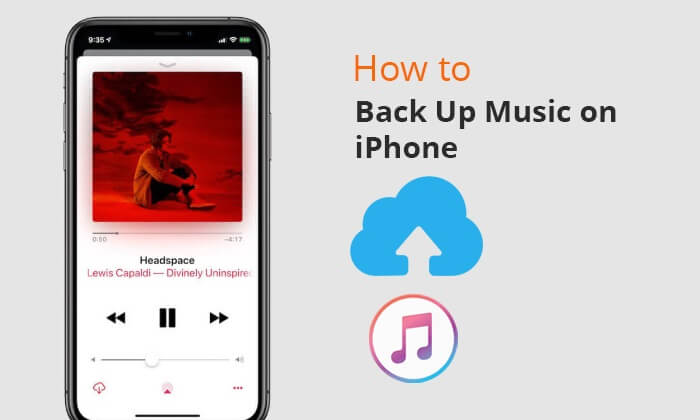
For many music enthusiasts, the iPhone is not just a phone, but also a portable music player. Whether it's songs they've cherished for years, music purchased through iTunes, or audio files shared by friends, if the iPhone is lost or damaged, these music files could be gone forever. Therefore, regular iPhone music backup is essential. So, how can you back up music on your iPhone? Please read this guide to learn how.
If you want to quickly and bulk-backup the music on your iPhone to your computer, Coolmuster iOS Assistant is the best choice. It is a professional iOS device management software, and with it, you can transfer the music you want to your computer without compromising quality. In addition to music, it also supports contacts, messages, photos, videos, notes, bookmarks, and more.
Key features of iOS Assistant:
Here is how to back up music on iPhone to PC/Mac using iOS Assistant:
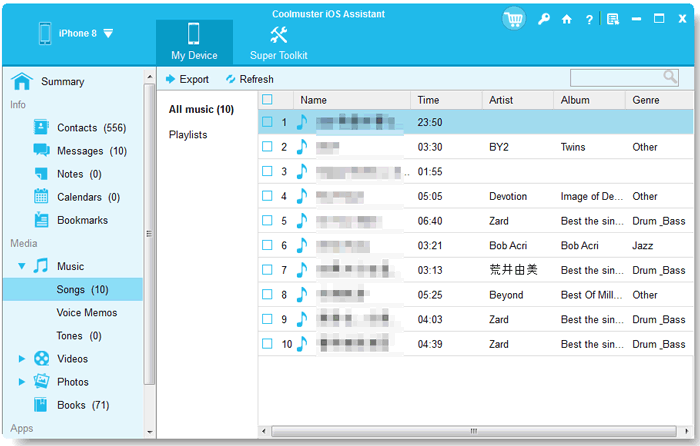
01Download, install, and launch the software. Then, link your iPhone to the PC using a USB cable. Once the software detects your device, you'll be greeted with the main interface, as shown below.

02Select the "Music" option on the left panel, choose the desired music from the right panel, and click "Export" in the top menu. Your chosen iPhone music will be transferred to the computer once the progress bar is complete.
Video Tutorial:
iTunes is Apple's official iPhone management software, and backing up your iPhone music to iTunes is also a great option. There are two methods to do this. Be sure to have the latest version of iTunes installed on your computer.
You can choose to back up all your iPhone data, including music, to iTunes. Here are the steps:
Step 1. Install and open the latest version of iTunes on your computer.
Step 2. Connect your iPhone to the computer using a USB cable.
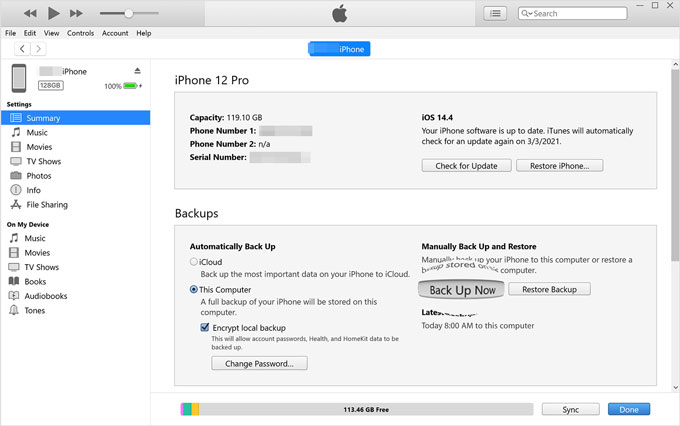
Step 3. Click the device icon in the top-left corner to access the device "Summary" page. (iPhone not showing up in iTunes?)
Step 4. In the "Backups" section, select "This Computer".
Step 5. Check the box for "Encrypt local backup" (optional, for privacy protection).
Step 6. Click the "Back Up Now" button and wait for the backup to complete.
If a significant portion of your music collection comes from the iTunes Store, you can transfer your purchases to iTunes. Here is how to do it:
Step 1. Open iTunes, go to "Account" > "Authorizations", and select "Authorize This Computer" to allow the computer to access and use your Apple ID.
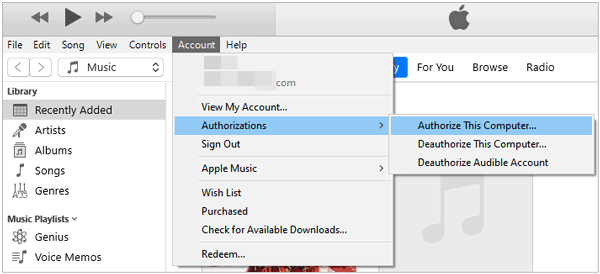
Step 2. Log in with your Apple ID and password, then click "Authorize" to ensure the computer can play iTunes Store purchases.
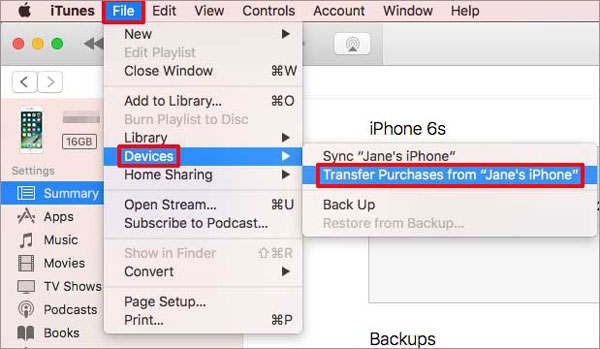
Step 3. Connect your iPhone to the computer via USB, then go to "File" > "Devices" and select "Transfer Purchases from [your iPhone name]" to transfer music from your iPhone to iTunes.
Step 4. Once the process is complete, you can click "Recently Added" in the left panel of iTunes to view the newly imported songs. If you see a Download button, click it to download the music to your computer.
iCloud is Apple's official cloud backup service, allowing users to store data from their iPhone in the cloud without the need for a computer, making it easy to restore at any time. However, it's important to note that the free iCloud account offers only 5GB of storage, so if you have a lot of music, you may need to purchase additional storage. (How to free up iCloud storage?)
The iCloud backup feature can store most of the data on your iPhone in the cloud, including local music and some in-app music. Here are the steps:
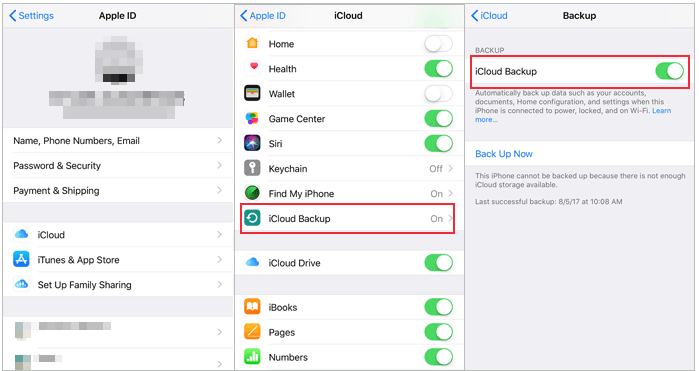
Step 1. Open your iPhone and go to "Settings" > "Apple ID" > "iCloud" > "iCloud Backup".
Step 2. Make sure the "iCloud Backup" toggle is turned on.
Step 3. Tap "Back Up Now", and the system will begin uploading the current device data to iCloud.
For Apple Music or iTunes Match subscribers, after enabling iCloud Music Library (or "Sync Library" in some newer systems), music will automatically upload to iCloud and be accessible on other devices. Here is how to do it:
Step 1. Open your iPhone and go to "Settings" > "Music".
Step 2. Find the "Sync Library" (or "iCloud Music Library") toggle and make sure it is turned on.
Step 3. Ensure your device is connected to the internet and wait for the music to automatically sync and upload.

Finally, you can also back up iPhone music to Google Drive. Before you start, the only thing you need to do is to make sure there is enough storage on Google Drive. As Google Drive merely offers 15 GB of free storage for every user, you will have to pay for expanded storage when it is used up. (How to back up iPhone to Google Drive?)
Steps to back up music from iPhone to Google Drive:
Step 1. Access the official Google Drive website on your iPhone's web browser or install the Google Drive client app. Sign in using your Google account credentials.
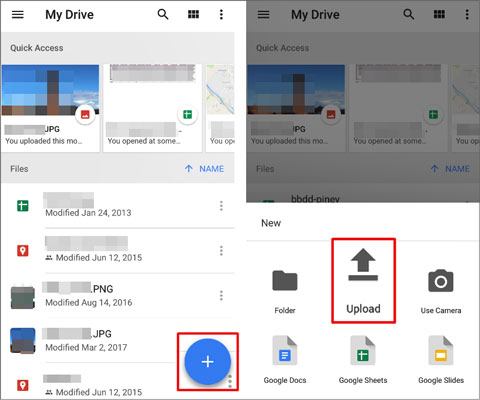
Step 2. Open the Google Drive app. Tap on the "+" or "Add" button.
Step 3. Choose "Upload" from the menu options. Navigate to the location of your music files and select the songs or folders you want to back up. Tap "Upload" to start the upload process.
Q1. How can I back up my Apple Music library?
To back up your Apple Music, open iTunes, go to "File" > "Library" > "Organize Library", select "Consolidate files", and click "OK".
Q2. How do I back up my iPhone without losing music?
Launch iTunes on your computer, select your iPhone, then go to "Summary" and check the option for "Manually manage music and videos". Click "Apply" to complete the process.
Q3. Will syncing my music erase it?
If you back up music via syncing, your existing tracks may be deleted. To avoid this, you can use Coolmuster iOS Assistant to back up your music files without losing data or quality.
In summary, there are various methods for backing up iPhone music. iTunes is suitable for users who are accustomed to Apple's official tools, but it is relatively cumbersome and has several limitations. iCloud backup is convenient but has limited storage and certain requirements for music types. Google Drive is ideal for temporary manual uploads but has limited use cases.
However, if you want a simple, efficient, and secure solution that allows you to manage and back up iPhone music in bulk, Coolmuster iOS Assistant is undoubtedly the best choice. It supports exporting various types of data, allows you to view and manage music files directly on your computer, and completely eliminates the complex restrictions of iTunes, making it perfect for iPhone users who prioritize efficiency.
Related Articles:
[Solved] How to Transfer Music from iPhone/iPad to External Hard Drive?
How to Back Up iPhone to Computer in Minutes? [6 Methods]
iPhone Music Manager: Transfer, Add and Organize Your iPhone Music
How to Transfer Songs from iTunes to iPhone in 4 Reliable Ways


 Free Download for PC
  Free Download for Mac

