Transferring videos from your iPhone to your computer is something you might want to do right now, especially when your iPhone's storage is running low or you want to edit videos more comfortably on a larger screen. If you're looking for a secure and fast way to transfer videos, you've come to the right place.
This guide will introduce several effective methods for transferring iPhone videos to your computer, whether you're using Windows or Mac. Each method is simple and easy to understand, helping you manage your videos with ease. Read on to choose the right method for you.
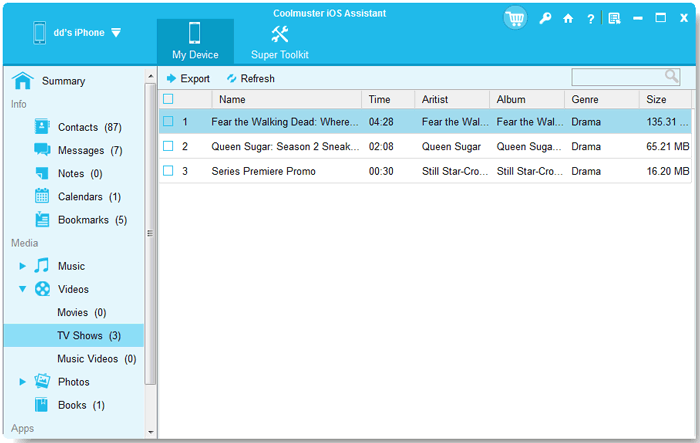
A highly effective method for transferring videos from your iPhone to a computer is using Coolmuster iOS Assistant. This powerful iOS data management and transfer software allows you to effortlessly transfer iPhone videos to both Windows and Mac computers, without any loss in video quality or compression. In addition to videos, it supports the transfer of other file types such as photos, music, contacts, SMS, notes and more. With its fast transfer speeds and user-friendly interface, it's an ideal choice for seamless file management.
Key features of iOS Assistant:
Here's how to put videos from iPhone to computer via iOS Assistant:
01Install and launch iOS Assistant on the Windows PC. Use a USB to connect the iPhone to the PC. Click "Trust" on your iPhone to trust your device. When the tool detects your phone, you'll see an interface with all files arranged in categories.

02Tap on "Videos" from the left panel. Preview as you select the specific video files to transfer. Tap "Export" to begin the transfer process.
Video Tutorial:
The iCloud app for Windows provides a simple and efficient way to access your iPhone videos directly on your computer. It automatically syncs your videos across devices, saving you the hassle of figuring out how to transfer videos from an iPhone. Additionally, you can select specific folders, organize files easily, and download them at any time without needing a cable. Here's how you can do it:
Step 1: Open your iPhone settings, tap on "Apple ID," then select "iCloud."
Step 2: Next, go to "Photos" and turn on the "Sync This iPhone" toggle.
Step 3: Open the iCloud app on your Windows PC and log in with the same Apple ID.
Step 4: Click the "Forward" icon next to "iCloud Photos."
Step 5: Enable the "Download HDR Video" option, press "Change Location," and click "Done." Your synced videos will now be available in the designated location.
However, this method relies on iCloud storage, and the free version only offers 5GB of storage. (How to free up iCloud storage?)
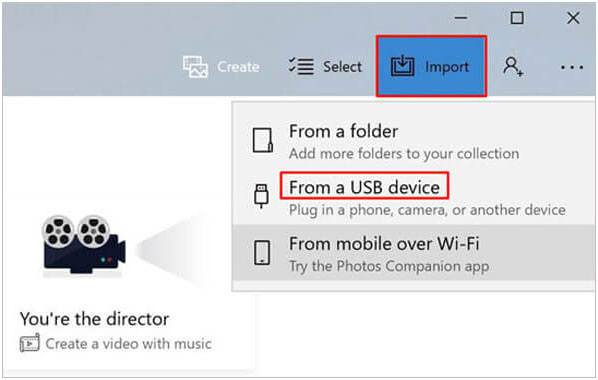
The Windows Photos app provides a simple way to import videos from your iPhone while preserving their original quality. It automatically detects your connected device, allowing you to choose the videos you want to transfer. You can either select specific videos or import them all at once, without worrying about data loss or file compression. Here's how to transfer videos from an iPhone to your laptop with ease:
Step 1: Connect your iPhone to your PC using a USB cable and tap "Trust" on your iPhone.
Step 2: Open the Photos app on your PC and select "Import" > "Apple iPhone."
Step 3: Choose the videos you want to transfer and click "Add Items" to begin the import process. (Can't import photos/videos from iPhone to PC?)
File Explorer allows Windows 10/11 users to directly access the iPhone's DCIM folder, enabling them to manually copy and paste video files without the need for additional software.
Here is how to transfer videos from iPhone to computer with USB:
Step 1. Connect the iPhone to the Windows computer using a USB cable and trust your device.
Step 2. Open File Explorer (shortcut "Win + E").
Step 3. In the left sidebar, find "This PC" > "Apple iPhone", and click to enter.
Step 4. Open the "Internal Storage" folder, then go into the "DCIM" folder.
Step 5. Select the video files you want to transfer, right-click to select "Copy", and then paste them into the target folder on the Windows computer.

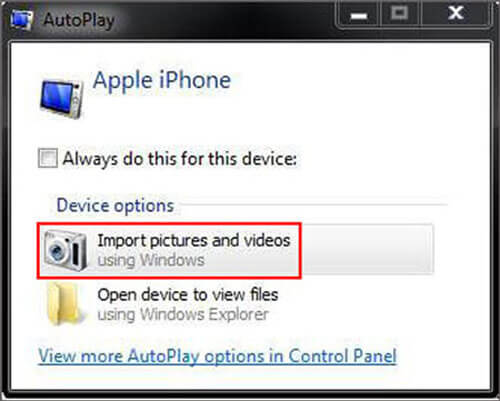
AutoPlay is an automatic import feature provided by Windows, designed for quickly transferring photos and videos.
Here is how to transfer videos from iPhone to Windows computer using AutoPlay:
Step 1. Connect the iPhone to a computer for automatic detection. After that, tap "Import pictures and videos" as prompted.
Step 2. Hit "Import Settings" to change the video storage path. (To save C disk space on your PC, suggest you set another disk for storing your videos.)
Step 3. Tap "Import" to get videos from iPhone to computer.
An alternative app to transfer video from iPhone to PC is by using iTunes. However, it only applies to video file transfer for specific applications.
Here's how to transfer videos from iPhone to PC via iTunes:
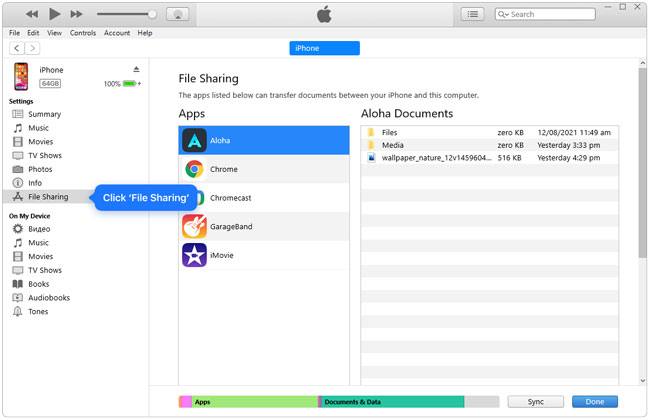
Step 1. Make sure your iPhone is connected to the computer, and open the most recent version of iTunes on your PC.
Step 2. After the iPhone icon appears in the iTunes window, simply tap on it. Then, proceed to select "File Sharing" and choose the desired app from the list.
Step 3. Select the desired video you wish to transfer, then tap on "Save to" to specify the storage location. Finally, click on the "Save" button to synchronize and transfer it to your PC.
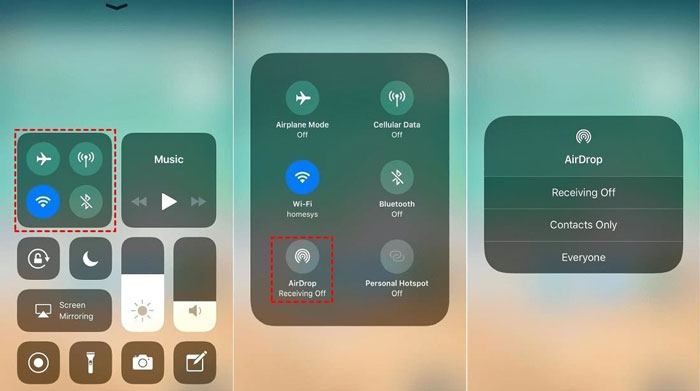
AirDrop is a built-in Apple feature that allows you to transfer files wirelessly without the need for cables. It uses Bluetooth and Wi-Fi to let you send videos between Apple devices. There's no need for third-party apps—just keep both devices nearby and enable AirDrop. Follow these steps to transfer videos from your iPhone to Mac using AirDrop:
Step 1. On your Mac, open AirDrop and select "Everyone" under the "Allow Me To Be Discovered By" section.
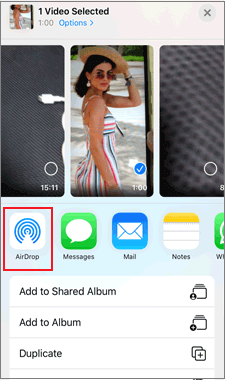
Step 2. On your iPhone, open the video, tap the "Share" icon, then select "AirDrop" and choose your Mac.

Step 3. Once your Mac detects the video, click "Accept" to start the download.
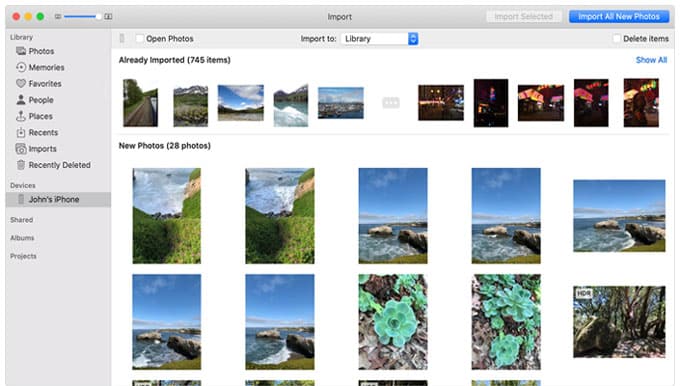
If you're looking for a simple way to transfer videos from your iPhone to Mac, the Photos app offers an easy, built-in solution. It automatically detects your iPhone, allowing you to preview videos and import them directly without any complicated steps. This method also preserves the original video quality and organizes your files automatically once connected. Here's how to do it:
Step 1. Connect your iPhone to your Mac and click "Allow" on your iPhone when prompted.
Step 2. Open the Photos app, go to the "iPhone" tab, select the videos you want, and click the "Import Selected" button.
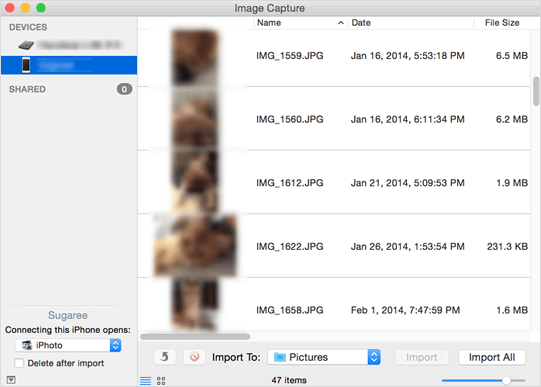
"Image Capture" is a built-in tool for quick media transfers from iPhone to Mac. After connecting your iPhone, it displays all your videos, allowing you to select only the ones you want to transfer. This method is fast, lets you preview files, and provides an easy way to choose where to save them. Follow these steps to transfer videos from iPhone to Mac:
Step 1: Open "Image Capture" on your Mac.
Step 2: Connect your iPhone via USB.
Step 3: Select the videos you want to transfer and click "Import."
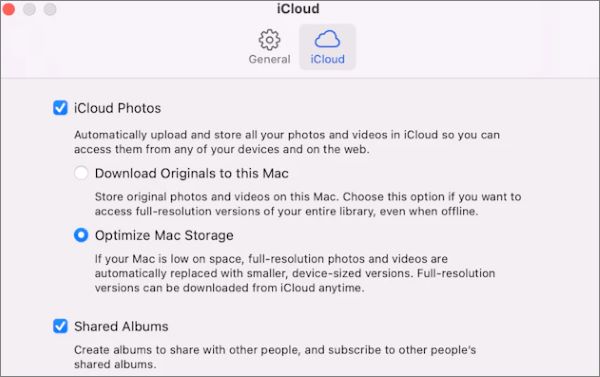
This method allows you to automatically sync videos across all your Apple devices using your Apple ID. You can safely store your videos in the cloud and sync them to your Mac without the need for additional software. By signing in with the same Apple ID, you can access your media anytime on any device (How to access iCloud?). Let's walk through how to transfer videos from an iPhone to a Mac using iCloud sync:
Step 1: Go to "Settings" and tap on your Apple ID account, then select the "iCloud" section.
Step 2: Choose the "Photos" app and turn on the "Sync This iPhone" toggle. Once enabled, your media files will begin appearing on the Mac, provided it's signed in with the same Apple ID.
You can transfer videos from your iPhone to your Mac using Finder, especially if you're running macOS Catalina or later. This method allows you to manually transfer files like videos, photos, and other documents without needing third-party software. Here's how to do it:
Step 1: Connect your iPhone to your Mac using a USB cable.
Step 2: Open Finder on your Mac (instead of iTunes, which was used in older macOS versions).
Step 3: In the Finder sidebar, select your iPhone under "Locations."
Step 4: Click on the "Files" tab at the top of the Finder window.
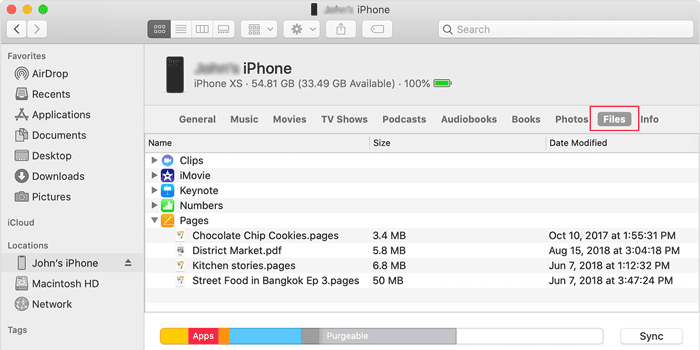
Step 5: Locate the videos you want to transfer from the list of apps that have files on your device.
Step 6: Drag the videos from the Finder window to a folder on your Mac or use the "Copy" option.
In conclusion, transferring videos from an iPhone to a computer is a great way to free up space and secure your backups. This article has covered various efficient methods for moving videos from an iPhone to a computer. For those seeking an easy and reliable way to transfer large video files, Coolmuster iOS Assistant is the ideal solution. It ensures smooth transfers of large files without any loss of quality, compression, or complex steps.
Related Articles:
How to Transfer Large Video Files from iPhone to PC? Try 9 Ways Here
How to Transfer Videos from iPhone to USB Stick with or without a Computer?
[Step-by-Step Guide] How to Transfer Videos from Mac to iPhone?
[Step-by-Step Guide] How to Transfer Videos from iPhone to iPad?


 Free Download for PC
  Free Download for Mac

