TL;DR:
Sharing photos with family and friends is easier with iCloud Photo Sharing (Shared Albums), and this guide will walk you through the process step by step.
Sharing photos is a great way to keep family and friends connected, but sending large numbers of pictures individually can be inconvenient. Luckily, Apple provides iCloud Photo Sharing (Shared Albums), a simple way to share selected photos and videos with others through iCloud.
In this guide, we'll explain what iCloud Photo Sharing is and show you how to enable and use it on iPhone, iPad, Mac, and Windows. Keep reading to learn how to share your favorite memories more easily.
iCloud Photo Sharing, now known as "Shared Albums", is a feature that allows Apple users to share photos and videos with family, friends, or other invited people through iCloud. Instead of sharing your entire photo library, you can create a shared album and select specific photos or videos that you want others to see.
After you invite people to a shared album, they can view the content, add their own photos and videos, leave comments, and like shared items (depending on the sharing settings). Shared Albums provide a simple way to collect and share memories without sending large numbers of files individually.
Each Shared Album can contain up to 5,000 photos and videos, and the shared content does not use your iCloud storage space. However, photos and videos in Shared Albums may be stored at reduced resolution compared with the originals.
Is your iCloud storage full? Read this article to learn how to free up storage.
iCloud Storage Full? Here's What to Do to Free up iCloud StorageAlthough iCloud Photos and iCloud Photo Sharing (Shared Albums) are both Apple photo features, they work differently. iCloud Photos is used to sync your entire photo library across your devices, while iCloud Photo Sharing is used to share selected photos and videos with others.
With iCloud Photos, your photos and videos are synced across devices using the same Apple ID. Any edits or changes will update automatically, but the feature uses your iCloud storage.
With iCloud Photo Sharing (Shared Albums), you can create albums and invite others to view, comment on, or add photos. Shared Albums don't use iCloud storage, but the quality of shared content may be reduced.
|
Feature
|
iCloud Photos
|
iCloud Photo Sharing |
|
Purpose
|
Sync your personal photo library
|
Share photos with others
|
|
Storage
|
Uses iCloud storage
|
Doesn't use iCloud storage
|
|
Access
|
Your Apple devices
|
Invited people
|
|
Photo quality
|
Original quality
|
May be compressed
|
|
Best for
|
Photo backup and syncing
|
Sharing memories
|
In short, use iCloud Photos to keep your photos updated across your own devices, and use iCloud Photo Sharing when you want to share specific photos with family or friends.
To set up iCloud Photo Sharing on your iPhone or iPad, you need to ensure that your device is signed in to iCloud and that the "Photos" option is enabled. Here are the steps:
Step 1. Open the "Settings" app on your device.
Step 2. Tap your Apple ID at the top, then select "iCloud".
Step 3. Tap "Photos", then turn on the "Shared Albums" feature. (Shared Albums not showing up?)
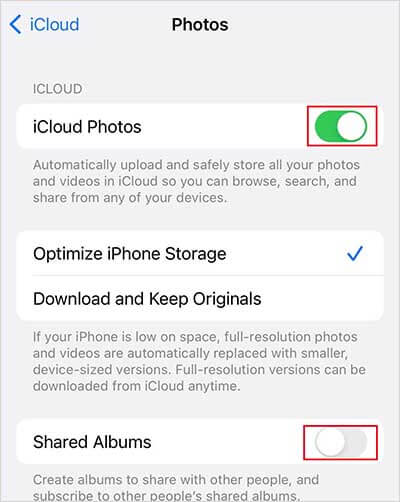
Step 4. You can now create and manage shared albums.
Note: With the release of iOS 12, Apple renamed iCloud's album-sharing feature to "Shared Albums". Depending on your iOS version, you might see it listed as either Shared Albums or iCloud Photo Sharing.
After enabling iCloud Photo Sharing (Shared Albums), you can create a shared album and invite others to view or add photos. Follow the steps below to share photos with family and friends on your iPhone or iPad.
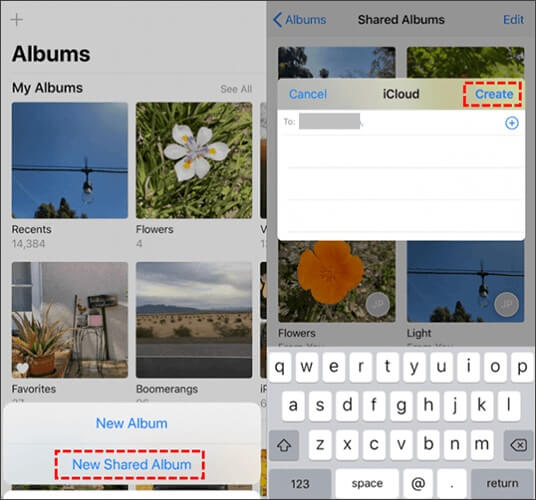
If you don't have a shared album yet, you can create one from the Photos app.
Step 1. Open the Photos app on your iPhone or iPad.
Step 2. Go to Albums, tap the + icon, and select "New Shared Album".
Step 3. Enter a name for the shared album and tap "Next".
Step 4. Select the contacts you want to share with, then tap "Create".
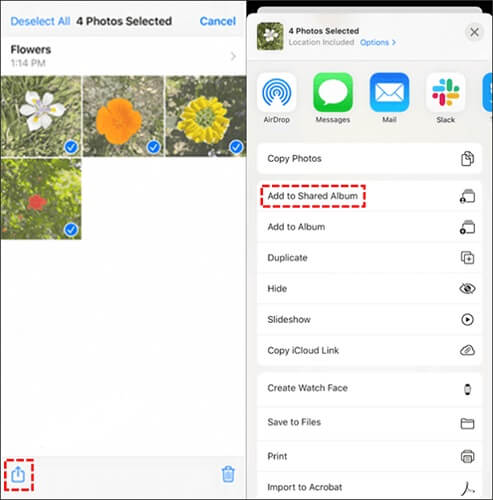
If you already have a Shared Album, you can add new photos or videos to it at any time.
Step 1. Open the Photos app and select the photos you want to share.
Step 2. Tap the "Share" button and choose "Add to Shared Album".
Step 3. Select an existing Shared Album.
Step 4. Add a comment if needed, then tap "Post" to share the photos.
Bonus: Are you unable to share photos on your iPhone or iPad? Read this article to find the reasons and solutions.
You can also use iCloud Shared Albums on your Mac to share photos and videos with family and friends. Before getting started, make sure you are signed in to iCloud with your Apple ID and have Shared Albums enabled.
Follow the steps below to create and share a Shared Album on Mac:
Step 1. Open the Photos app on your Mac.
Step 2. From the menu bar, click "Photos" > "Settings" (or "Preferences" on older macOS versions).
Step 3. Select iCloud and enable "Shared Albums".
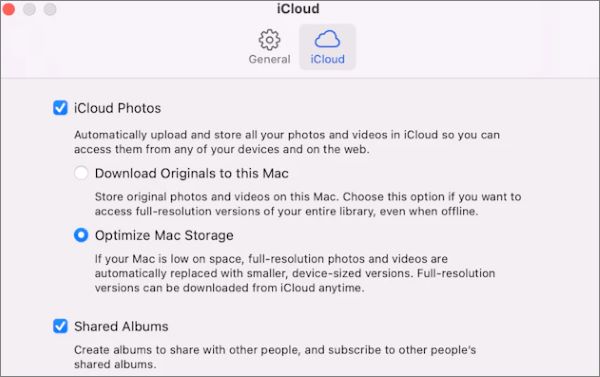
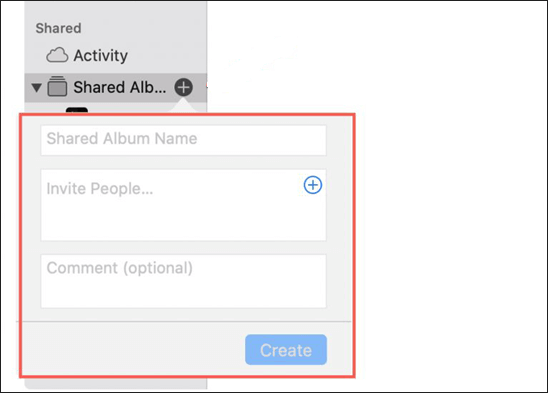
Step 4. In the Photos app, find "Shared Albums" in the sidebar, click the + icon, and create a new shared album. Enter a name, invite people, and click "Create".
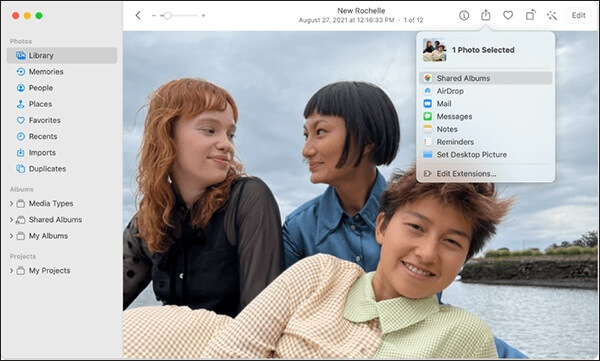
Step 5. Select the photos you want to share, click the Share button, choose "Shared Albums", select the album, and click "Post".
Unlike iPhone, iPad, and Mac, Windows PCs have limited support for iCloud Shared Albums. You can use iCloud for Windows to access synced photos and view Shared Albums, but creating and managing Shared Albums is mainly done through Apple devices.
Before you start, download and install iCloud for Windows, then sign in with the same Apple ID used for your Shared Albums.
Follow these steps to access iCloud Shared Albums on Windows:
Step 1. Open iCloud for Windows and sign in with your Apple ID.
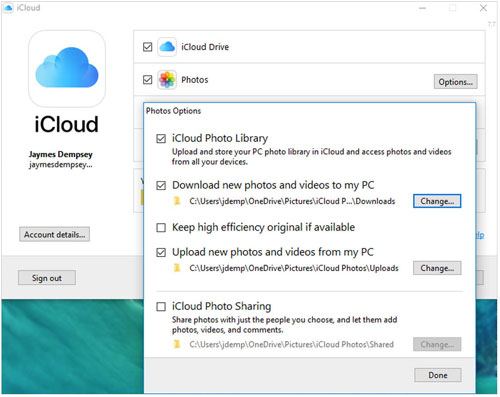
Step 2. Select Photos, then click Options next to it.
Step 3. Enable "Shared Albums" and click "Done", then select "Apply".
Step 4. Open File Explorer and select iCloud Photos from the sidebar.
Step 5. Find the Shared Albums section to view photos and videos shared with you.
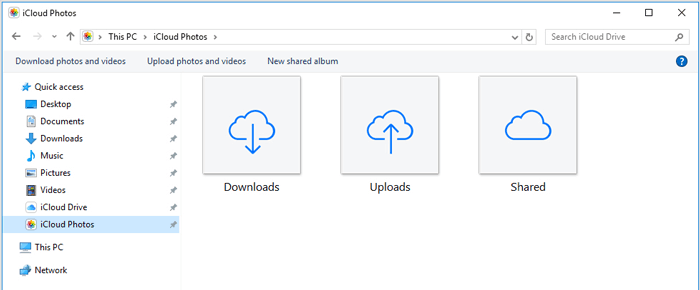
Note: If you want to create a new Shared Album or invite people, it is recommended to do so on an iPhone, iPad, or Mac for a better experience. (What Happens If I Turn Off iCloud Photos?)
If you no longer want to share photos with others, you can stop sharing them by deleting a Shared Album or removing specific people from it. Keep in mind that when you delete a Shared Album, all photos and videos in that album will be removed for everyone who has access to it.
If you only want to stop sharing photos with certain people, you can remove them from the Shared Album without deleting the entire album.
Step 1. Open the Photos app on your iPhone or iPad.
Step 2. Go to Albums and open the Shared Album you want to manage.
Step 3. Tap the "People" icon, select the person you want to remove, and tap "Remove Subscriber".
If you no longer need a Shared Album, you can delete it completely.
Step 1. Open the Photos app and go to "Albums".
Step 2. Open the Shared Album you want to delete.
Step 3. Tap the People icon and select "Delete Shared Album".
Step 4. Confirm the deletion to stop sharing the photos with all subscribers.
After deleting a Shared Album, other participants will no longer be able to view the shared photos and videos. If you want to share photos again later, you can create a new Shared Album at any time. (How Do I Stop My iPhone Photos from Syncing to My iPad?)
While iCloud Photo Sharing (Shared Albums) is great for sharing photos, it is not a complete backup solution. If you want to transfer iPhone photos to a computer, manage your photo library, or save photos without iCloud storage limits, Coolmuster iOS Assistant can help you do it easily.
How to Transfer Photos from iPhone to Computer with Coolmuster iOS Assistant:
01 Download and install Coolmuster iOS Assistant on your computer. Connect your iPhone to the computer using a USB cable and tap Trust on your device if prompted.
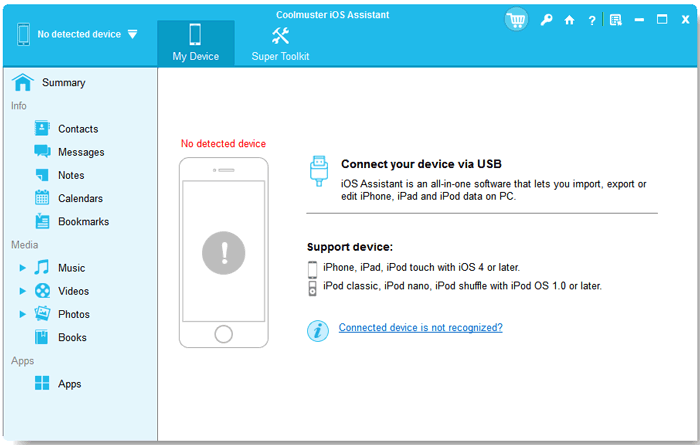
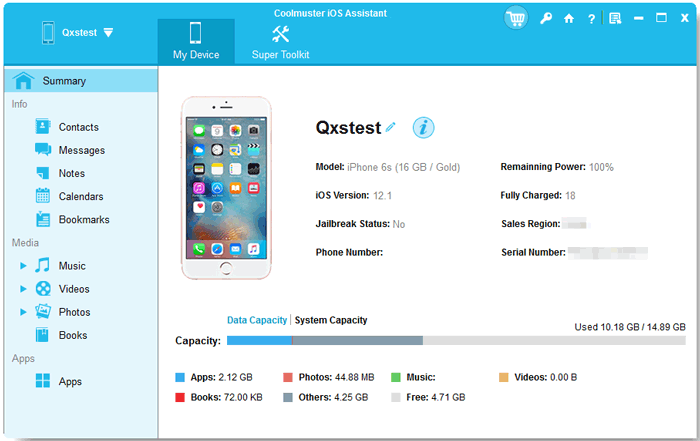
02Launch the program and wait for it to recognize your iPhone. Once connected, you will see your device information on the main interface. Click Photos from the left sidebar to preview all photos stored on your iPhone.
03Select the photos you want to transfer, then click the "Export" button to save them to your computer.
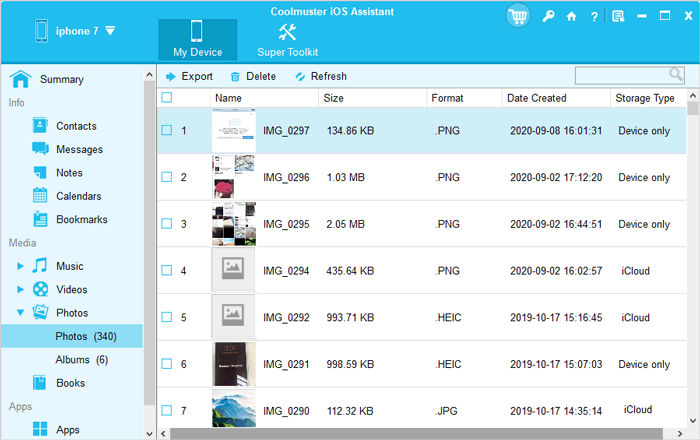
After the transfer is complete, you can safely access your iPhone photos on your computer and keep an extra copy of your important memories.
Video Guide:
Q1. How many photos can I share with iCloud Photo Sharing?
Each Shared Album can store up to 5,000 photos and videos. You can invite up to 100 people to view or contribute to a shared album.
Q2. Can I share iCloud photos with someone who doesn't have an iPhone?
Yes. You can share a public link to a Shared Album so that people without Apple devices can view the photos in a web browser. However, some features, such as adding photos or comments, may require an Apple device.
Q3. Why is my iCloud Photo Sharing not working?
If Shared Albums are not working, check that you are signed in with the correct Apple ID, have a stable internet connection, and have enabled Shared Albums in iCloud settings. You can also try restarting your device or turning Shared Albums off and on again.
Q4. Can I recover deleted photos from an iCloud Shared Album?
No. Once photos are deleted from a Shared Album, they cannot be recovered through iCloud. If you want to keep a copy, save the photos to your personal library before removing them from the shared album.
iCloud Photo Sharing (Shared Albums) makes it easy to share selected photos and videos with family, friends, or other people without sending files one by one. Whether you use an iPhone, iPad, Mac, or Windows PC, you can access and manage shared photos in a convenient way.
In this guide, we covered what iCloud Photo Sharing is, how to enable it, and how to create, share, and manage Shared Albums on different devices. Now you can choose the best way to share your favorite memories with the people who matter.
Related Articles:
[2026 Update] How to Stop Sharing Contacts on iPhone
[Answered] Do Shared Albums Take Up Storage on iPhone/iCloud?
Fix iCloud Link Not Working or Loading | Effective Solutions




 Free Download for PC
  Free Download for Mac


