When syncing an iPhone, iPad, or iPod with iTunes, most people connect the device to a computer using a USB cable and complete the process manually. In fact, you are allowed to sync iPhone to iTunes over Wi-Fi. With a few simple settings in iTunes, you can enable Wi-Fi syncing and keep your iPhone or iPad connected without using any cables. As long as both your iOS device and computer are on the same network, your music, movies, TV shows, and tones will sync automatically. This saves time and eliminates the need to plug in your device every time. Now, let's take a look at how to set it up.

Before getting started, make sure iTunes is updated to the latest version. To activate wireless syncing, you will need to connect your device to the computer with a cable the first time.
Step 1: Use a USB cable to connect your iPhone or iPad to the computer. Open iTunes if it does not start automatically.
Step 2: Once iTunes recognizes your device, click the iPhone or iPad icon at the top of the window. Then select your device name from the left sidebar.
Step 3: Scroll down to the Options section and check the box labeled "Sync with this iPhone over Wi-Fi" or "Sync with this iPad over Wi-Fi".
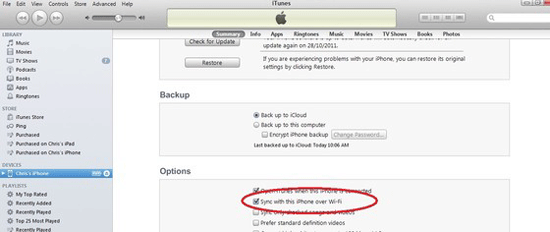
Step 4: Click "Apply" in the bottom right corner to save the settings. After that, click the eject icon near the top left to safely disconnect your iPhone or iPad. (iTunes Back Up Now Greyed Out?)
Once iTunes Wi-Fi syncing is set up, your preferences will be saved. Whenever you want to sync your iPhone wirelessly, you can simply follow the steps below.
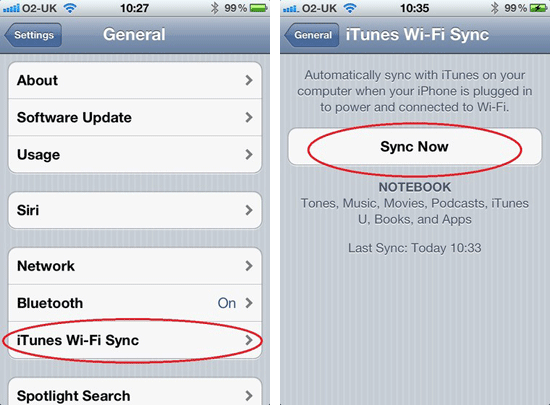
Step 1: Make sure your iPhone and computer are connected to the same Wi-Fi network.
Step 2: Turn on your iPhone, open the "Settings" app, and tap your name at the top of the screen.
Step 3: Navigate to "General", select "iTunes Wi-Fi Sync", and choose your computer from the list.
Step 4: Tap "Sync Now" to begin syncing your iPhone through iTunes over Wi-Fi. When the process finishes, you will see a confirmation message.
Note: Wireless syncing usually takes longer than syncing with a Lightning cable. However, it is more convenient since syncing can start automatically whenever your iPhone and computer are connected to the same network.
After the sync is complete, you can check the iTunes backup location to confirm that the backup has been created successfully.
If your syncing process does not work, here are some tips you can use to troubleshoot your problems. (For more details: How to Fix iPhone Not Syncing with iTunes?)
Tip 1. Restart your desktop and iOS device.
Tip 2. Make sure that both your device, and your desktop are connected to the same Wifi network. This syncing does not happen over Ethernet to Wifi networks. You can Forget the Network and then rejoin the network once again.

Tip 3. Check your firewall settings. In case you are using a security firewall, contact your software security for help.
Tip 4. You can contact your router manufacturer if you are using firewall on your router.
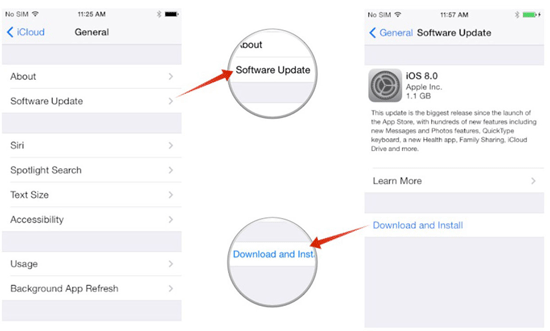
Tip 5. Update iOS and iTunes to the latest versions.
Tip 6. After trying all the fixes, iTunes Wifi sync still doesn't work, you may need to reset network settings on your device.
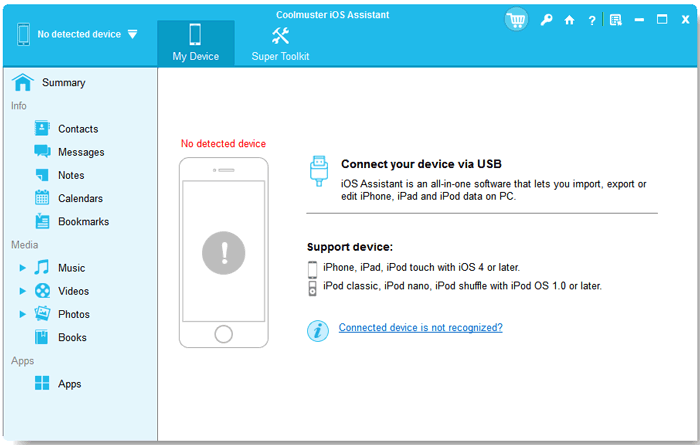
In fact, you may encounter iPhone stuck on connect to iTunes, and iTunes Wi-Fi syncing is not the only way to transfer data from your iPhone. For example, Coolmuster iOS Assistant offers a reliable and efficient alternative to iTunes. It is a professional iPhone data manager that helps you transfer, back up, and organize your iOS files easily. It supports contacts, photos, videos, messages, notes, and more. With this tool, you can manage iTunes backups, restore data, or selectively export files from iPhone to computer without data loss.
Key Functions of iOS Assistant:
How to Sync iPhone to Computer with iOS Assistant:
01Install and launch Coolmuster iOS Assistant on your computer, then connect your iPhone via USB. The software will detect your device automatically.
02Browse your iPhone files by category, preview the data, and select the items you want to transfer.

03Click "Export" to save the selected files to your computer. You can choose any folder as the destination.

Video Guide:
In conclusion, wireless syncing has made transferring data much faster and more convenient compared to the older, cumbersome methods. Most of the time, the syncing process works seamlessly, but if you run into issues, following the steps above should help. For a completely hassle-free experience, you can use Coolmuster iOS Assistant to easily transfer files between your iPhone, iPad, or iPod and your computer without relying on iTunes Wi-Fi sync.
Related Articles:
2 Ways to Transfer Music from iPhone to iTunes Library
2 Simple Ways to Transfer iPhone Purchases to iTunes


 Free Download for PC
  Free Download for Mac

