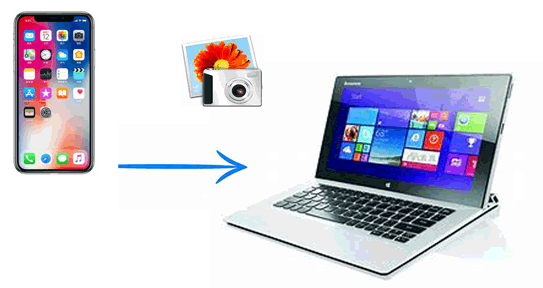
Many people love capturing moments with their iPhones, especially with the impressive camera quality of the new iPhone 16 and 17. However, as time goes on, those stunning photos can quickly start filling up your storage. When that happens, transferring your pictures to a computer is a smart way to free up iPhone space while keeping your memories safe.
So, how can you efficiently transfer photos from your iPhone to your laptop?
In this guide, we'll show you 8 simple and effective ways to do it. Whether you're using a Windows laptop or a MacBook, you'll find an easy solution that works for you.
Since people use different operating systems on their laptops, I've picked out three methods that work perfectly on both Mac and Windows. This way, you won't have to waste time looking for separate solutions for your device. Whether you choose Coolmuster iOS Assistant, iCloud, or Google Drive, you'll have flexible and convenient ways to transfer photos from your iPhone to any Windows or Mac laptop you use.
If you're looking for the easiest way to import photos from your iPhone to your laptop, Coolmuster iOS Assistant is a great option. This professional iPhone-to-laptop transfer tool lets you move photos, music, contacts, and voice memos between your iPhone and computer with ease. Whether it's pictures you've just taken or those stored in your Camera Roll and Photo Library, iOS Assistant makes the process quick and seamless.
In addition to its powerful transfer features, iOS Assistant works smoothly with all Windows and Mac versions, as well as overall iOS versions and iPhone models, including the latest iOS 26/18 and iPhone 17/17 Pro/17 Pro Max/17 Air.
Follow the simple guide below to learn how to transfer photos from your iPhone to your laptop using this reliable tool.
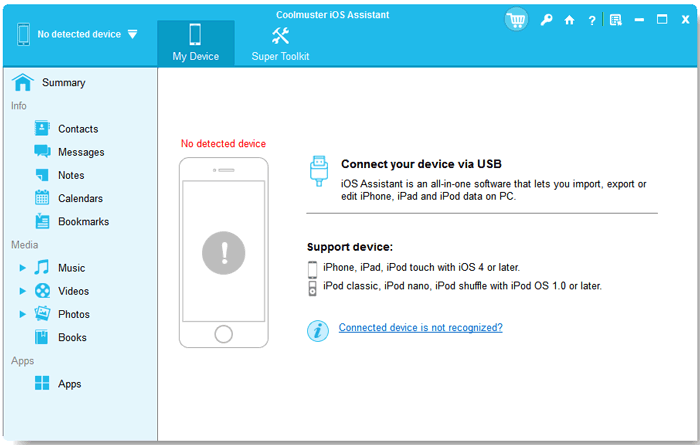
Step 1: Launch the software on your laptop
First, download and install the correct version of the software on your laptop. Once installed, open it and connect your iPhone using a USB cable. The program will automatically recognize and detect your device.
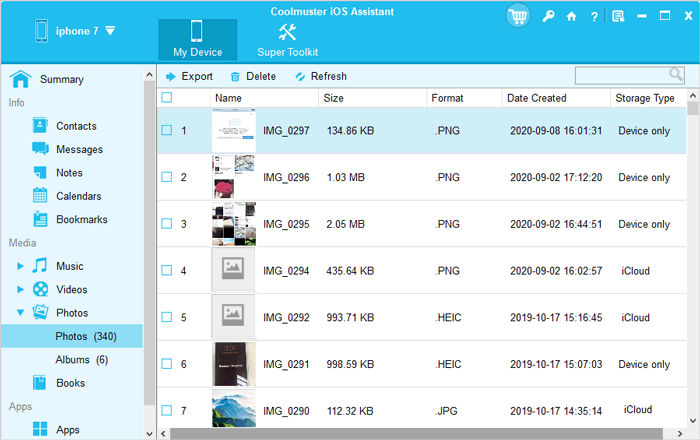
Step 2: Locate the photos you want
After your iPhone is successfully detected, all your data will appear on the screen, as shown in the example below. To transfer photos, simply click "Photos" from the left sidebar to browse your images.

Step 3: Transfer photos from iPhone to laptop
Select the photos you wish to move, then hit the "Export" button. The software will begin transferring the selected photos from your iPhone to your laptop in just a few moments.
Video Tutorial:
Check this video tutorial to see more details on how to transfer photos from iPhone to laptop.
No matter what laptop you use, using iCloud to transfer pictures from iPhone to the laptop is a good way. It will automatically upload your photos to your cloud storage and therefore you can access your photos from any devices, like a laptop. (iCloud storage is insufficient?)
Here is the guide for transferring pictures from iPhone to the laptop using iCloud.
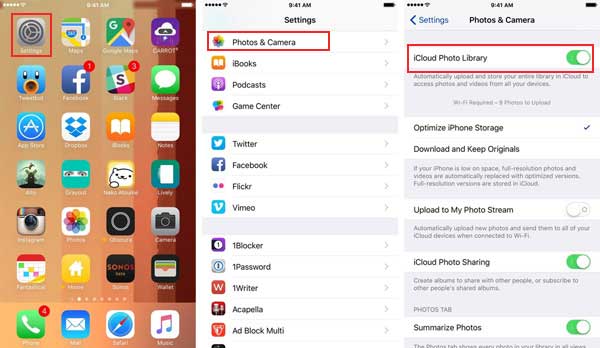
Step 1: Enable the iCloud Photos on your iPhone
Go to "Settings" > "Photos & Camera" and turn on the "iCloud Photo Library".
Step 2: Open the iCloud on your laptop
For Mac users, you may open it directly. If you are Windows users, download the iCloud for Windows first. After installing it, open it on your laptop.
Step 3: Sign in to iCloud and sync your photos
On your laptop, sign in to your iCloud with the same Apple ID. Check "Photos" and select "Download new photos and videos to my PC". Then click "Done" > "Apply". Now, your photos are uploaded to iCloud with Wi-Fi.

Step 4: Download your photos from iCloud to the laptop
For Windows users, open the Windows Explorer or File Explorer, click "This PC" > "iCloud Photos" > "Download". For Mac users, your photos are located in the Photos App.

Google provides 15GB of free cloud storage, making it a convenient option to move photos from your iPhone to your laptop wirelessly. Here's how to transfer your pictures using Google Drive:
Step 1: Download and install Google Drive from the App Store on your iPhone. Open the app, tap the "+" icon at the bottom, choose "Upload", then select "Photos and Videos". Pick the photos you want to transfer and upload them to your Drive. (How to Back Up iPhone to Google Drive?)
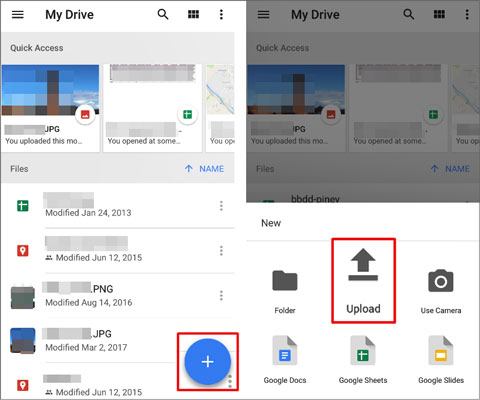
Step 2: Next, install Google Drive on your computer. Once set up, a Google Drive folder will automatically appear on your PC. Open this folder, and you'll find all the photos you uploaded from your iPhone ready to view or download.
Here's another simple way to move photos from your iPhone to your Windows or Mac laptop, by emailing them to yourself. This method works best if you only need to transfer a few pictures, since it can be quite slow for larger batches.
Step 1: Open the Photos app on your iPhone and go to your Camera Roll or any album where your pictures are stored.
Step 2: Tap "Select", then choose up to five photos you want to send.
Step 3: Tap the "Share" icon (the square with an arrow) at the bottom left of the screen.
Step 4: Choose "Mail" from the sharing options.
Step 5: Enter your own email address, write a short subject if you like, and tap "Send".
Step 6: On your PC, open your email, download the attached images, and save them to a folder.
Since you can only send a few photos at once, this method can be time-consuming if you need to transfer a large collection.
Some of you may only want to know about how to transfer pictures from iPhone to a Mac laptop. So how to import pictures from iPhone to laptop for Mac? Here are the 2 methods which may help you.
The Photos app for Mac is a native Mac OS software which enables you to transfer photos from iPhone to your Mac laptop. You can also manage and share pictures using this software. To use it, however, you are required to running the iTunes 12.5.1 or above.
Now, follow the instruction below to transfer pictures from iPhone to laptop with Photos App.
Step 1: Connect your iPhone to the laptop with a USB cable.
Step 2: Generally, the Photos App would launch itself. If it doesn't, launch it.
Step 3: Click the "Import" button on the top of the interface.

Step 4: Choose the photos you want to transfer and click "Import" button to import them from your iPhone to the laptop.
So now have you known how to download pics from iPhone to laptop? It's a piece of cake.

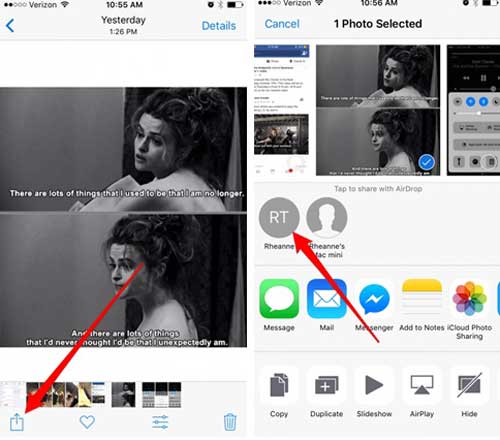
If you want to transfer photos from iPhone to laptop wirelessly, you can use AirDrop to complete it. Although it doesn't work as quickly as using a cable connection, it is much easier and more convenient when you have only a few photos to transfer. Using it, you can also download your photos from your laptop to the iPhone.
If you have an interest, follow the procedure below to transfer photos from iPhone to your laptop.
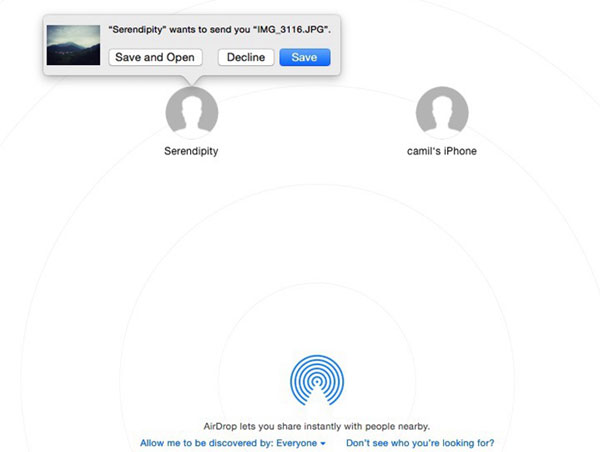
Step 1: Enable Wi-Fi and Airdrop on both your iPhone and laptop. To do this, open the Finder and click the "AirDrop" button. On the bottom of the screen, click "Allow me to be detected by Everyone or Contacts Only" option.
Step 2: Open the Photos app on your iPhone and choose the pictures you want to transfer.
Step 3: After the selection, tap the "Share" icon, and in the AirDrop list, choose the laptop where you want to upload the photos to.
Step 4: On your laptop, click the "Accept" button on the pop-up window.
Now your photos have been transferred from iPhone to your Mac laptop. There is no limit on how many pictures you can transfer. More pictures to transfer, more time it will cost.
It is more likely for iPhone users to have a Mac laptop, but maybe some of you would also use a Windows one. In that case, using Windows Photos or Windows Explorer, you can easily transfer your photos from iPhone to your Windows laptop.
Similar to the Photos App on Mac, Windows also has a Photos app. On Win 7/8/10, the Photos App only supports to transfer the camera roll photos from iPhone to the laptop. If you are using a Windows laptop now, you can follow the guide below to get pictures from your iPhone to the computer.
Step 1: Connect your iPhone to your laptop with a USB cable.
Step 2: Launch the Photos app from the "Start" menu on your laptop. Then click "Import" on the top-right corner.

Step 3: By default, all photos will be selected, and you should uncheck the photos you don't want to transfer.
Step 4: After selection, click the "Continue" button to transfer these photos from your iPhone to the laptop. (iPhone Photos Not Showing Up on PC?)

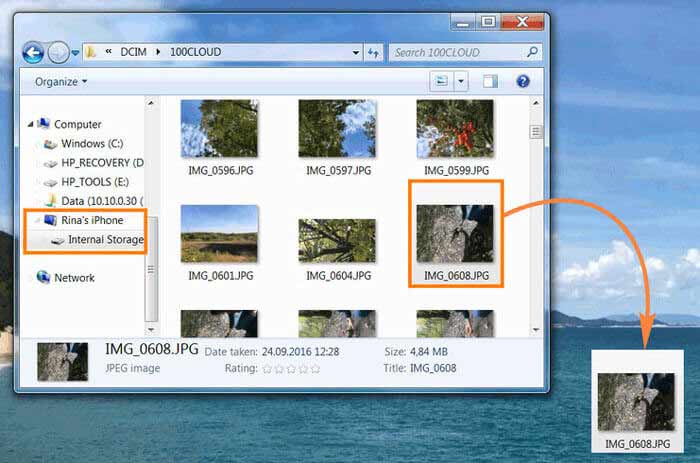
If you want to transfer multiple albums from different sources from your iPhone to the laptop, you can use this method. Here is the usage guide.
Step 1: Connect your iPhone to the laptop.
Step 2: Open Windows Explorer on your laptop and find your device in removable storage. Click the icon to open your iPhone.
Step 3: Go to Internal Storage icon and click to open the "DCIM" folder where your photos are located.
Step 4: Choose the photos you want to transfer. Copy them and paste them to the designated folder on your laptop.
Transferring photos from your iPhone to a laptop might sound tricky at first, but with the right tools, it's actually quite simple. In this guide, we introduced 8 effective ways to move your photos effortlessly.
Whether you prefer using built-in options like Windows Photos or cloud services like iCloud and Google Drive, each method has its strengths and fits different needs. However, if you're looking for the most reliable and flexible solution, Coolmuster iOS Assistant stands out. It allows you to selectively transfer individual photos or move your entire collection between your iPhone, iPad, and laptop with ease.
And remember to make it a habit to back up your cherished memories to your PC or external drive regularly. Doing so keeps your iPhone storage free and ensures your memories stay safe no matter what happens.
Related Articles:
How to Transfer Photos from Android to Laptop? [Full Solutions]
Restore Photos from iPhone without iCloud Backup


 Free Download for PC
 Free Download for Mac

