With the release of the new iPhone 14 and iPhone 13, most Apple fans are ready to switch from their old phones to the brand new gadget. Since Symbian system is becoming outdated, it is no double that users will be experiencing a saltant feeling in using iOS features with the newly released iPhone after they switch from old Symbian or other OS phones to this new iPhone. However, how do you deal with the content you stored in the old Symbian phone?
This article is written for the people who are planning to switch from Symbian to iPhone and want their data to get transferred to the new iDevice. A pretty simple tool is able to help transferring Symbian to iPhone in one click, without any risk. The name of the program is Symbian to iPhone 8 Transfer. Just take a look at its amazing features first:
Features of Symbian to iPhone Transfer:
- Supports to transfer overall file types, including contacts, SMS, photos, videos, music, call logs, calendar, apps, etc.
- Supports various operating systems like iOS, Symbian, Android and BlackBerry.
- Can backup and restore data without any loss of quality.
- Helps in transferring between Android and iOS, iOS and iOS, Android and Android, Symbian and iOS, Symbian and Android, etc.
- Even be able to transfer iCloud, iTunes, BlackBerry backup to Android/iOS.
Read More:
Move Contacts between iPhone and Google Nexus
Below is the step by step guide for transferring data from Symbian to iPhone 14/13/12/11/X/8 Plus/8/7/6, with the help of Symbian to iPhone Transfer.


Step 1. Run Symbian to iPhone 8 transfer tool
Launch the Symbian to iPhone Transfer tool after installed it on your computer. When its primary window appears, you can see there are 4 different options are displayed. You should choose the mode of "Phone to Phone Transfer".
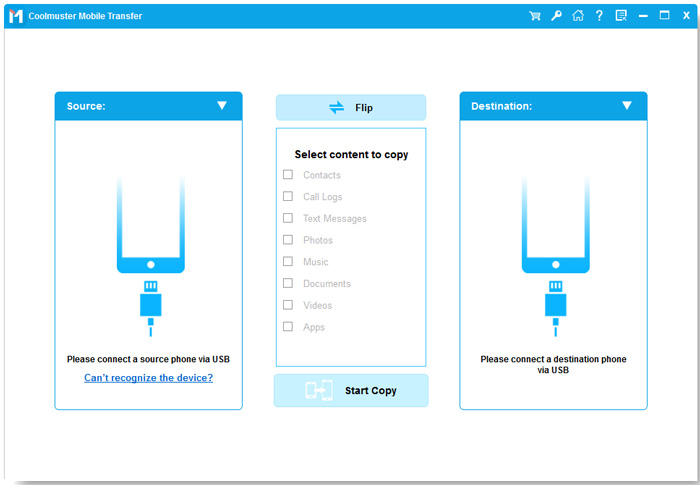
Step 2. Connect Symbian phone and iPhone to computer
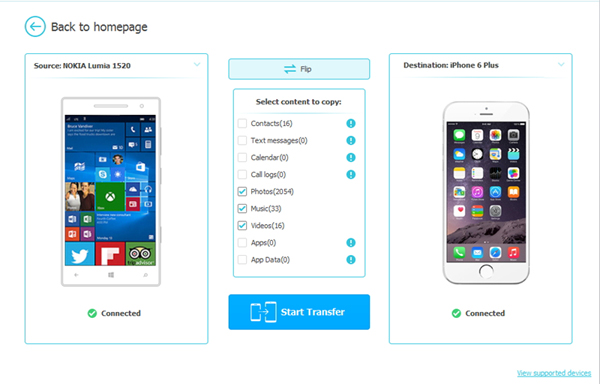
Link your Symbian phone and iPhone to the computer via two USB cable. Both the phones will be detected by the program and displayed side by side. To transfer data from Symbian to iPhone, you should make sure the iPhone is placed as "Destination". If not, you need to click "Flip" button to change their positions.
Step 3. Transfer data from Symbian to iPhone
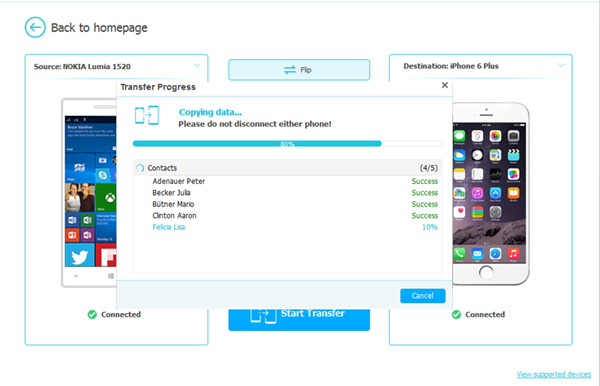
All the transferable file types are listed in the middle. Tick off the data types you want to transfer and then click "Start Transfer" button. When the transfer is done, click "OK" to end it.
It is really smart to use the Symbian to iPhone transfer program to help you finish transfer because it can save you a lot of time and energy. Now, let's download the trial version of the program to have a try.
Related Articles:


 Download for PC
 Download for Mac
