Got your hands on the newest iPhone? That rush of excitement is hard to beat. But then comes the task of transferring all your stuff from your old iPhone to the shiny new one. Apple makes this seem easy with its data transfer features, especially the iPhone migration tool. However, what do you do when the dreaded "iPhone won't transfer to new iPhone" issue pops up?
It's a common headache when moving data from an older iPhone to a new one. Despite being a frequent problem, it's frustrating to deal with data transfer failures between iPhones without a clear cause.
In this article, we'll dive into practical solutions to tackle the "transfer directly from iPhone not working" snag.

"Transfer Directly from iPhone" refers to the process of copying files between iPhones using Wi-Fi. This feature, provided by Apple, allows you to transfer data or perform a factory reset on iOS devices.
However, it's essential to note that your iPhones should be running iOS 11 or later for this method to work smoothly. Also, make sure to back up your old iPhone's data before proceeding with the transfer.
There are several reasons why your iPhone may encounter difficulties during data transfer. Based on expert analysis and user experiences, here are some possible causes for the "iPhone transfer not working" problem:
Now, let's delve into each issue and explore effective solutions to get your data transfer back on track.
Here are some common methods you can try if you're experiencing issues with direct transfer on your iPhone.
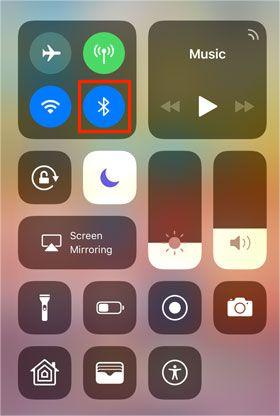
To transfer data directly from one iPhone to another, you need to ensure they are connected via Bluetooth. Without this connection, the direct transfer won't work. If you're having trouble with the transfer not working on your new iPhone, follow these steps:
By ensuring Bluetooth is turned on and both iPhones are connected, you should be able to resolve the issue with direct transfers.
To ensure that the transfer process runs smoothly, ensure both phones have a minimum of 50% battery charge. If they are not properly charged, the transfer process may repeatedly get canceled. Your old iPhone may have very low battery health and thus can't keep the charge properly. In that case, connect it to power during the transfer process.
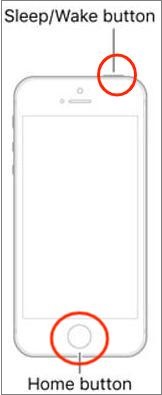
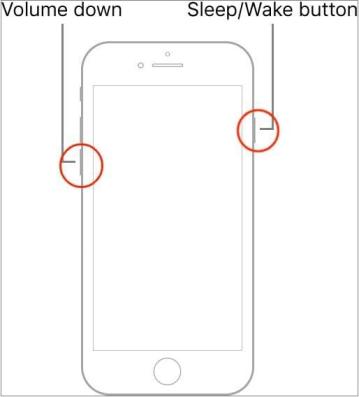
Still facing "transfer from nearby iPhone not working" issue? You can try force restarting your iPhone to activate its self-cleaning feature. This could potentially solve the issue. This is a simple solution to try before attempting more complex methods.
For iPhone 6/6s and SE 1st Gen:
For iPhone 7 and 7 Plus:
For iPhone 15/14/13/12 and earlier models:

To use Quick Start correctly, your device must have at least iOS 12.4 or a later version installed. Also, remember that the direct iPhone transfer may not work properly if the version of your old iPhone (Source) is higher than the new iPhone (Target). You should therefore check the version of your iOS and update it if necessary. Here's how to do that:
Step 1. First, open your iPhone's "Settings" application, then head to "General".
Step 2. Click on the "Software Update".
Step 3. Select "Install Now" if an update is available, or choose "Download and Install" to download the update. Once downloaded, enter your passcode and select "Install Now".

If you have large files, around 500 GB or more, the transfer process may be slow because of data overload and "iPhone won't transfer" issue may occur. So, it's good to sort through your data first. Delete any photos, apps, videos, or large-size documents that you don't need anymore.
Learn More: What if your iPad keeps restarting on its own? If you want to fix it, you can click this guide to get useful tricks.
Are you tired of the hassle of transferring data between iPhones? Well, here's a neat trick for you: transferring data from one iPhone to another in just one click. Imagine the convenience of syncing all your contacts, music, photos, apps, and more with just a single button press.
One of the best tools for this job is Coolmuster Mobile Transfer. It's like your personal data transfer wizard, capable of seamlessly moving various types of data between iPhones and even between iOS and Android devices.
Here's why it's such a game-changer:
Effortless Data Transfer: Coolmuster Mobile Transfer simplifies the entire process. With a click, you can transfer contacts, music, photos, eBooks, apps, messages, videos, call logs, and more from your old iPhone to the shiny new one.
Cross-Platform Compatibility: It doesn't matter if your other device is an Android phone or another iOS device. This tool bridges the gap, letting you transfer files between iOS to iOS, Android to iOS, iOS to Android, and even Android to Android.
Stay Up-to-Date: Worried about compatibility with the latest devices? Fear not. Coolmuster Mobile Transfer is fully compatible with the latest iPhones, iPods, iPads, including the newest models like the iPhone 15 and beyond.
Picture this:
You're upgrading to the latest iPhone, and all you need is one click to seamlessly migrate all your important data. No more manual transfers, no more headaches. Just smooth, effortless data migration. So, why not give Coolmuster Mobile Transfer a try and make your device transition a breeze?
Click the button below to download a free trial of Coolmuster Mobile Transfer.
Here's how to transfer files from iPhone to iPhone:
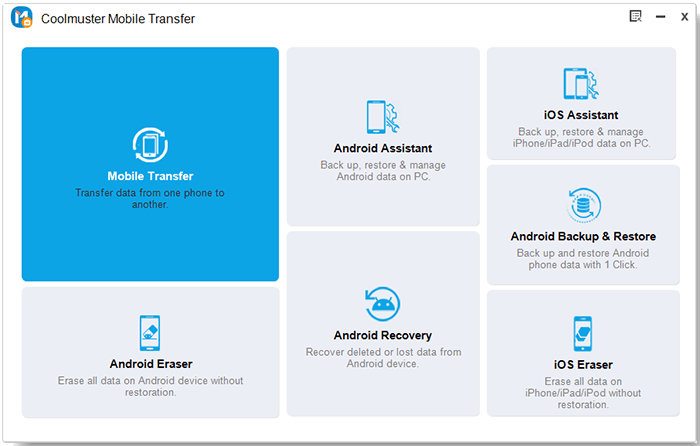
01Download and Install Coolmuster Mobile Transfer
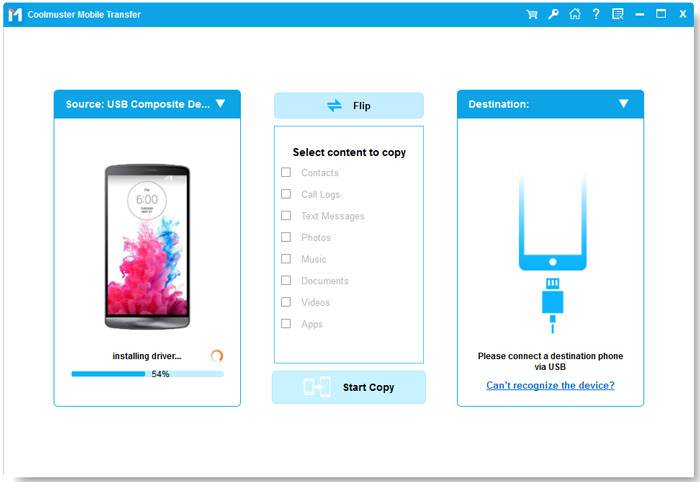
Download, install, and run the application on the computer. After that, choose the "Mobile Transfer" option from the toolkit.
02Connect to Computer
Connect your iOS devices to the computer using their lightning cables. Once connected, you will be directed to an interface where you can see both devices on the screen.
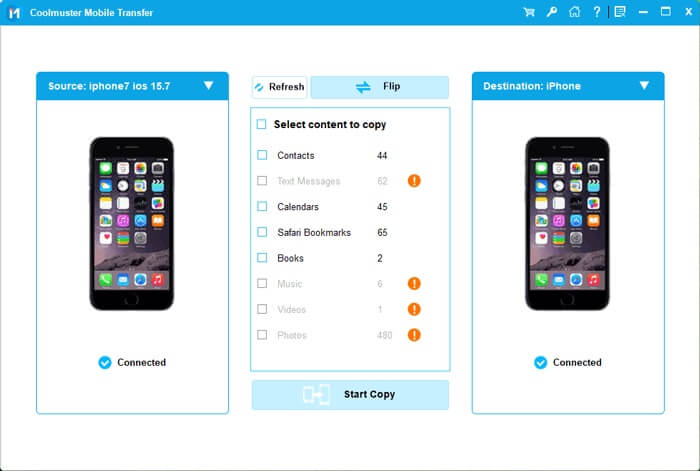
03Transfer Directly from iPhone to iPhone
Now tick the files you want to transfer from the screen. For example, you can choose the "Notes" or "Contacts" option from the content list for transfer. Once confirmed, click the "Start Copy" button to transfer the contacts immediately.
Q1. How long will it take for iPhone migration?
The duration of the migration process might take about half an hour to finish sending your files. But it depends on your internet connection and the size.
Q2. Why is transfer directly from iPhone to iPhone taking forever?
You have large files, or your internet connection is weak and unstable. In some cases, the transfer may take longer than expected. Depending on your internet connection speed, phone performance, and other factors like network congestion or bad reception, the process may prolong.
By now, we hope you can confidently resolve the "iPhone transfer to new phone not working" problem. As you can see, it is very easy to fix with the reliable solutions mentioned above.
If you prefer not to use the tricks, use a powerful phone-to-phone data transfer program such as Coolmuster Mobile Transfer. This great tool also can help you solve "new iPhone won't transfer from old iPhone". It makes transferring data between two phones a breeze.
Related Articles:
How to Transfer Data from iPhone to iPhone without iCloud? (8 Scientific Ways)
How to Transfer Data from iPhone to iPhone after Setup in Four Dependable Ways?
How to Transfer Data from Broken iPhone to New iPhone? (4 Ways Out)


 Free Download for PC
  Free Download for Mac

