Microsoft PowerPoint is a powerful tool for creating visually appealing presentations. However, adding high-resolution images to your slides can make your file size balloon, causing performance issues and difficulties when sharing your presentation.
To avoid those problems, you can compress pictures in PPT without sacrificing image quality. In this article, we'll guide you on how to reduce the size of PPT with pictures, helping you create smoother and more manageable presentations. (Need to share your screen on Zoom for marketing presentations?)
Compressing pictures in PowerPoint offers several benefits:
1. Reduced File Size
Compressing images reduces the overall size of your PowerPoint presentation, making it easier to share via email or other platforms.
2. Faster Loading Times
Smaller file sizes mean quicker loading times for your presentation. This is particularly important when presenting in front of an audience or sharing your slides online.
3. Improved Performance
Compressed images contribute to smoother transitions and animations within your presentation, enhancing the overall viewing experience.
4. Compatibility
Some email systems and presentation-sharing platforms may have file size limits. Compressing pictures ensures compatibility with these platforms.
You May Like: After the compression, you can choose to convert images to PDF for further management.
With a solid understanding of why PPT image compression is essential, it's time to dive into the practical aspects. In this part, we'll explore a range of methods to effectively compress pictures in PPT. These methods will empower you to strike that delicate balance between image quality and file size, ensuring your presentations impress without the hassles of performance issues or unwieldy files. Let's explore one by one.
The first method to compress pictures in PowerPoint is using the built-in "Compress Pictures" feature. This feature is a versatile tool that can help you optimize your images without external software or applications. Here's how to reduce PPT file size with pictures using this feature:
Step 1. Open your PowerPoint presentation and choose the specific image you wish to compress.
Step 2. Head to the "Picture Tools", then click the "Format" tab located at the top, and from there, select the "Compress Pictures" option.

Step 3. Check the box labeled "Delete cropped areas of pictures", and then select your preferred resolution for the image. When you've made your selections, simply click the "OK" button to proceed.
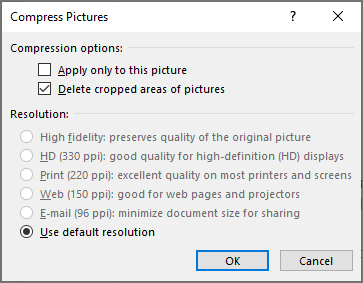
Note: If you leave the "Apply only to this picture" checkbox unchecked, the compression settings will be applied to all images within your presentation. This allows for a uniform resolution setting for all images. Alternatively, you can apply the above steps individually to specific images, providing you with the flexibility to compress only those selected images.
By default, PowerPoint compresses images based on the settings in the PowerPoint options. If you set the default resolution to a lower value, this should compress images in PowerPoint. Here is how to reduce PPT size with pictures:
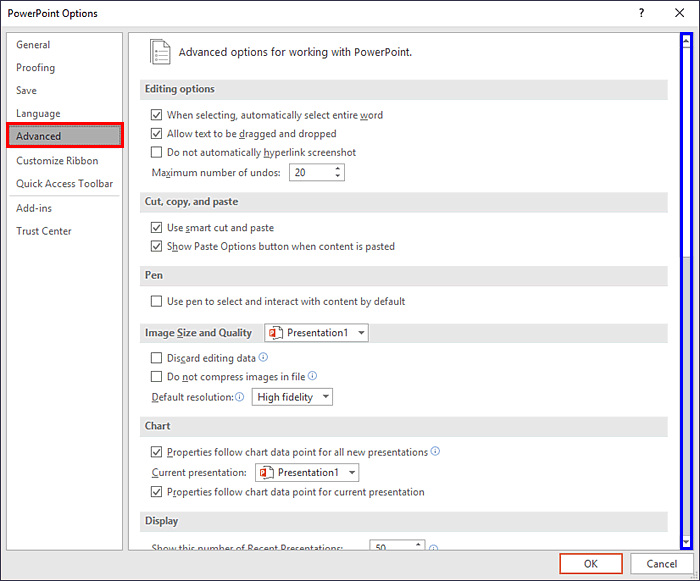
Step 1. Open your PowerPoint presentation, then click on "File" > "Options".
Step 2. From the left sidebar, choose the "Advanced" tab.
Step 3. In the "Image Size and Quality" section, mark the "Discard editing data" option, deselect "Do not compress images in file", and opt for the "Default resolution" setting.
Step 4. Once you're done, click "OK".
Opting for image insertion is the recommended approach, as opposed to using copy-and-paste or drag-and-drop methods when adding images to a PowerPoint file. When you copy and paste or drag and drop images into the presentation, it can potentially cause problems like compression loss, alterations in file types, and the inclusion of extra data, potentially leading to larger file sizes. Here is how to do it to compress photos in PowerPoint:
Step 1. Open your PowerPoint presentation and go to the slide where you want to add an image.
Step 2. On the top "Insert" tab, click "Pictures" > "This Device".
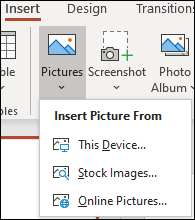
Step 3. Choose the image you want to add, and then click the "Insert" button.
This way, you can upload images with much smaller dimensions.
Explore More: 11 Best Free AI Image Upscaler Tools You Do Not Know [Never Miss!]
When you apply picture effects, including artistic ones, to an image in PowerPoint, the software preserves both the original image and a modified version with the applied effects. This allows users to reset the image but significantly increases the file size. Compressing images typically does not have any impact on images with applied artistic effects.
If you have applied picture effects to an image, the best way to compress or reduce the size of such images is to save them as new images and then replace them with these copies. Here are the steps on how to compress pictures in PPT:
Step 1. Right-click on the image with picture effects. A drop-down menu will appear.
Step 2. Select "Save as Picture". A dialog box will appear.
Step 3. Go to the directory where you intend to store the image. Then, enter a name and choose the file type (e.g., JPG or PNG). Once done, click "Save".
Step 4. In your PowerPoint presentation, delete the image with picture effects.
Step 5. Click "Insert", then click "Pictures". Navigate to the location where you saved the image with artistic effects. Double-click the image.
Another way to compress pictures in PPT is to resize them to smaller dimensions. You can do this by dragging the image's corner handles to make it smaller or by specifying the exact dimensions under the "Size" options in the "Format Picture" pane. Here is how to do it:
Step 1. Open your PowerPoint presentation and select the image you want to resize.
Step 2. Go to the "Picture Tools" tab (ensure the image is still selected). In the "Format" tab, find the "Size" group.
Step 3. Adjust the image dimensions by either. Enter new values for "Width" and "Height" while maintaining the aspect ratio. Alternatively, click and drag the corner handles to visually resize the image.
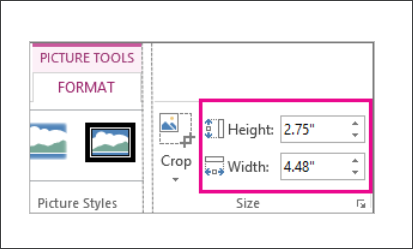
Step 4. Apply the changes and save your presentation to preserve the changes.
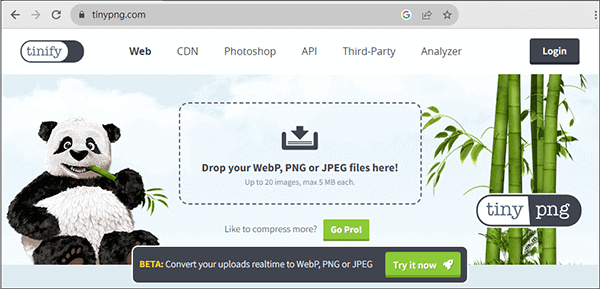
In addition to the methods mentioned above, you can also compress all images using the Online Image Compressor. There are numerous online image compression websites that offer a user-friendly way to reduce image file sizes with just a few simple clicks, such as iLoveIMG, TinyPNG, CompressJPEG, and so on. Here is how to compress photos in PowerPoint via TinyPNG:
Step 1. Launch your web browser and navigate to the TinyPNG website.
Step 2. On the center of the screen, you'll find a prominent section that reads, "Drop your WebP, PNG, or JPEG files here!" You can either drag and drop your image file into this area or click to choose a file from your computer.
Step 3. TinyPNG will initiate the image compression process automatically. A progress bar will keep you informed of the compression's status.
Step 4. After compression is finished, TinyPNG will present the results, showcasing both the original image size and the size of the compressed image. To save the compressed image to your computer, simply click the "Download" button.
Step 5. Once downloaded, insert the compressed images into your PowerPoint.
Compressing pictures in PowerPoint is a simple yet effective way to enhance the performance and shareability of your presentations. This article has provided valuable insights into the world of image compression in PowerPoint. By following the methods outlined in this article, you can reduce file sizes, improve loading times, and ensure compatibility with various platforms.
Don't hesitate to experiment with these methods and discover the best approach that suits your specific presentation needs. With optimized images, you'll be well-prepared to deliver a smoother and more engaging PowerPoint presentation.
Related Articles:
How to Compress Photo on iPhone? 5 Proven Ways to Reduce Image Size
Top 6 Online File Compressors for Quick and Easy Compression


