"Recently, I have noticed that the list of trusted devices no longer appears under my Apple ID on both iPhone SE running iOS 14.0.1 and iPhone 5c running 10.3.3. Has anyone else seen this issue and determined the root cause? It's not a huge deal, but I do find unsolved mysteries annoying."
- from Apple Community
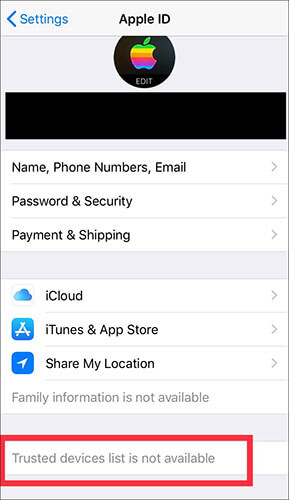
When managing Apple ID security settings, the trusted devices list plays a critical role. It shows all devices currently signed in with your Apple ID and approved for two-factor authentication. However, many users report seeing the error message "Trusted devices list is not available" on their iPhone, making it impossible to view or manage these devices.
If your iPhone says the trusted devices list is not available, you are in the right place. In this guide, we'll explain why the trusted devices list is not available and walk you through step-by-step solutions to fix the issue.
Before attempting to fix the issue, it's important to understand the potential causes. Here are the most common situations:
This section provides nine proven fixes, ordered from the easiest to the most advanced. For best results, try them one by one instead of skipping steps.
Since the trusted devices list depends on Apple server communication, a poor or unstable network is the most common reason why the trusted devices list is not available. Even if other apps work, Apple ID services may still fail.
Steps to follow:
Step 1. Go to "Settings" > "Wi-Fi" and confirm you're connected.
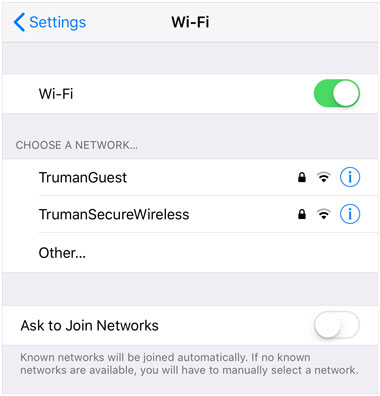
Step 2. Switch to another Wi-Fi network, or turn off Wi-Fi and use cellular data.
Step 3. Turn Airplane Mode on and off to refresh the network and re-establish a new connection.
Step 4. If the trusted devices list is still unavailable after trying the previous methods, you can go to "Settings" > "General" > "Transfer or Reset iPhone" > "Reset" > "Reset Network Settings" to perform a network reset, which may help resolve the issue.

If the network is fine but the issue persists, temporary system lag or background service abnormalities may also cause the "Trusted devices list not available" error. Force restarting can clear the background cache and reload system services.
Here is how to force restart the iPhone to fix trusted devices list is not available issue:
iPhone 8 and newer models:
iPhone 7 / 7 Plus: Press and hold both the "Volume -" button and the "Power" button simultaneously.
iPhone 6s and earlier models: Press and hold both the "Home" button and the "Power" button simultaneously.
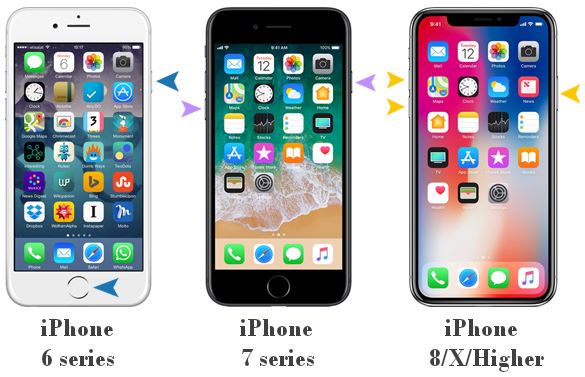
After the restart, go back to the Apple ID settings to check if the issue is resolved.
Apple ID synchronization issues are one of the common causes of the "Trusted devices list not available" error. Signing out and signing back in can force a refresh of your account data.
Here is how to fix trusted devices list is not available iPad/iPhone:
Step 1. Open the "Settings" app, then go to "General".
Step 2. Tap your Apple ID name, scroll down, and select "Sign Out". (Can't sign out of your Apple ID?)
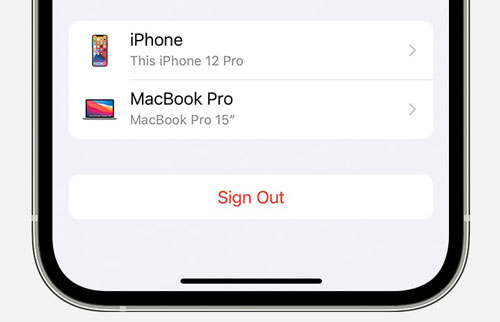
Step 3. When prompted, enter your Apple ID password to disable Find My iPhone, then tap "Turn Off" at the top right to completely sign out of your Apple ID.
Step 4. Next, force close the Settings app. Then, sign back into your Apple ID using the same steps to check if the trusted devices appear on your iPhone.
If you're still seeing the "Trusted devices list is not available" message, it might be because two-factor authentication (2FA) hasn't been enabled on your account. Since the trusted devices list depends on 2FA, you'll need to enable it for the feature to work.
Here's how to enable 2FA:
Step 1. Open "Settings" on your iPhone, then tap [your name] > "Password & Security".
Step 2. Tap "Turn On Two-Factor Authentication", then tap "Continue".
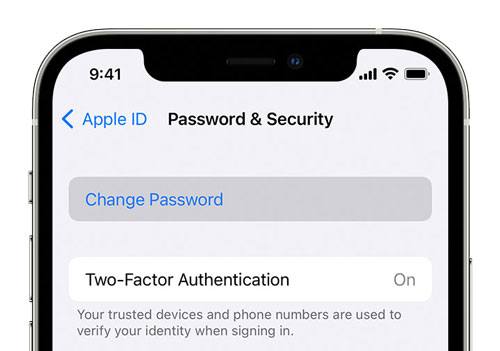
Step 3. Enter a trusted phone number (the one you'll use to receive verification codes), then tap "Next".
Step 4. After a few seconds, a verification code will be sent to that phone number. Enter the code on your iPhone.
Step 5. Once 2FA is enabled, your device will automatically become a trusted device, and the trusted devices list should now be available.
Sometimes the issue may not lie with the Apple ID itself, but rather with a system or configuration issue on the current iPhone.
Try signing in with the same Apple ID on another iPhone, iPad, or Mac, or use a web browser to visit appleid.apple.com to check if the trusted devices list is displayed correctly.
Apple server issues can also cause the trusted devices list to be unavailable. Open a browser and visit the Apple System Status page to check if Apple ID, iCloud Account & Sign In are showing as normal (green). If the service is down, you'll need to wait for Apple to fix the issue.

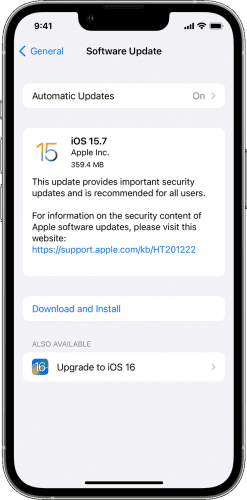
If the trusted devices list isn't available on your iPhone, it could be due to a software glitch or compatibility issue. Apple frequently releases iOS updates that fix bugs. In such cases, updating your iPhone to the latest version can help resolve any underlying system issues that might be preventing the trusted devices list from appearing correctly.
Here's how to update:
Step 1. Go to "Settings" > "General" > "Software Update". (iPhone won't update?)
Step 2. If a new update is available, tap "Update Now".
If the above methods don't work, you can reset all settings on your device. This won't delete your personal data, but it will restore system settings (such as Wi-Fi networks, location preferences, and other configurations) to their default state.
Here's how to do it:
Step 1. Go to "Settings" > "General", then scroll down.
Step 2. Tap "Transfer or Reset iPhone" > "Reset" > "Reset All Settings".

Step 3. Enter your screen passcode to confirm, then tap "Reset All Settings" again.
Step 4. After your iPhone restarts automatically, go back to Settings to check if the trusted devices list is now available.
If your device still isn't showing the trusted devices list, you should contact Apple Support for assistance. Reach out through their official channels, explain the issue, and wait for a solution.
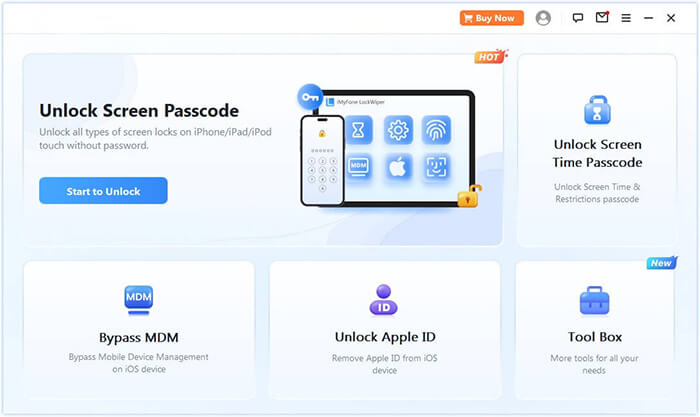
If you've forgotten your Apple ID password or your Apple ID is grayed out, making it impossible to log out, the methods above won't work. In this case, third-party tools may become a necessary solution.
iPhone Unlocker is a professional iPhone unlocking tool that can help you remove the Apple ID/iCloud account from your iPhone/iPad without needing the password. Once removed, you can sign in with your original Apple ID or a new account and access or view the trusted devices list.
The highlights of iPhone Unlocker:
* Erase Apple ID from your device in just minutes, no password required.
* Remove all types of screen locks, including 4-digit/6-digit passcodes, Face ID, and Touch ID.
* Bypass MDM (Mobile Device Management) restrictions and remove MDM profiles without needing login credentials.
* Recover or reset Screen Time passcodes without losing any data.
* Fully compatible with all iPhone models and iOS versions, including the latest iPhone 17 series and iOS 18/26.
Here is how to unlock an Apple ID without a passcode using iPhone Unlocker:
01Download and install iPhone Unlocker on your computer. Open the program and select "Unlock Apple ID" from the main page.
02Connect your iPhone to the computer, and the program will automatically detect your device. Once it's recognized, click "Start" to continue.
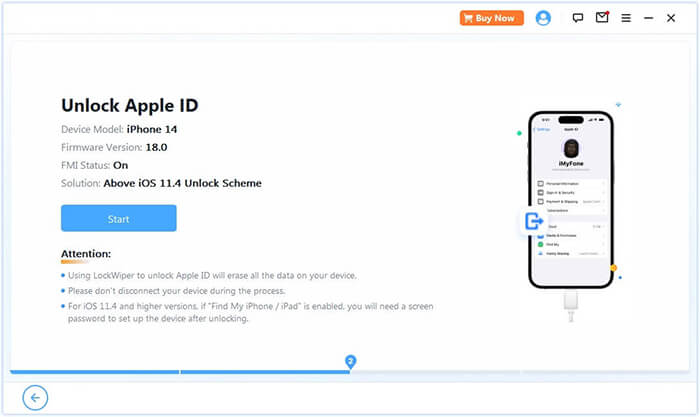
03If "Find My" is turned off, the program will begin unlocking your Apple ID immediately. If "Find My iPhone" is enabled, go to Settings > General > Reset All Settings to disable it before proceeding. If two-factor authentication is enabled, check and confirm the device status, then click "Next". A pop-up window will appear asking you to confirm again. Enter "000000" and click "Unlock" to continue.

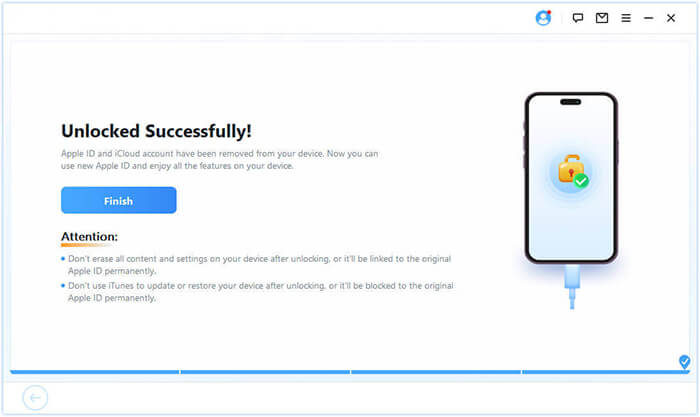
04Wait a moment, and the program will quickly unlock your Apple ID without any issues.
To add a new device to your trusted devices list, follow these steps:
Step 1. Sign in with your Apple ID on the device you want to add. You may be asked to enter the device passcode during the setup process.
Step 2. Open "Settings" and tap on your profile at the top of the screen.
Step 3. Tap "Password & Security" > "Turn On Two-Factor Authentication", then follow the on-screen instructions to complete the setup.
Step 4. Once 2FA is enabled, your new iOS device will be added to the trusted devices list.
The "Trusted devices list is not available" issue is usually not a serious fault, but it is caused by network, system, or Apple ID synchronization problems. With the step-by-step troubleshooting methods provided in this article, most users can resolve the issue on their own.
If you are stuck at a certain step due to forgetting your password or account issues, iPhone Unlocker offers a more direct and effective solution to help you regain control of your device and Apple ID.
Related Articles:
The Device Is Unreachable on iPhone Error: Fixed in 7 Ways
How to Fix iPhone Unavailable Try Again in 1 Minute Error - 100% Working
How to Fix iPhone Unavailable No Erase Option? - 4 Easy Ways
Sign Out Is Not Available Due to Restrictions? - 5 Quick Fixes


 Free Download for PC
  Free Download for Mac

