Unbeknownst to many customers, iPhones keep track of your location data without you even realizing it. So, if you are wondering where you were some weeks back, you can find it on your iPhone by checking your location history. Not only that, but you can also find your location on Google Maps. If you don't know how to check your iPhone location history, please follow the methods below.
Have you ever wondered if viewing your location history on an iPhone is possible? Smartphones have been built with tracking capabilities, making it possible to see location tracking history. As for iPhones, they have Google-based Location History that should be activated. To activate this function, you should log into your Google account.
This feature is essential, and it couldn't be simpler to access. It customizes maps to the routes you've already traveled. Besides, it provides multiple advantages, such as getting up-to-date traffic updates, locating your iPhone, and displaying ads based on your interests.
To monitor your location history through Google Maps, ensure you have logged into your Google account and that both "Location History" and "Location Reporting" are active. Apple will track and record your location history when you activate either "Frequent Locations" or the "Significant Locations" in the Settings. To protect your privacy, you can delete this data automatically or manually at any time. Read on to learn how to see recent locations on iPhone.
Services that track locations use GPS, Bluetooth, or Wi-Fi hotspots to record your location discreetly. If you access the location history apps with tracking permission enabled, you'll be able to see the location of your device. This comes in handy if you'd like to keep track of your family members' whereabouts or want to recall that exciting place you visited.
Therefore, when you want to trace phone location history, here are the methods on how to find location history on iPhone.
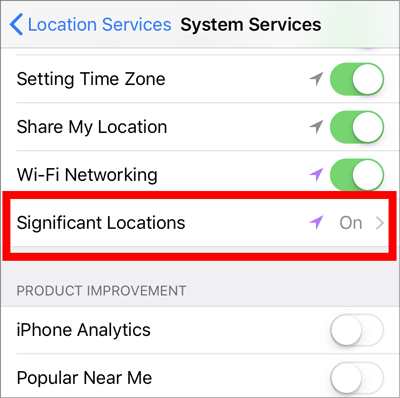
If you want to check your iPhone's location history effortlessly, the iPhone's settings offer a straightforward solution. By simply navigating to "Settings", Location Services can be activated in mere seconds. Here's how to view significant locations on an iPhone:
Step 1: Go to "Settings" on your device, and from the drop-down menu, choose "Privacy" and select "Location Services".
Step 2: Scroll to the bottom of the menu and select "System Services". Then tap on either the "Frequent Locations" option or "Significant Locations", where you can easily find your stored location history.
You can track when you check in and out of your destinations by viewing the time stamps on the location log. All you have to do is tap on the city name and see where you have been. If, ever before, locations were labeled on your device, then those visited cities will be shown instead of the street names.
For those of you who use the Google Maps application on your iPhones, especially when you want to navigate to places, there is a Timeline feature that can assist you in viewing location history. This feature allows iPhone users to check the places they visited in previous days or months.
You can access the Timeline page on your iPhone through a mobile app, and it helps you stay up-to-date with where and when you visit any location. Not only will it show in detail each place that was visited, but it will also inform you of the time you stayed at a particular location. Here's how to see past locations on an iPhone:
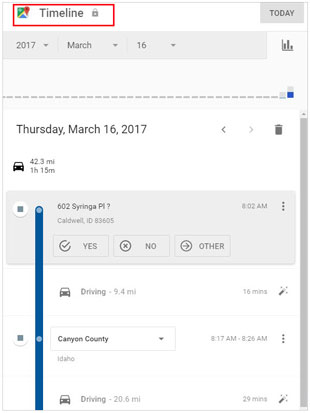
Step 1: To begin, launch the Google Maps application and tap your profile icon.
Step 2: Next, look for the "Timeline" option in the top left corner of your screen. Click on it. This feature lists all your travel data with their particular dates. You'll see the routes from the map and iPhone location history by date.
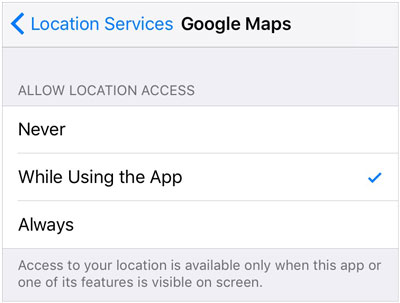
You should also enable location services for Google Maps to have complete control over your location privacy settings when using Google Maps. For example, you can track your whereabouts while the app is active or always in background mode. If at any point you wish to review a past location history from within Google Maps, go into "Settings Privacy" and "Location Services", then toggle on Google Maps on iPhone to set it to "Always".
How can you turn off Location History on Google Maps?
If you don't want Google to collect and store your location details, disable the "Location History" feature. Here is how to do that:
Step 1: Find the location history page in the lower row of the Timeline page. It should read "Location History Is On".
Step 2: Hit the button for "Manage Location History". You'll be directed to another page where you can slide the toggle next to "Location History" off.
Even though doing this will hinder Google Maps from tracking your location on your gadget, some Google applications will keep the time-stamped of the locations. Therefore, to ensure Google Maps cannot trace your whereabouts on any of your digital devices, turn off the Web & App Activity from the Settings.
Location history tracking is a formidable security measure. But, there may be instances when these features could risk your safety and privacy. You may encounter numerous issues which make you look for a way to hide the location on your iPhone.
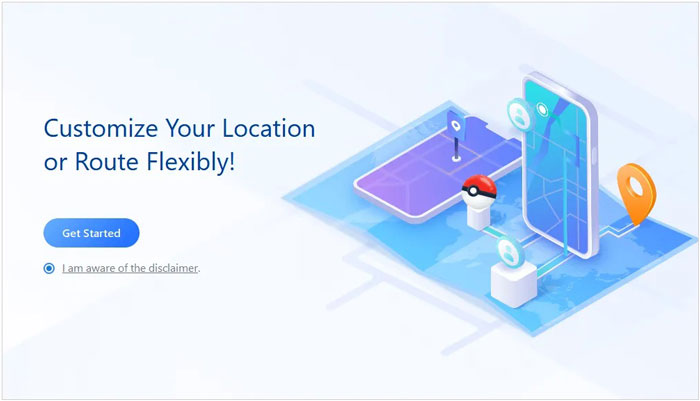
One way to prevent your iPhone from being spied on is by pretending you are elsewhere. To do that, you need reliable software - Location Changer. This outstanding tool facilitates the effortless changing of your iPhone's GPS location with a single click. Not only can you fool people into believing you are somewhere else, but this ingenious application also leaves no trace behind. Here are its features:
* Instantly change iPhone GPS location with just one click.
* Seamlessly fake your locations on Facebook Dating, Twitter, and more social platforms.
* Spoof your location for playing Pokémon GO on Android and iOS devices.
* Joystick feature to simulate GPS movements effortlessly.
* You can play AR games at home and design your routes and speed.
* Work for most iOS and Android mobile devices.
Download this software to keep your location from being tracked.
Change your iPhone location fast:
01First, download the location changer software onto your PC. Launch it and select "Get Started" to use this powerful tool.
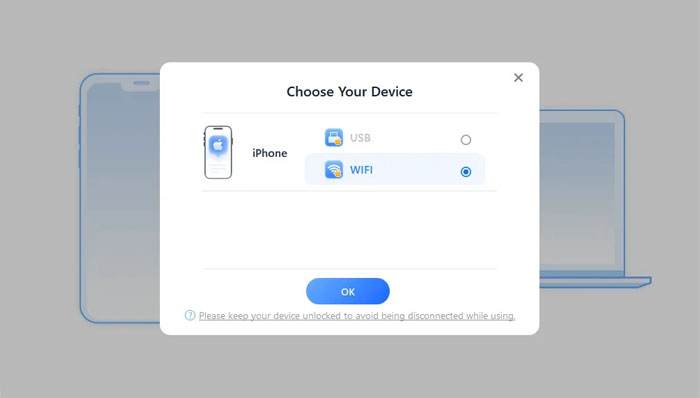
02Connect your iPhone, choose your device and "USB" on the interface, and tap "OK". Also, you can select "WIFI" if you want a wireless connection.
03You will see the map on your computer. Please hit the "Teleport Mode" option, select your desired location and drag the marker to your chosen spot. When finished, click "Move" to change location. You can access your fake location, and the new spot will show up on your device.

Don't let yourself forget the wonderful memories of your last vacation. If you don't want to miss these details, simply pull up your iPhone's location history. Sure, Apple may not provide as exact information as Google Maps, but with some trusty research and recollection, you'll be fine.
Additionally, to stop someone from checking your location, use the Location Changer program to quickly change your iPhone's GPS to anywhere in the world instantly.
Related Articles:
Top 10 iTools Virtual Location Alternatives for Android and iOS Devices
Easy Pokémon GO Spoofing on iOS Devices in Top 7 Ways
6 Feasible Ways to Spoof GPS Location on iPhone
How to Fake GPS with No Root on Android? [8 Trustworthy Apps]


 Free Download for PC
  Free Download for Mac

