Is your Android internal memory getting full faster than expected? You're not alone. This common issue affects many Android users, even after deleting apps or media files. When your internal storage fills up, your phone may slow down, crash, or refuse to install updates.
In this article, we explain why Android internal memory gets full, what exactly is taking up the space, and how to free up internal storage using smart and effective methods, from manual cleanup to advanced tools.
There are numerous factors contributing to the persistent state of the internal storage being full, encompassing:
What is taking up my internal storage on Android? There are many types of files that can cause internal storage to remain full, such as apps and their data (including APK files, cached files generated during usage, and user data), media files (like photos, videos, and music), system files (such as system update packages, space occupied by pre-installed apps, and system cache), and downloaded files (documents, APKs, etc.).
How do I clear internal memory on Android? Let's explore the most effective methods to clear internal storage on your Android device. Each method tackles a different aspect of your storage problem, helping you reclaim space safely and efficiently.
1 out of 4 mobile apps is never used after the first time. You will have many apps stored in the internal storage that you don't use anymore. Go ahead and uninstall them to free up internal memory.
Open "Settings" > "Apps" > See all apps, and uninstall any apps you haven't used recently.
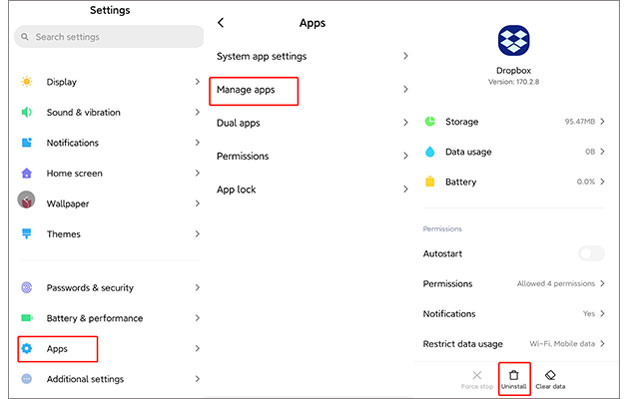
You can also visit Google Play > "My apps" > Installed to find rarely used applications.
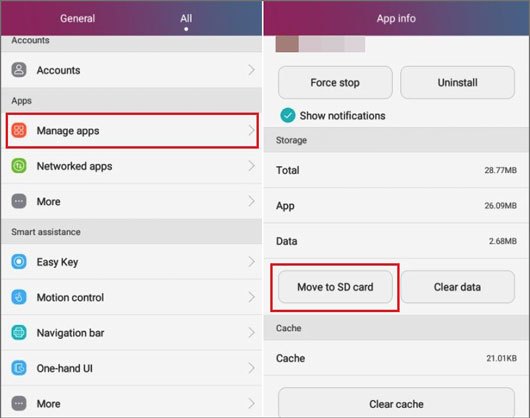
Apps store cache files and other offline data in the Android internal memory. You can clean up the cache and the data in order to get more space. But deleting data from some apps may cause them to malfunction or crash. Also, the offline files may not be available anymore.
To clean your app cache, head right over to "Settings", navigate to "Apps", and select the app you want. Now, select "Storage" and tap on "Clear Cache" to erase cached files. You can also clear app data from the same page if you wish to.

If you don't want to delete files but still need to free up internal storage, transferring data to external or cloud storage is a smart solution. Below are three common and effective ways to do this.
Transfers files such as photos, videos, and documents from internal memory to an SD card (if your device supports one), freeing up significant space.
How to do it:
Step 1. Insert a properly formatted SD card into your Android phone.
Step 2. Open the File Manager or My Files app.
Step 3. Navigate to internal storage and select the files you want to move.
Step 4. Tap "Move" > select "SD Card" > choose the destination folder and confirm.
Note: Some phones allow setting the SD card as the default storage for photos or app data via "Settings" > "Storage" > "SD Card".
Upload Files to Cloud Storage
Stores your files in a cloud service so you can access them anytime while freeing up space on your device.
How to do it:
Step 1. Install a cloud storage app like Google Drive, Google Photos, Dropbox, or OneDrive.
Step 2. Sign in with your account.
Step 3. Upload files manually or enable auto-backup for photos/videos.
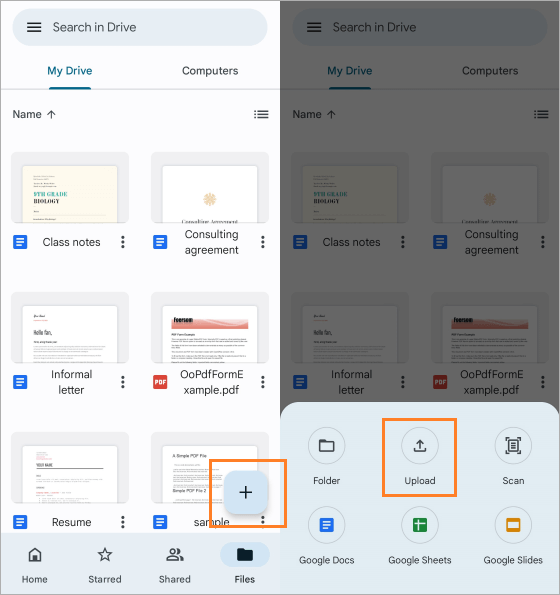
Step 4. After confirming uploads are complete, delete the originals from your phone to save space.
Let you back up large files to a computer for safekeeping and clear them from your phone.
How to do it:
Step 1. Connect your Android phone to the computer using a USB cable.
Step 2. On your phone, set the USB mode to File Transfer (MTP).
Step 3. On the computer, open the phone's storage from File Explorer (Windows) or Finder (Mac with Android File Transfer).
Step 4. Drag and drop files from the internal storage to a folder on your computer.
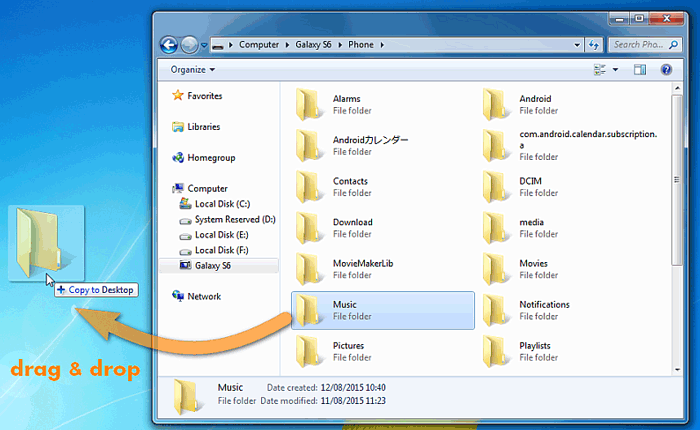
Step 5. Safely disconnect and delete the transferred files from your phone.
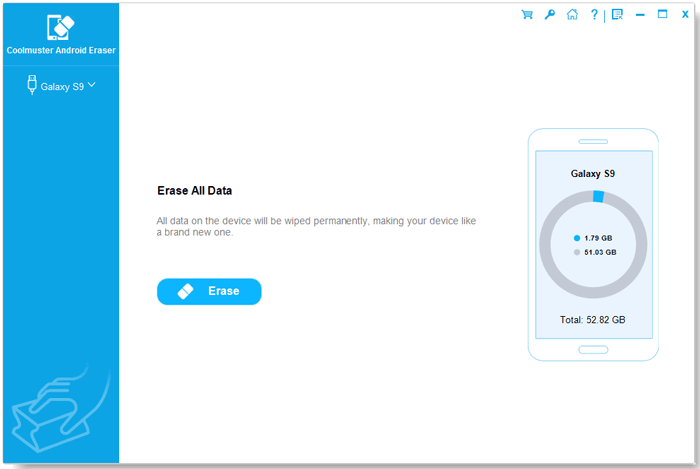
If you want a thorough and permanent cleanup, a professional tool is your best bet. Coolmuster Android Eraser is exactly the kind of software designed for this purpose. It helps you permanently erase data from your Android phone, making it unrecoverable even by professional data recovery tools.
Highlights of Coolmuster Android Eraser:
How to clear internal storage on Android with Android Eraser?
01To get started, download, install, and launch Coolmuster Android Eraser on your computer. Next, connect your Android device using a USB cable.
02Once the connection is established, click the "Erase" button to begin.
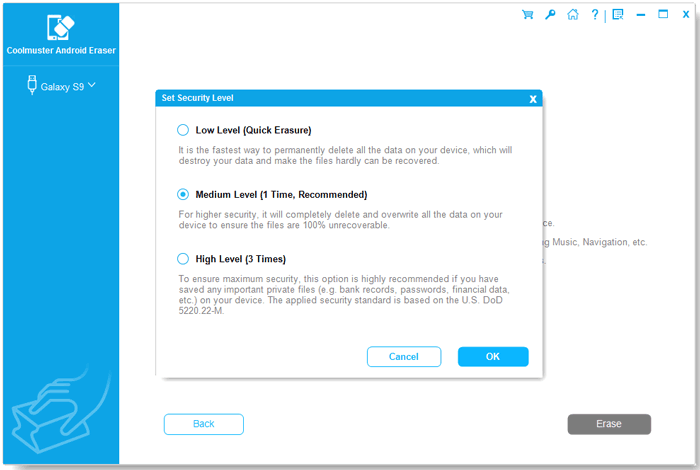
03You'll be prompted to choose a security level - Low, Medium, or High - depending on how thoroughly you want to wipe the data.
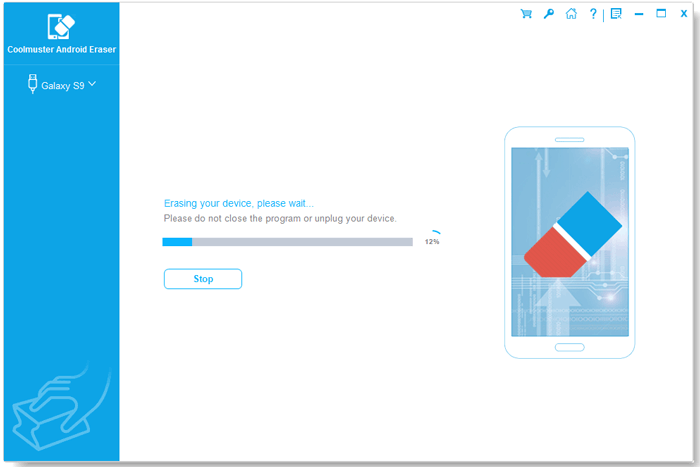
04After confirming your selection, the software will quickly scan your phone and begin permanently deleting the selected data, ensuring nothing can be recovered.
Here's the video guide (about two and a half minutes):
When all else fails, a factory reset provides a clean slate. A factory reset will completely wipe your phone, restoring it to its default state. So, please back up your Android phone before factory resetting your phone.
How to do it:
Step 1. Navigate to "Settings" > "System" > "Reset" > "Factory data reset".
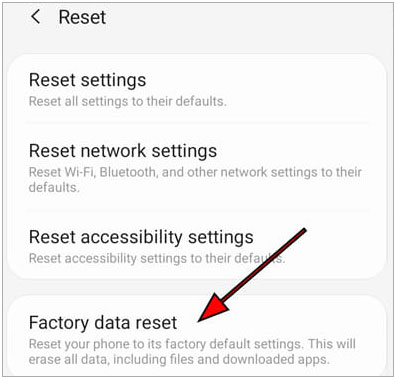
Step 2. Confirm your choice and follow the prompts.
Dealing with a full Android internal storage can be frustrating, but with the right strategies, you can free up space and restore your device's performance. Whether you choose to delete unnecessary apps, clear cached data, or move files to external storage, each method plays a crucial role in managing your phone's space efficiently.
However, if you're looking for a quick, secure, and permanent solution to wipe sensitive data, Coolmuster Android Eraser is the ultimate tool to ensure that your data is completely erased, beyond recovery. With its ease of use, multiple security levels, and support for a wide range of Android devices, it's the best choice for anyone wanting to maintain a clutter-free and secure device.
Related Articles:
Why Is My Android Phone Storage Full After Deleting Everything?
How to Free Up Space on Android Without Deleting Anything in 6 Ways
How to Free Up Space on Samsung Tablet or Phone in 7 Ways
How to Get More Storage Space on Samsung Phone with Simple Clicks


 Free Download for PC
  Free Download for Mac

