Keeping a full backup of your iPhone is essential for protecting your photos, messages, apps and settings. However, the process can hit a snag if your device is locked or disabled, as you may be unable to access your data or start a normal backup.
This article walks through three practical ways to back up a locked or disabled iPhone/iPad without a passcode, including options for when iTunes won't recognize the device. Keep reading to find simple and effective backup solutions that suit your needs.

Under normal circumstances, backing up an iPhone requires unlocking the device and entering the password. However, in certain specific situations, you can still back up your iPhone without a password, such as:
If there is no trusted computer, or the device has never been synced, you may need to unlock the iPhone first before performing the backup.
If your iPhone has previously been connected to your computer and marked as a trusted device, you can use Coolmuster iOS Assistant to back up your iPhone without a password. This reliable and powerful tool helps users securely and easily back up virtually all data from their iPhone to their PC/Mac, including photos, videos, music, notes, text messages, contacts, and more. Simply connect your iPhone to a previously trusted computer to freely access and back up files on your locked iPhone.
What can Coolmuster iOS Assistant do for you?
Download the required version and let's see how to back up iPhone without passcode or with a broken screen.
How do I back up my iPhone if it won't unlock? Here are the steps:
01After installing the iOS Assistant on a computer you've trusted before, connect your iPhone to the computer with a USB cable. The software will automatically detect your locked iPhone and you will see the main interface as below.

Note: In order to get your locked iPhone detected by iOS Assistant, please make sure to use a computer that your iPhone has trusted before. Otherwise, the program is unable to recognize your locked iPhone.
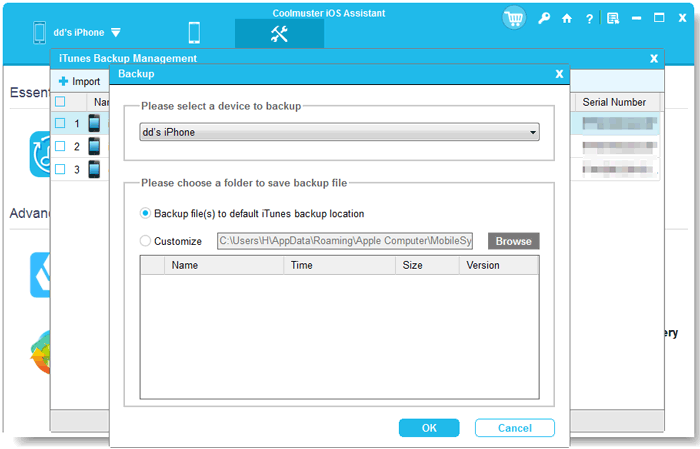
02Go to the "Super Toolkit" > "iTunes Backup & Restore" > click "Backup" > choose the location to store backups > click "OK" to back up your iPhone in one go.
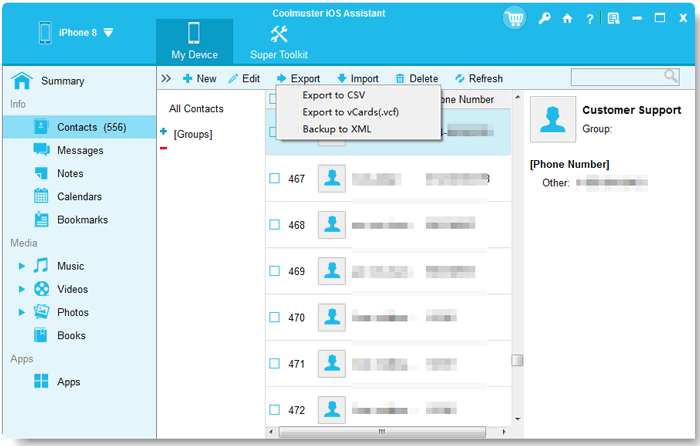
Or you can go to the desired file type > preview and select the specific files you'd like to back up > click the "Export" button to back up your iPhone without passcode to the PC.
Video Tutorial:
If your iPhone is locked, you can still back it up using iTunes, though this works only under certain conditions. If you've previously synced your iPhone with a trusted computer, iTunes might still recognize your device and allow you to back it up without needing to enter the passcode. Keep in mind, this method only works if you haven't restarted the iPhone since your last sync.
Here's how to back up your locked iPhone using iTunes:
Step 1: Launch the iTunes software on your PC or laptop.
Step 2: Connect your locked iPhone to your computer using a USB cable. iTunes will begin syncing with the device. (iPhone Not Showing Up in iTunes?)
Step 3: Click on the device icon in the top left corner. Go to the "Summary" section, select "This Computer," then click "Back Up Now."
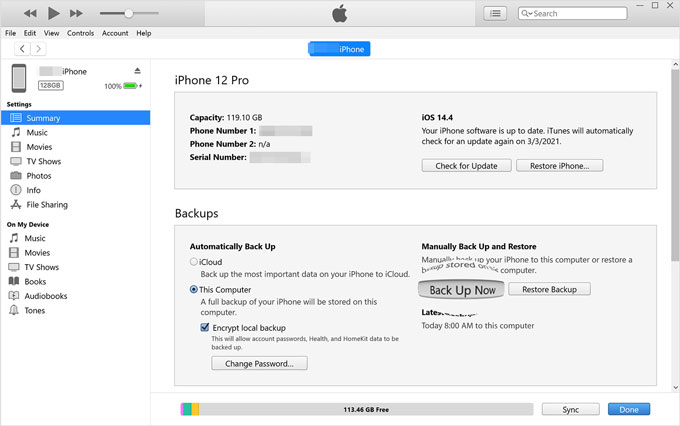
In just a few seconds, your iPhone will be backed up to your computer, and you'll be able to restore it later. This process is specific to Windows. Let's now look at how to do this on a Mac.
Backing up a locked iPhone on a Mac is similar to doing so on a Windows PC. However, this method only works if you've previously synced and backed up your iPhone with iTunes or Finder on that Mac. If you've done that, you can easily back up your device again by following these steps.
Here's how to back up your locked iPhone via Finder:
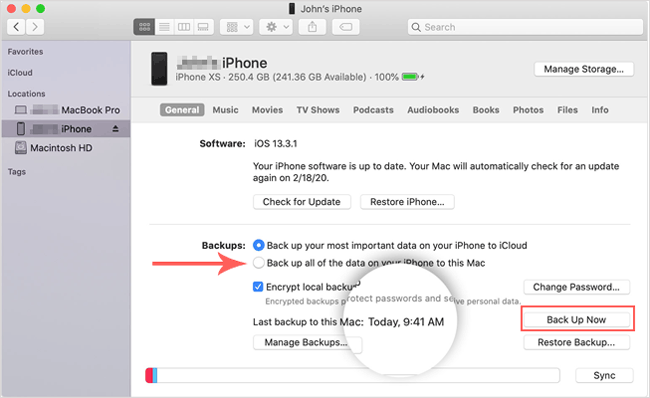
Step 1: Connect your iPhone to your Mac using a USB cable.
Step 2: Open Finder on your Mac. Under the "Locations" section, you'll find a list of devices. Select your iPhone from the list to continue.
Step 3: At the top of the Finder window, you'll see a few tabs. Click on "General".
Step 4: In the General section, you'll see an option to "Back up all of the data on your iPhone to this Mac". Click "Back Up Now" to start the backup process.
That's how you back up your iPhone to your Mac via Finder. If your phone is locked and you're wondering how to access it afterward, don't worry! We've got a solution for that as well. Let's explore it together.
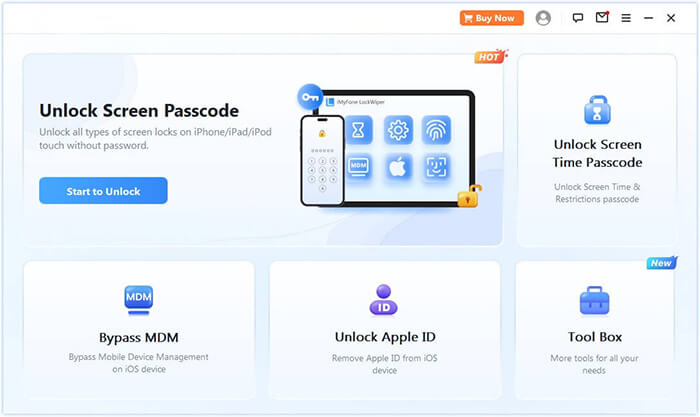
If your iPhone cannot be entered with a passcode and the device is not yet trusted by any computer, you may need to unlock it before backing up your data. In this case, iPhone Unlocker is a very useful tool that supports quickly unlocking Touch ID or Face ID, unlocking Apple ID accounts, removing MDM (Mobile Device Management), and restoring the device to normal use. In this section, we will explore how to unlock your iPhone without a passcode.
Here is how to use iPhone Unlocker to unlock your locked/disabled iPhone:
01Open the iPhone Unlocker and choose the "Unlock Screen Passcode" mode. Click "Start to Unlock", then press "Start" and connect your iPhone to the computer using a USB cable.
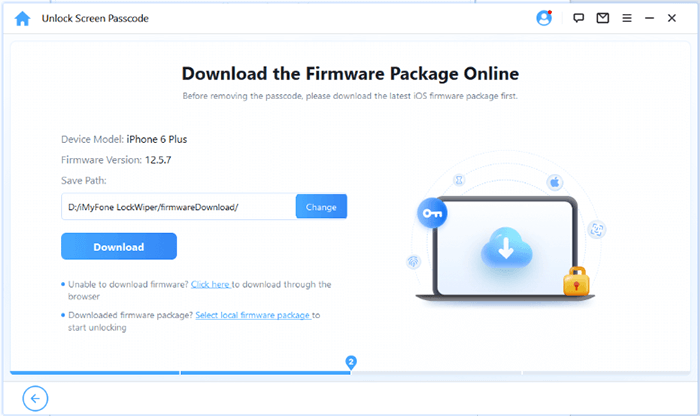
02Put your iPhone into Recovery Mode or DFU Mode. The software will automatically detect your device model. You can select a different storage location for the firmware package and then click "Download" to begin the download.
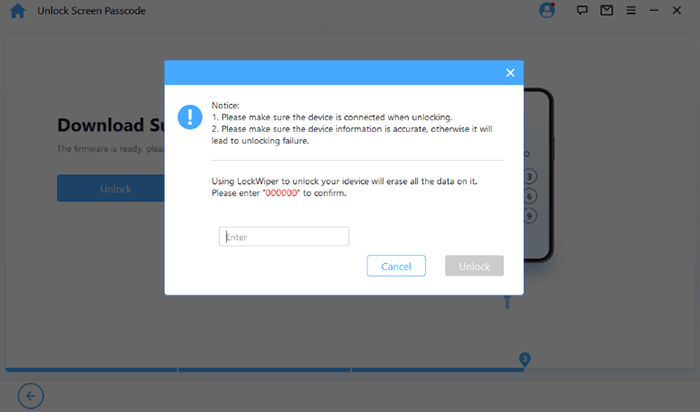
03Click "Unlock" to proceed. Carefully read the prompt, enter "000000" to confirm your consent to unlock the device, and then click "Unlock" again.
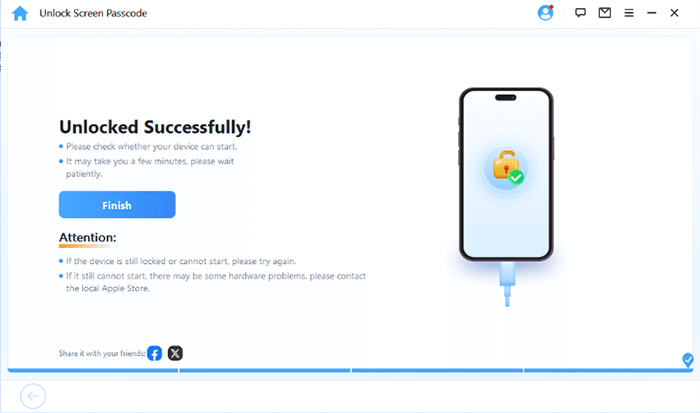
04After a few minutes, your iPhone screen passcode will be successfully removed.
Backing up an iPhone without a password is not difficult, especially when the device has established a trust relationship with a computer. Coolmuster iOS Assistant offers an efficient selective backup solution, while iTunes/Finder is the official and reliable tool. If the device has not established a trust relationship with any computer, iPhone Unlocker can help you quickly unlock the device. Whether it's for backing up data or unlocking the device, these tools provide the best solutions to ensure your data security.
Which way did you use to back up iPhone without passcode? Welcome to share your experience in the comment area.
Related Articles:
4 Fixes to Enter the Password to Unlock Your iPhone Backup Issue
How to Erase iPhone Without Passcode in 5 Simple Ways? (Step-by-Step)


 Free Download for PC
  Free Download for Mac

