People own an iPhone for a number of reasons. Some own it because it's Apple. Some own it because it doesn't lag like many other Android phones. And some own it because of its great camera.
Why Taking Pictures With iPhone Can Be Easy?
Many casual users of iPhone love it for its great camera. Even professional photographers use it sometime to document something quickly. iPhone camera is getting better day by day with new features. Now it has the HDR feature integrated on the phones. HDR is short for High Dynamic Range and aims to produce a picture with proper and balanced exposure.
There are many advantages of taking HDR pictures. Apple camera will take 3 pictures at different exposures and then unify them to present a well exposed picture. It is useful mostly for landscape photography where the subject is made up of lights of various intensities. It brightens low light and dark scenarios and can give you better pictures than normal clicks.
Way 1. How to Take HDR Photos with iPhone Itself
Way 2. How to Take iPhone HDR Photos with App
Taking HDR pictures with iPhone is very easy. Follow the steps mentioned below:
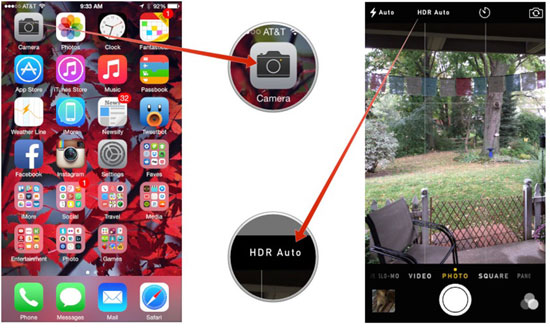
Step 1 - Switch On HDR. Launch the camera app on iPhone and find the tab called Options at the top of the screen. Tap on it to reveal the grid and HDR toggles. Tap on HDR and switch it on. Close the menu and use the camera app. You can also choose the HDR option directly while taking pictures. Open the camera app to take a picture. Now find the button displayed as "HDR Off". Click on it and it will turn yellow to read "HDR On".
Step 2 - Take picture with HDR. Keep your subject at the focal point and focus. You can use autofocus or tap the screen to set the focusing area. It is advisable to use a tripod or steady surface as it takes longer to click HDR images. It ensures that the image will be well exposed and makes a better picture. iPhone will save two pictures on the camera roll – the normal one and the HDR treated one.
Pros:
- Built is feature and easy to use
- Takes better pictures with balanced exposure
Cons:
- Does not make a difference in the output each time
- Picture may be blur or washed out
Can't Miss:
How to Take Panorama Photos with iPhone
How to Make Slow-Motion Videos with iPhone
Guide to Make Slideshow with iPhone Photos
And if you want to better your experience, why not take help of some great apps? There are a number of apps on the iOS store that you can try out. Here is a look at one of the more popular ones.
Simply HDR - It is a popular and high rated app for composing HDR pictures. It can be used for iPads too. Here is a look at some of the features you would love.
Features:
It has a powerful HDR program which makes better HDR copies than iPhone. It balances light and dark effectively and is very easy to use.
Different styles of HDR including black and white, shadows and light, contrasted HDR and contrasted light, etc. You can create your settings and also save them.

How to Use It?
Just use the app to import any picture. Now apply the changes you want to or used saved presets. After applying the changes save the picture wherever you want.
Pros:
- Powerful HDR engine to make great photos
Cons:
- Does not take pictures. Just applies HDR changes to them.
You can take some great pictures on your iPhone with the HDR mode. It doesn't matter whether you're looking to take pictures in 4K or not, the clarity on offer is sure to leave you mesmerized.
Related Articles:


