The iPhone 17 series is finally here, and if you're considering an upgrade, you should know what to do before getting a new iPhone 17/17 Pro/Air. Whether you're switching from an Android phone or upgrading from an older iPhone, the excitement of getting a new device can sometimes overshadow the necessary preparation. In this guide, we'll walk you through setting up and using your new iPhone 17/17 Pro/Air. Let's get started and make sure you're fully prepared!
Before you upgrade to a new iPhone 17/17 Pro/Air, you should back up your old iPhone and then move your data from the old smartphone to the new iPhone 17/17 Pro/Air. Below are some ways of backing up your old iPhone's data:
The most efficient way of backing up your iPhone's data is by using professional iPhone backup software. Despite the many tools available on the market, Coolmuster iOS Assistant is the most popular and highly-rated one.
It not only allows users to back up the entire iPhone with one click but also enables selective backup of various types of data such as videos, photos, contacts, call logs, documents, music, and more at an unmatched speed. Moreover, you can select and preview the data before backing it up and preserve the original data formats without affecting the quality of the data.
Below are some of its features:
To back up your iPhone's data to a computer, you need to follow the below steps:
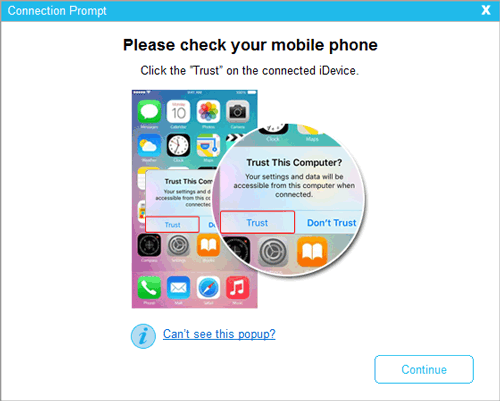
01Download the latest version of the application. Run the application on your PC and launch it. Use a lighting cord to connect your iPhone to the PC. Tap Trust when you receive a Trust This Computer pop-up to authorize the connection and hit on the Continue button.
02A screen showing all your iPhone data categorized into folders will appear after the software detects your iPhone.

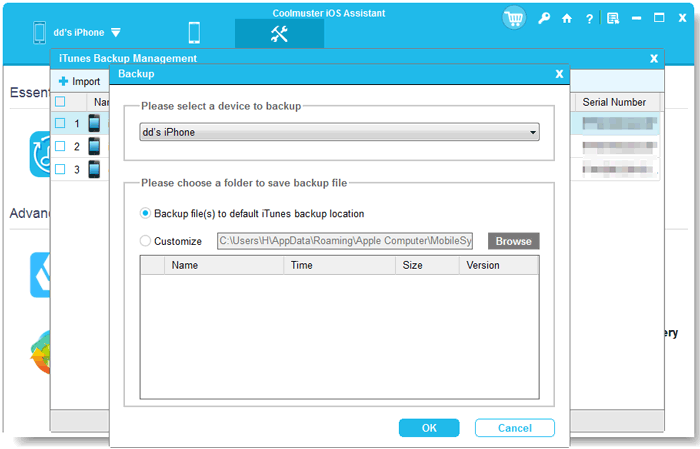
03To back up whole iPhone, go to Super Toolkit > Backup & Restore > Backup. Select your device, choose a location to save the back up file, and then click OK to start the backup process.
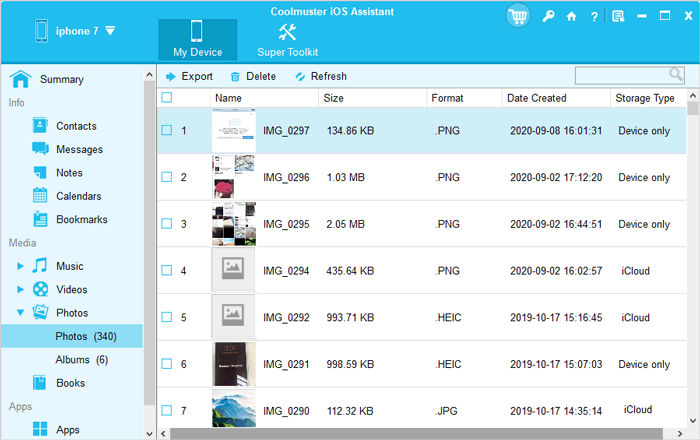
To selectively back up iPhone data, double-click on the folder that contains the data you want to back up and open it. Preview the folder's content, select the data items you want to backup, and hit the Export option. Select the output format, and your iPhone's data will be saved on your PC.
Video Tutorial:
You can also using iCloud to back up your iPhone. Below are the steps for backing up your iPhone to iCloud:
Step 1. Launch the Settings app from your iPhone's home screen.
Step 2. Tap on iCloud and sign in to your iCloud account. Scroll down to locate Backup and tap on it.
Step 3. Toggle the slider next to iCloud Backup to the On position to activate automatic backup.
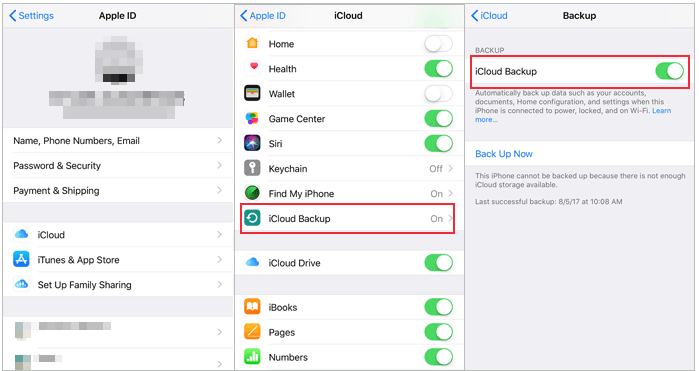
Note: iCloud backup is the conventional technique used to back up iPhone data. However, iCloud only provides 5GB of free storage. Hence, if your iCloud storage is not enough, you can purchase additional storage space.
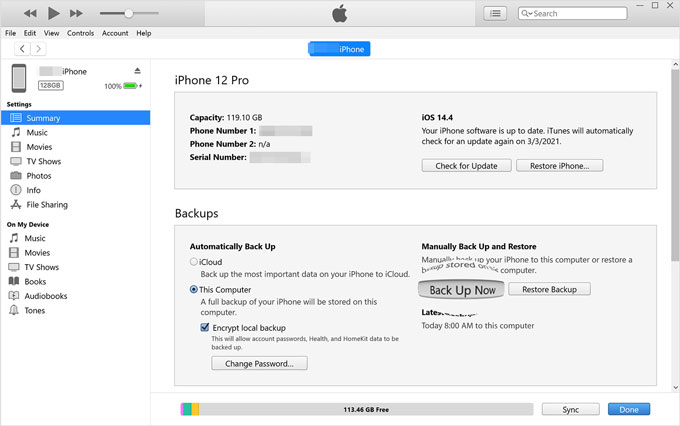
Besides iCloud, Apple also provides iTunes to back up your iPhone. The following are the specific steps:
Step 1. Launch the most recent version of iTunes on your PC and link your iPhone to your computer via a USB cable. If prompted, tap "Trust" on your iPhone.
Step 2. Click on the iPhone icon once it appears at the top-right corner, then select Summary from the left panel.
Step 3. Under the Backups section, choose This Computer and then click Back Up Now.
Another fundamental thing you need to do before purchasing a new iPhone 17/17 Pro/Air is upgrade your old iPhone to the latest iOS version. This procedure is vital because it will minimize the risk of bumping into errors while transferring your data from the old phone to the new iPhone 17/17 Pro/Air. Below are the methods for updating your iPhone:
Step 1. Ensure the iDevice has sufficient power and is connected to a Wi-Fi network. Open the Settings app, tap on the General button, and hit on the Software Update button. Your iPhone will begin to scan for the most recent updates.
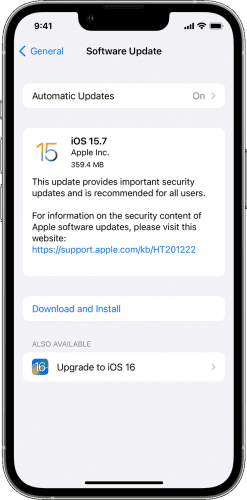
Step 2. Click Download & Install and then input your respective passcode if requested.
Step 3. Hit the Install Now button, and the iPhone will display a progress bar and the Apple logo.
Are you still wondering what to do before getting new iPhone 17/17 Pro/Air? Syncing your photos on the old device to iCloud before you purchase a new iPhone 17/17 Pro/Air is crucial.
Follow the elaborate steps below to sync your photos to iCloud:
Step 1. Open Settings on your iPhone and click on your profile to access iCloud settings. Ensure that you have signed in to your iCloud account.
Step 2. Locate iCloud > Photos and turn on iCloud Photo Library.

Step 3. Choose if you want to enhance the size of the photos or maintain their original size.
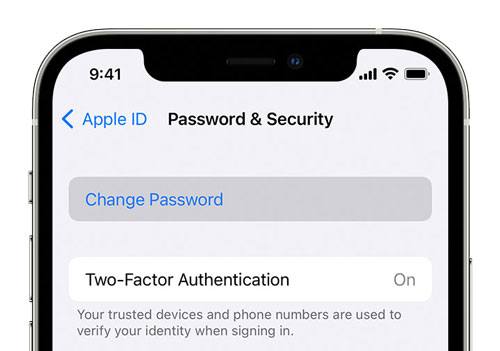
Two-factor authentication can compromise the process of transferring data between two iPhones. To prevent such issues, you are advised to disable two-factor authentication on the old iPhone.
Follow the elaborate steps below to disable two-factor authentication on the old iPhone:
Step 1. Launch a web browser on your PC and open the Apple ID webpage. Use your Apple ID and passcode to sign in to your respective Apple account.
Step 2. Move to the screen's left side, tap on the Sign-in and Security button, and select the Account Security option. Tap the Two-Factor Authentication option and disable it.
Step 3. You can also disable Two-Factor Authentication on your iPhone by head to Settings > Your Apple ID > Password & Security; find the Two-Factor Authentication option and turn it off.
There are some things to do before getting a new iPhone 17/17 Pro/Air because it can reduce the time spent during the switching process. For example, you should remove the two factors authentication security feature, synchronize your photos to iCloud, update your iPhone, and back it up. The fastest way of backing up your iPhone to a computer is using a data transfer tool like Coolmuster iOS Assistant. Apart from this application being fast, it is also secure and backs up data without affecting its quality.
Here's a simple guide to help you with some common issues before changing your iPhone. If you need more details, check out the info below:
Q1: How do I erase my iPhone if I'm selling it?
If you're getting rid of your old iPhone, it's important to wipe it clean to protect your personal data. The "Erase iPhone" feature in Coolmuster iOS Eraser can securely erase all data from your device.
Q2: Why are my photos not restoring from iCloud?
If your photos aren't coming back after restoring from iCloud, here are some things to check:
Q3: How do I recover notes from an iTunes backup?
To retrieve notes from an iTunes backup, make sure these conditions are met:
For a step-by-step guide, check the tutorial linked here.
Related Articles:
How to Transfer Data from Broken iPhone to New iPhone? (4 Ways Out)
Top 9 Ways to Fix Messages Didn't Transfer to the New iPhone
How to Fix the iPhone Transferring Data Stuck Issue Effortlessly? 14 Quick Tricks Here
How to Transfer iPhone to iPhone After Setup in 4 Dependable Ways


 Free Download for PC
  Free Download for Mac

