Q: Recently, I have purchased a new MacBook Air, so I want to transfer songs from my iPad Air to the MacBook Air to save my time. Can anyone tell me how to do it? Thanks!
We all know that Apple's iTunes effort to protect illegal music copy, so it is impossible for you to copy songs from iPad to Mac without any third-party tool's help. Thus, if you want to export and share iPad music on Mac computer, you need to find a solution and learn how to transfer songs from iPad to Mac.
Part 1. Tutorials: How to Copy/Transfer Music from iPad Air to Mac?
Part 2. How to Sync Songs from iPad to iTunes Library?
Things could be very easy once you owned a professional yet reliable iPad to Mac Transfer program. Here, we could like to strongly recommend Coolmuster iOS Assistant for your reference. With this powerful iPad Music Transfer for Mac, you can copy songs from iPad to Mac in fast speed. And it allows you to export movies, photos, eBooks, audiobooks, etc. from iPad to Mac easily. As a powerful iPad Data Manager, this iPad to Mac Transfer also supports iPhone and iPod.
To make you understand how iPad to Mac Transfer works, here is a step-by-step guide below. If you're a Windows user, please don't hesitate to try its Windows version.
You might be interested in:
Best Music Apps for iPhone/iPad You Can't Miss
What if Volume on iPhone/iPad is Not Loud Enough?
As a prominent transfer tool, Coolmuster iOS Assistant enables users to freely copy songs from iPad Pro, iPad 2, the new iPad, iPad mini, iPad 4, iPad Air to Mac with one click. Now, click the download button to get the installation package for this powerful tool. And install it on your Mac computer.


Step 1. Connect iPad with Mac Computer
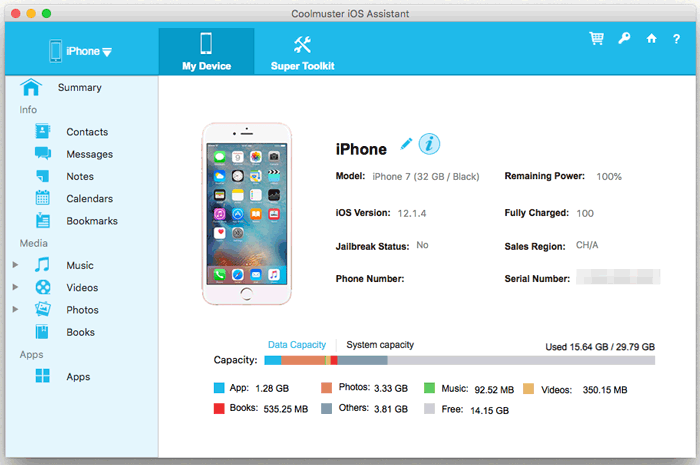
Connect your iPad with Mac computer via a USB cable and launch iPad Music Transfer for Mac software. Then it will automatically recognize your iPad and display its information in the screenshot just like below picture. Please be attention that this tool supports all iPad models, including iPad Pro, iPad Air, iPad mini, the new iPad, iPad 2, iPad, etc.
Step 2. Check and Mark All Songs You Want to Export
Click "Music" and check the detailed music info in the right panel. This tool will display a song with its title, time, size, genres, and artists accordingly. Just mark all songs you want to transfer in this interface.
![]()
Step 3. Export Songs from iPad to Mac Immediately
When you have chosen all files you need, just click the big "Export" image button on the top of the panel to start transferring songs from iPad to Mac at once.
In just a second, all songs you want to transfer from iPad to Mac are there where you wish them to be. It is very simple and easy to use, right? If you have the needs of transferring music from iPad to Mac and you're satisfied with this tool we recommend here, then please don't hesitate to take it home now.
What are you waiting for? Just get this powerful iPhone Music Transfer via below methods and try it now.
See Also: How to Put Music on iPhone without iTunes
You can also transfer songs from iPad to iTunes library for backup or share. Just follow the steps as below.
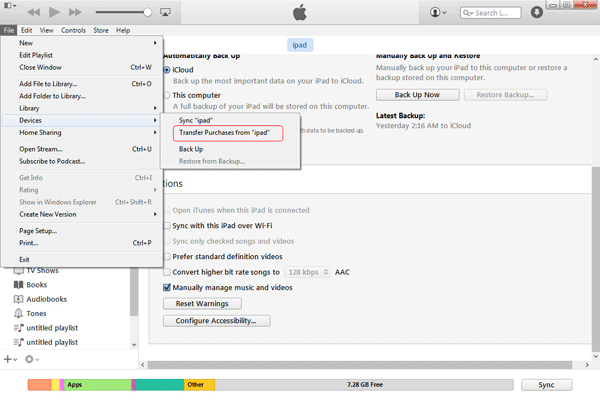
Step 1. Launch iTunes on your computer, then go to Edit > Devices > Prevent iPods, iPhones, and iPad from syncing automatically.
Step 2. Connect iPad to computer via a USB cable, then iTunes will automatically detect your iPad and show the iPad icon on the left top of iTunes window.
Step 3. Click File > Devices > Transfer Purchases from "iPad". Then iTunes will sync the purchased music from iPad to iTunes library automatically.
Coolmuster iOS Assistant provides comprehensive iOS Data Management. It allows you to manage various types of data on your iOS devices, including contacts, messages, photos, videos, music, books, and more. It provides a convenient way to organize, export, import, delete, and backup your data. Just give it a try.
Related Article:
How to Backup/Transfer PDF Files from iPad to PC or Mac
Top 10 Methods to Transfer Files to iPad
How to Transfer iBooks from iPad to Computer with or without iTunes?
Ultimate Guide on Transferring Files from iPhone to PC without iTunes
How to Transfer Photo from iPhone to Computer/PC without iTunes


 Download for PC
 Download for Mac
