iCloud is Apple's built-in cloud service that gives every user 5GB of free storage. It lets you keep your photos, videos, documents, calendars, notes, contacts, backups, and more safely online. You can also share files with others and work together without hassle.
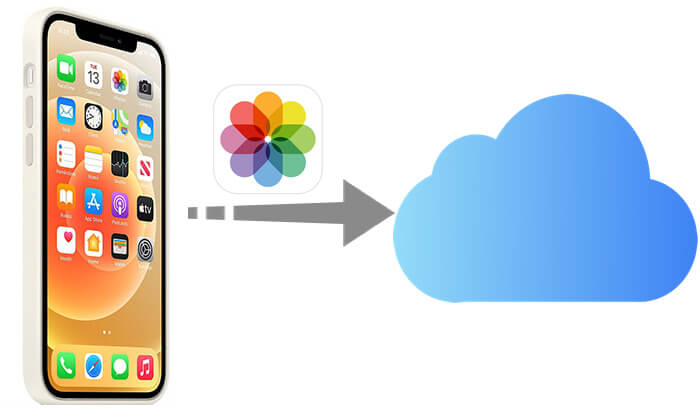
Because iCloud helps save space on your device, many iPhone users wonder how to move photos from iPhone to iCloud, especially when their iPhone storage is running low. If you're facing the same problem, the next section will walk you through simple ways to upload photos from your iPhone to iCloud.
iCloud Photos can automatically upload and sync all your photos to the cloud, allowing you to access them on all your Apple devices. As long as you're connected to Wi-Fi and have enough iCloud storage space, your photos will be backed up automatically.
Here is how to offload photos to iCloud via iCloud Photos:
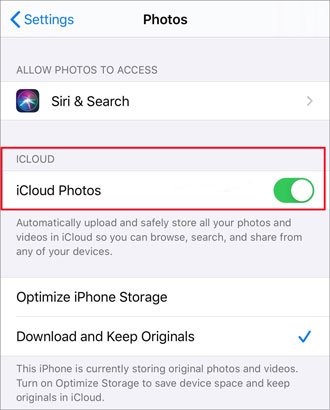
Step 1. Open "Settings" on your iPhone, tap [Your Apple ID], then go to "iCloud".
Step 2. Tap "Photos" and turn on "iCloud Photos". (On iOS 16 and above, this option is shown as "Sync this iPhone".)
Step 3. Choose "Optimize iPhone Storage" (if your iPhone storage is full) or "Download and Keep Originals" (if you want to keep original photos both locally and in the cloud).
Step 4. Connect to Wi-Fi and plug in your iPhone, and it will automatically start uploading photos to iCloud. (iCloud Photos not syncing?)
Note: If you have plenty of photos to move from iPhone to iCloud, the free 5GB storage space of iCloud won't be enough. So you must upgrade your iCloud photo storage which can at times be costly. Click here to learn how to free up iCloud storage space.
If you want to store your photos in iCloud but free up space on your iPhone, the process is simple. Before you start, make sure you've already turned on Sync This iPhone and allowed enough time for all photos to finish uploading to iCloud.
Step 1: First, make sure you're signed in to both your iPhone and iCloud using the same Apple ID.
Step 2: Open "Settings" on your iPhone. Tap your name at the top, then go to "iCloud" and choose "Photos".
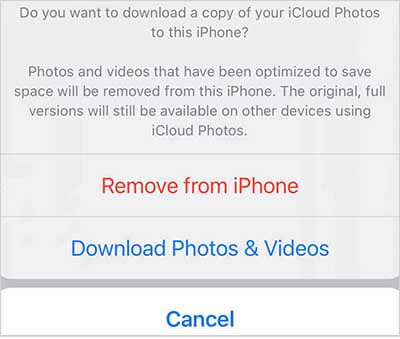
Step 3: Turn off "Sync This iPhone". A message will appear asking what to do with the photos on your device. Choose Remove from iPhone.
Step 4: Confirm your choice by tapping "Remove from iPhone" again. Your photos and videos will be cleared from your device, but they will stay safely stored in iCloud.
If you want to upload your iPhone photos to iCloud using a Windows computer, start by installing "iCloud for Windows". After the installation, follow these simple steps:
Step 1: Open "iCloud for Windows" and sign in with your Apple ID.
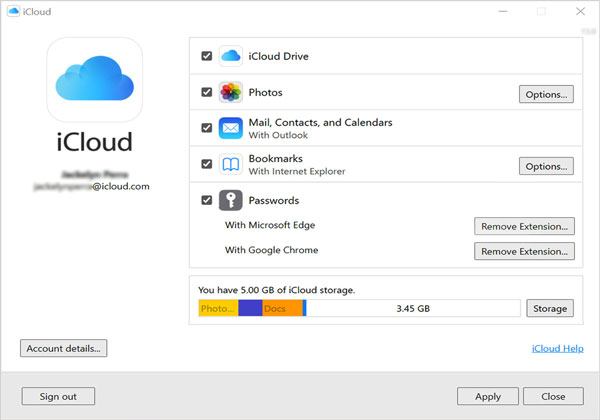
Step 2: Next to "Photos", click "Options".
Step 3: Select "iCloud Photos" so your computer can upload photos to iCloud, then choose "Done".
Step 4: Hit "Apply" to save the changes.
After everything is set up, Windows File Explorer will automatically create folders for "iCloud Drive" and "iCloud Photos". Any photos synced to iCloud will appear in the iCloud Photos folder, where you can view and organize them. You can also drag and drop files into these folders to upload them to iCloud Drive whenever you need.
If your goal is to prevent photo loss rather than managing photos in the iCloud Photo Library, you can back up your entire iPhone directly. iCloud Backup can fully back up your iPhone's photos, app data, and more to iCloud.
Here is how to put photos in iCloud storage via iCloud backup:
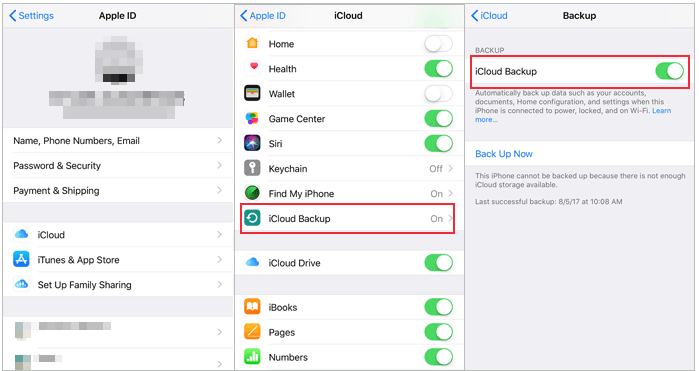
Step 1. Open "Settings", tap [Your Apple ID] > "iCloud" > "iCloud Backup".
Step 2. Turn on "iCloud Backup", then tap "Back Up Now".
Step 3. Connect to Wi-Fi and wait for the iPhone backup to complete.
Although iCloud provides cloud storage for iPhone users, its storage space is limited (5GB free), and when you enable iCloud Photos, deleting photos from your iPhone will also sync and delete those photos from iCloud. If you want to back up iPhone photos without loss and avoid the limitations of iCloud storage or synchronization, Coolmuster iOS Assistant is an ideal choice. It allows you to batch export iPhone photos to your computer without using iCloud space or affecting the data in iCloud.
Key features of iOS Assistant:
Here is how to transfer photos from your iPhone to your computer using iOS Assistant:
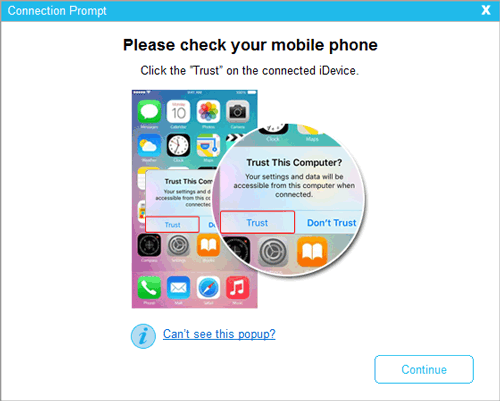
01Install the program on the computer and open it. You'll see its primary interface displayed on the screen. Plug in your iPhone to the computer with a lightning cable. Hit "Trust" when prompted to "Trust This Computer". Then, click "Continue".
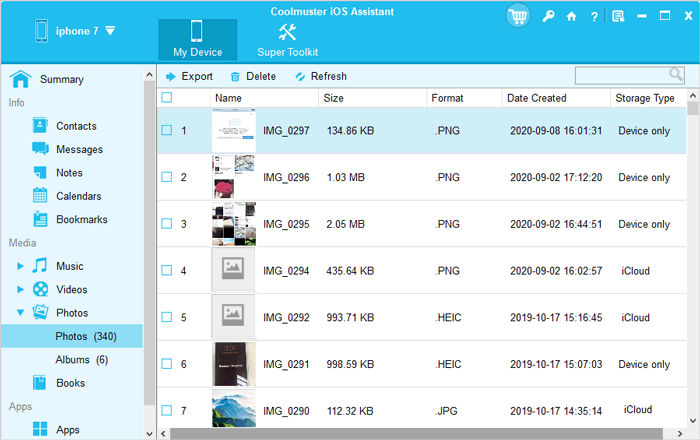
02Once your iPhone is detected by the software, the main interface will appear as shown below. As you can see, all the different file folders are organized on the main screen.

03Tap on the "Photos" folder and preview the photos the software scans out. As you select the ones you want to back up to the computer, hit the "Export" tab.
Video Tutorial:
Q1. Why can't iPhone photos upload to iCloud?
If your photos do not upload to iCloud, here are some possible reasons:
Q2. If you delete photos from your iPhone, will they still be available on iCloud?
If iCloud Photos is enabled, deleting photos from your iPhone will also delete them from iCloud as they are synced. However, if photos are stored only through iCloud Backup, deleting photos from your iPhone will not affect the photos in the iCloud Backup. (How to delete photos from iPhone but not iCloud?)
That's all on how to move photos to iCloud to free up space. Hopefully, by following these instructions, you can successfully upload your pictures to iCloud and solve how to move storage into iCloud. Although iCloud provides a convenient way to store and manage iPhone photos, its storage space is limited. If you need a more secure and flexible backup solution, Coolmuster iOS Assistant is a great choice.
Related Articles:
How to Upload Photos to iCloud from iPhone/iPad/Mac/Windows?
[Solved] How to Move iPhone Storage to iCloud to Free Up Space?
The Ultimate Guide on How to Manage iCloud Photos
How to Access iCloud Photos on Different Platforms? 5 Powerful Methods


 Free Download for PC
  Free Download for Mac

