Have you ever received an important text message on your iPhone and wished you could view and reply to it more conveniently on your Mac? You're not alone. Many people wish to sync their messages better between different devices. This article will teach you how to easily sync messages from your iPhone to your Mac. With simple settings, you can view and manage all your iPhone's text messages on your Mac, eliminating the need to switch between two devices. Are you ready? Let's get started on how to sync messages from iPhone to Mac!
Syncing messages from an iPhone to a Mac is now easier than ever, thanks to professional software like Coolmuster iOS Assistant. The software lets you selectively sync messages from an iPhone to a Mac computer. You don't need to use Wi-Fi to complete this syncing process. You can effortlessly do that by connecting the device to the Mac computer where you installed the software and letting it do the task. Importantly, you can conveniently save your messages in HTML, CSV, and text files to the computer through the iOS Assistant.
Highlights of iOS Assistant:
Here is how to sync iPhone messages to Mac using iOS Assistant:
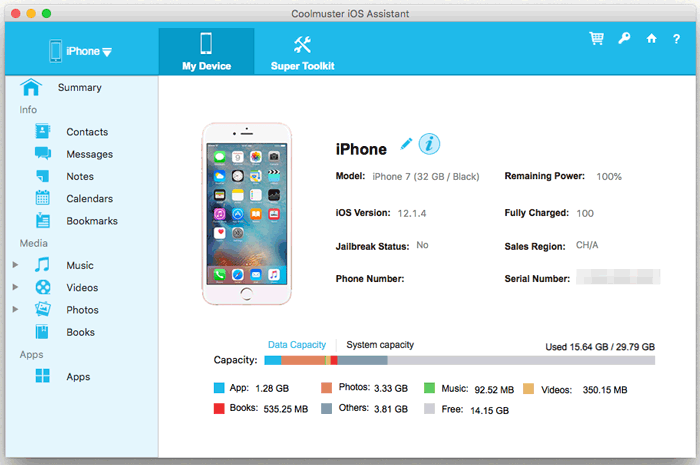
01Start by downloading the software on your Mac computer, then launch it. After that, use a lightning cable to connect the iPhone to the Mac.
02Click on the "Trust" option on your iPhone, then click "Continue" after that. When the iPhone connects with the Mac successfully, you will see all files displayed in categories on the screen on the left panel.
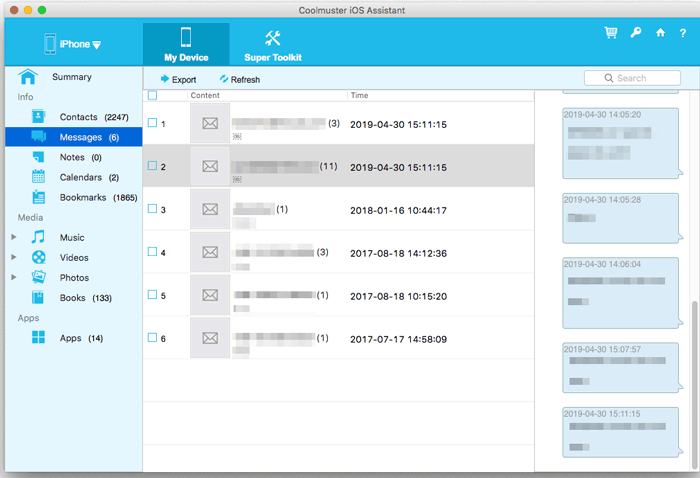
03Select the "Messages" option to check all texts in the right section. It will show all content on messages and the time. Choose the iMessages you wish to sync and hit the "Export" tab above. You'll have to choose the format you wish, either CSV, text, or HTML files. Once done, you'll have to transfer the messages automatically.
Video Tutorial:
The iCloud service provided by Apple is the official solution for seamless data synchronization between devices. As long as both your iPhone and Mac use the same Apple ID and the information synchronization feature in iCloud is enabled, your text messages will automatically sync between the two devices, eliminating the need for manual operations.
How do I get my iPhone to sync with my Mac automatically? Here are the steps:
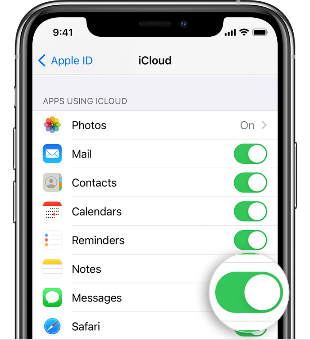
Step 1. Head to your iPhone's "Settings" page and tap "iCloud".
Step 2. Switch on the slider next to the "Messages" option. (How to Back Up iPhone Messages to iCloud?)
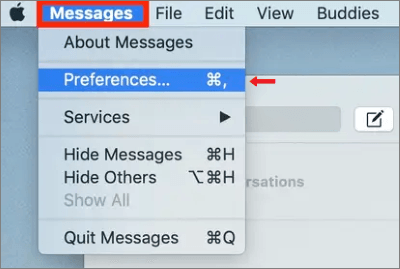
Step 3. On Mac, launch the "Messages" application. When you open the app, navigate to "Preferences" and "Accounts".
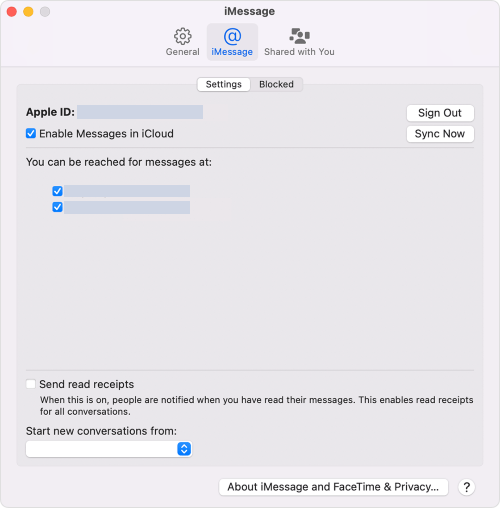
Step 4. Choose the iCloud account from the accounts showing on the list. Ensure the "Enable Messages in iCloud" option is selected.
Step 5. Hit the "Sync Now" icon to begin syncing the messages.
How to sync messages from iPhone to Mac without iCloud? In addition to iCloud, Apple also offers the "Text Message Forwarding" feature, which allows SMS/MMS text messages received on your iPhone to be forwarded in real-time to your Mac. This enables you to receive and reply to text messages directly on your Mac. It's very convenient for daily communication, especially for text messages from contacts who don't use iMessage. To ensure this function operates correctly, please make sure your iPhone is connected to Wi-Fi or a cellular network.
Here is how to sync iPhone messages to Mac via Text Message Forwarding:
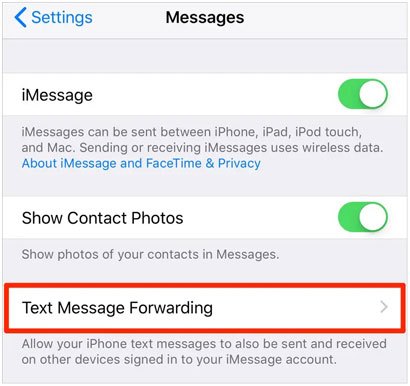
Step 1. On iPhone, head to "Settings" then to "Messages" and click on "Send & Receive".
Step 2. Open the Messages application on a Mac and tap the "Messages" menu. Then tap the "Preferences" and "iMessage" tab.
Step 3. On your iPhone, navigate to "Settings" > "Messages" > "Text Message Forwarding". Select your Mac as the device to forward messages to.
Step 4. Once set up, you can receive messages from your phone on your Mac as long as your iPhone is connected to Wi-Fi or a cellular network.
Note: Do you want to know how to sync messages from iPhone to iPad? Click here to find all the possible ways.
Apple ID syncing offers a quick way to keep your conversations up to date across your iPhone and Mac. By signing in with the same Apple ID on both devices, your messages can appear instantly on each one. This method is simple and requires no extra tools, but it depends on a stable internet connection and works only when both devices share the same Apple ID.
Step 1: Sign in to the same Apple ID on your iPhone and your Mac.
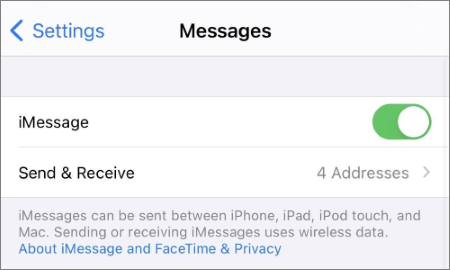
Step 2: On your iPhone, open "Settings" and tap "Messages".
Step 3: Turn on "iMessage" if it is not already enabled.
Step 4: Tap "Send & Receive" and make sure your phone number and Apple ID email are both selected.
Step 5: On your Mac, open the Messages app and choose "Settings" from the "Messages" menu.
Step 6: Select the iMessage tab and check that the same Apple ID is signed in.
Step 7: Make sure your phone number and email are enabled under You Can Be Reached At.
Step 8: Wait a few moments for both devices to sync and confirm new messages appear on your Mac.
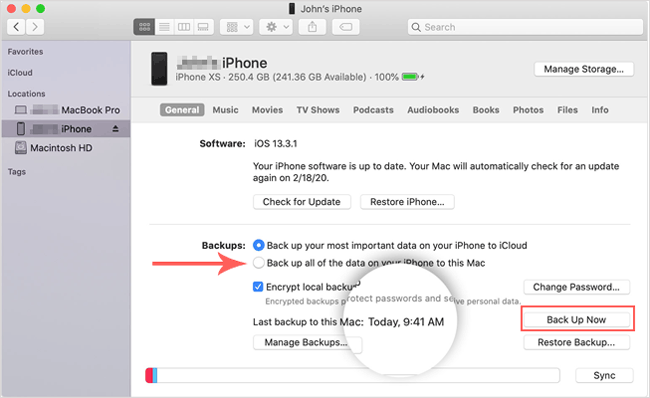
Using iTunes or Finder to move messages from your iPhone to your Mac works by creating a full device backup. This method is reliable and keeps your data safe, but it does not allow you to view messages directly on your Mac unless you use extra software to read the backup. It is best for users who want a complete copy of their iPhone data stored locally.
Step 1: Connect your iPhone to your Mac using a USB cable.
Step 2: Open Finder on macOS Catalina or later, or open iTunes on earlier macOS versions.
Step 3: Select your iPhone when it appears in the sidebar.
Step 4: Choose the option to back up your iPhone to your Mac.
Step 5: Click the "Back Up Now" button and wait for the backup to finish.
Step 6: Your messages are now stored inside the backup on your Mac.
While looking into this topic, I noticed that many Apple users report that their messages refuse to sync between their iPhone and Mac. If you are facing the same problem, try the following solutions. (For more information, go to How to Fix iMessage Not Syncing on Mac.)
Start by making sure both devices are connected to a stable internet connection. A weak or unstable network can easily interrupt the syncing process. After confirming that, move on to the steps below.
1. Make Sure You Are Signed In Correctly
For your messages to sync smoothly, both your iPhone and Mac must be using the same Apple ID. Check not only the Apple ID on your Mac but also the one used inside the Messages app. If the accounts do not match, the messages will not sync.
2. Try Syncing Messages Manually
At times, iCloud may pause syncing with a message saying that the process is temporarily stopped. If this happens, you can try syncing manually.
3. Check the Receive Settings
Regardless of the method you use, make sure the correct phone number or email address is selected for receiving messages. If the wrong option is chosen, your devices may not sync properly.
4. Review Your iCloud Storage
If your iCloud storage is full, your iPhone cannot back up or sync new messages. Consider clearing unused files, upgrading your iCloud storage plan, or using text message forwarding as an alternative way to keep your messages updated.
Q1. How long will it take to sync messages from iPhone to Mac?
Syncing messages from an iPhone or iPad to a Mac typically takes just a few seconds. However, the time required can vary based on network quality and the number of messages being synced.
Q2: How do I stop my messages from syncing?
On an iPhone, open Settings, tap your name, and go to iCloud. Look for Messages and turn off "Sync this iPhone". If you also use an iPad, repeat the same steps there so your messages no longer sync through iCloud.
On a Mac, open the Messages app, choose Settings, go to the iMessage tab, and turn off "Enable Messages in iCloud".
Q3: What does syncing paused mean on iPhone messages?
When your iPhone says "Syncing with iCloud paused", it means your messages are temporarily unable to update through iCloud. You can try checking your iCloud storage, turning iCloud off and then back on, or deleting the existing Messages backup and letting the device create a fresh one.
This guide has explained different ways to get iPhone messages on a Mac computer. Hopefully, you can effortlessly link the messages on your iPhone with your Mac. It is easy with the correct steps.
We recommend using Coolmuster iOS Assistant, the best iOS data manager, to sync iOS devices with computers. It syncs data, not limited to messages, between iPhone and Mac easily and quickly.
Related Articles:
How to Sync Contacts from iPhone to Mac [6 Quick Ways]
[Solved] How to Sync iPhone to Mac Wirelessly or with Wires?
How to Sync Notes from iPhone to Mac in Minutes - 5 Reliable Ways
4 Proven Methods on How to Save Texts from iPhone to Computer


 Free Download for Mac
 Free Download for PC

